After the first full year of writing this blog I thought it would be interesting to take a look at the games I've played over 2019 and see what rules and armies are getting the most use.
Chain of Command had the most games with 24 (10 Soviet, 7 USA, 5 British and 2 German). I've really enjoyed my CoC games and the pint sized campaigns add further interest to the rules.
Initially I wasn't too keen on the rules but they have grown on me and I feel I have become a better player over the year. They bring out the differences in the armies quite well and all the ones I have are perfectly viable in the rules with their own quirks. The Soviet's remain my favorites. I expect I'll play more CoC next year.
ADLG came next with 19 games played using a wide variety of armies (only the 25 mm ones made more than a single appearance with 3 Late Roman, 2 Carthaginian and 2 Kushite Egyptian). I play these games despite the rules rather than because of them partly as ADLG games are easy to get with their popularity at the club, partly as I like using the figures and finally as I enjoy playing the people I do play. I'll probably still play ADLG but might try to cut down on it.
Rommel accounted for 12 games (7 Americans, 3 Germans, 1 Russians and 1 8th Army). All my Rommel games were great fun and really make you think about what you are going to do. I'm sure Andy and I will keep playing next year and might even recruit a few more people to play with a bit of interest at the club from other players.
Sharp Practice also had 12 games (5 AWI British and 7 Napoleonic French). SP has seen a decline in interest with, I think, most of us now preferring CoC. I've entered the SP period at Roll Call for next year so will certainly be playing more and it isn't something I want to drop.
Blucher had 8 games (plus one of Battaile Empire) using six different armies, basically one game each apart from the Austrians who played three. Rather like Rommel very enjoyable games but limited by the number of opponents I can get. Somewhat surprisingly given that the club bought 27 copies of the rules BE has not taken off at all with, as far as I know, only the single game Gordon and I played to date.
FoGR/ADG-R once the mainstay of my gaming was down to 3 FoGR games with Confederate Irish all at an Oxford 1 day competition and a single ADG-R game with Pirates. I'd happily play a lot more FoGR but sadly it has no interest any more at the club and I am no keener on ADLG-R than ADLG. I will try to play more Oxford 1 day competitions next year.
Cruel Sea's is a new game for me with 3 games so far. I enjoyed it a lot more than I thought I would and it is very easy to add new ships to the collection. Something I'll be hoping to play more of next year.
Fire and Fury is the oldest rule set I still play and I managed 2 games, both battle recreations. I'll look to keep playing and would love to do some of the other big battles but they just are not practicable on a club night really.
Black Sea's had one game, perhaps not as varied as Cruel Seas but the ships look fantastic and will go into action again.
In total that is 74 games I played in 2019, a decent total considering there were very few competition games among them. The year's gaming highlight was probably playing again at the Redcar club after so many years something I intend to do again next year.
Looking at the above list a couple of rules sets have dropped off, Men Who Would Be Kings and Deadman's Hand both of which I'd like to play again.
Tuesday, 31 December 2019
Monday, 30 December 2019
ADLG Late Roman v Late Roman
My final game of 2019 saw the 25 mm Late Romans take on Gordon's 20 mm Late Romans, both armies being commanded by Stilicho!
The table was quite open with a hill slightly on my side of the table and a few other features on the flanks. Gordon (from now on the Usurper!) had one large Warband and Legionary command with a couple of Cataphracts and one command of Auxila. His other command must be flank marching. I had a cavalry command, a large Legionary command with two Cataphracts and a smaller Legionary/Auxilia command:

The Userper's infantry have made a small advance while the Loyal Romans advance, redeploying their cavalry from the left to the centre. It isn't obvious which flank the Usurpers flank march will arrive on:

The Usurper's Auxilia retreat, suggesting that the flank march will arrive on the Loyal Roman's left:

The Loyal Romans press forward while detaching some light horse to face the flank march:

The Usurpers flank march arrives and quickly deals with the single light horse opposing them:
The view from the Usurpers lines, the Loyal Romans have little to face the flank march and must hope to break through quickly:

Looking bad for the Loyal Romans from this viewpoint!:

The Loyal Romans attempt to defend the hill and the flank:

The Loyal Romans on the hill are swept aside:

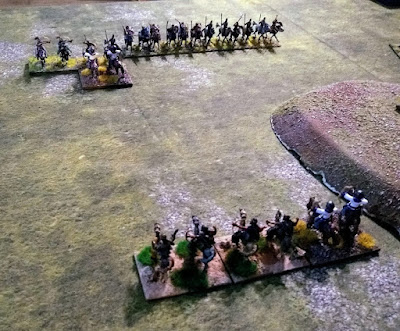
In the centre foot and mounted clash, the Loyal Romans flank will collapse quickly. The Loyal Roman horse and right flank are also attacking:

The Loyal Roman impact cavalry fail against the Usurpers Cataphracts. The Loyal Roman Legionaries are being cut down by flank attacks:

The Loyal Romans start to create a gap on their right but the centre is falling rapidly:

The Usurpers troops have largely taken the hill, a single Loyal Light Horse Archer holds off one of the Usurper's generals and has a chance of killing him but fails:

The Loyal Romans are on the brink of routing:

The Loyal Romans break leaving the Usurper victorious:

Another ADLG defeat which showed that I just have not got the measure of the micro management that makes all the difference, several times Gordon made moves that I'd just not spotted as possible. As usual I didn't take into account all the sliding and turning that troops which are not pinned can do even though they are close to the enemy. Also my list was I think worse than Gordon's and he had a better plan than me!
Other than playing loads of games of ADLG and taking it seriously neither of which is going to happen I'm not that sure how I can improve much.
Having said that it is unrealistic to expect to compete that well in a club which takes ADLG very seriously and where many members play considerable numbers of games both friendly and competition. As ever I enjoyed playing though which is the main thing and it was nice to get the veteran Romans on the table again!
The table was quite open with a hill slightly on my side of the table and a few other features on the flanks. Gordon (from now on the Usurper!) had one large Warband and Legionary command with a couple of Cataphracts and one command of Auxila. His other command must be flank marching. I had a cavalry command, a large Legionary command with two Cataphracts and a smaller Legionary/Auxilia command:

The Userper's infantry have made a small advance while the Loyal Romans advance, redeploying their cavalry from the left to the centre. It isn't obvious which flank the Usurpers flank march will arrive on:

The Usurper's Auxilia retreat, suggesting that the flank march will arrive on the Loyal Roman's left:

The Loyal Romans press forward while detaching some light horse to face the flank march:

The Usurpers flank march arrives and quickly deals with the single light horse opposing them:

The view from the Usurpers lines, the Loyal Romans have little to face the flank march and must hope to break through quickly:

Looking bad for the Loyal Romans from this viewpoint!:

The Loyal Romans attempt to defend the hill and the flank:

The Loyal Romans on the hill are swept aside:

In the centre foot and mounted clash, the Loyal Romans flank will collapse quickly. The Loyal Roman horse and right flank are also attacking:

The Loyal Roman impact cavalry fail against the Usurpers Cataphracts. The Loyal Roman Legionaries are being cut down by flank attacks:

The Loyal Romans start to create a gap on their right but the centre is falling rapidly:

The Usurpers troops have largely taken the hill, a single Loyal Light Horse Archer holds off one of the Usurper's generals and has a chance of killing him but fails:

The Loyal Romans are on the brink of routing:

The Loyal Romans break leaving the Usurper victorious:

Another ADLG defeat which showed that I just have not got the measure of the micro management that makes all the difference, several times Gordon made moves that I'd just not spotted as possible. As usual I didn't take into account all the sliding and turning that troops which are not pinned can do even though they are close to the enemy. Also my list was I think worse than Gordon's and he had a better plan than me!
Other than playing loads of games of ADLG and taking it seriously neither of which is going to happen I'm not that sure how I can improve much.
Having said that it is unrealistic to expect to compete that well in a club which takes ADLG very seriously and where many members play considerable numbers of games both friendly and competition. As ever I enjoyed playing though which is the main thing and it was nice to get the veteran Romans on the table again!
Black Sea's Spanish
I've now finished the first lot of Black Sea's Napoleonic Naval ships I painted and Dave kindly rigged by adding the appropriate flags to make them Spanish:

The "Santa Margarita":


Brigs "Juno" and "Ventura":


The frigates "Hermiona" and "Santa Catalina":

The "Santa Margarita":

Brigs "Esmerelda" and "Aguila":

Brigs "Juno" and "Ventura":

The Third Rate "Neptuno":

The Third Rate I rigged myself having taken on board some hints from Dave and with his examples to copy. It was a somewhat frustrating experience but the end result does not look bad for a first attempt and hopefully when I do the other two Third Rates it will be easier.
These ships really look fantastic for such a minimal outlay, the frigates and brigs were very easy to paint (the 3rd rate took a bit more effort), the rigging really brings them to life as do the flags. When I have done all the ones I have I'll have three Third Rates, three Frigates and four Brigs which will be a decent sized fleet. The difficulty will be avoiding the temptation to add more I think!
Just for comparison (and the reason why I bought the blue hex cloth a while ago) I also possess the entire fleets of both sides for Trafalgar in 1/3000th scale ships which myself and two friends of mine at my old Redcar club bought and painted many years ago and I ended up with. The French in particular are beautiful little ships as the guy who did them was a very talented painter:

There are 64 ships in that tray and even though they are tiny when set up on a 6 x 4 table they take up the whole table! It is also extremely difficult to see how any set of rules can cope with so many ships on table, even the simplest ones I could find wouldn't really cope.
The "Black Seas" rule book includes a Trafalgar scenario and suggests with huge optimism playing on an 8 x 6 table using the 1/700th ships!
Cruel Sea's British
Some extra units from Warlord for my Cruel Sea's collection mainly added after thinking the Norwegians were somewhat under powered compared to the Germans!
Two much larger and better armed Fairmile D MGB:

The arrival of air power with three Beaufighters:

Hopefully these should give the Allies some more options other than the Vospers.
Two much larger and better armed Fairmile D MGB:

The arrival of air power with three Beaufighters:

Hopefully these should give the Allies some more options other than the Vospers.
Saturday, 28 December 2019
Rommel Mid-War Soviets
Having really enjoyed Andy and I's Rommel games I thought I'd invest in a 10 mm Mid-War Russian army. The infantry and artillery are all from Minifigs while the vehicles are Pendraken.
A Soviet Rifle Division with supporting artillery and KV-1 tanks:

A small Tank Brigade with T-34's, T-26's and motorised infantry:

A larger Tank Brigade with added T-34's and a couple of SU-152:

A Motor Rifle Brigade supported by more KV-1's:

Finally, army level artillery support in the form of two Katyusha's and four 152 mm Howitzers:

The whole force comes to around 115 points in Rommel which is easily enough for all the scenario based games we play.
I think they will play differently to the Allies or Germans, it is quite hard to combine Russian infantry and armour in the rules due to their organisation and in the Mid-War period the armour have green crews which isn't great. It is also possible to downgrade the infantry to conscript or poor as well.
Where they are strong though is in artillery with a massive 10 elements of guns 6 of which are army level and can support anyone. This gives a huge 32 points of artillery support to throw into combats (the Allies and Germans would do well to have 10 available usually) though it will have to be used carefully as the Soviets can only use most of their artillery support in the first phase of their own move.
Given that I'm not bothered about the difference between the various models of T-34's it will be easy to change the army to Late War (replace the KV-1's with T34/85) or Early War (add a lot more T-26's).
Tuesday, 24 December 2019
Blucher 1809 Austrians v French
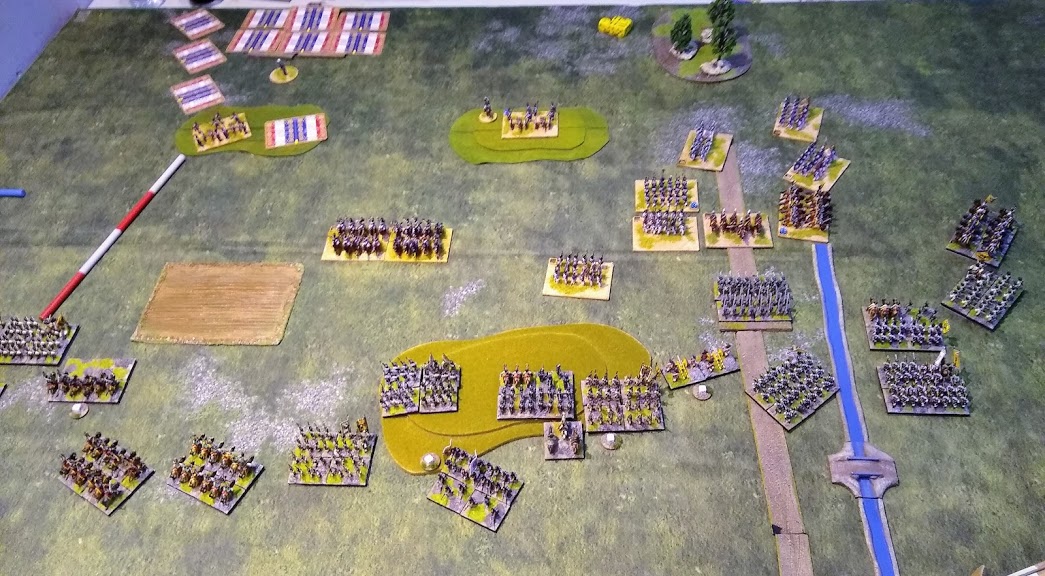
My final Blucher game of the year was a 300 pt per side game using Austrians against Sean's French. As it was 300 pts I chose the Archduke Charles himself, two mixed Infantry corps and a powerful Reserve Corps of Grenadiers, Kuriassiers and artillery.
Using the Insurrection Hussars to win the scouting the Austrians managed to capture the majority of objectives in Scharnhorst though the French got to choose the battlefield:

Both sides had two columns on table with the Austrians having two arriving on the left flank of the battlefield and one French column arriving on their right giving a somewhat crowded battlefield:

The French centre advances while the Austrians respond by using a reserve move to attempt to outflank the French on the Austrian right:

The French continue to push forward supported by their artillery on the hill. Some of the French attackers are drawn off to meet the Austrian advance on the French left though:

A powerful French Cuirassier Corps heads for the Austrian centre:

The last few Austrian reserve brigades in the centre deploy to counter the Cuirassiers:

A second French Corps has arrived on the French right. The remainder of the Austrian II Corps has also arrived on the Austrian left and moves up to support the hoped-for arrival of the Austrian Reserve Corps:

The French 2nd Corps moves forward on the French right. The Austrian Reserve Corps arrives and looks well placed to crash into the French right but is facing the Middle Guard and some powerful artillery. In the centre the fight has died down somewhat with the French thrown back but the Austrians looking shaky themselves:

Initially at least the situation looks good for the Austrians:

The Austrians suffer from lack of space to maneuver. To try to gain space Austrian Kuirassiers charge the French guns but are repulsed. The Grenadiers and Kuirassiers are taking losses from fire and the situation has deteriorated quite quickly!:

The battle overall:

The Reserve Corps leaves a couple of brigades to delay the French and retires more off the table before they are destroyed stabilising the situation somewhat:

In the centre and on the right the Austrians are now gaining the upper hand with French brigades being destroyed and forced back:

On the Austrian left some desperate French attacks are repulsed, night will fall soon and the Austrians will probably hold on:

The Austrians push on in the centre and on their right:

The Austrian lines hold firm:

Night falls and the French are forced to fall back:

300 points of Blucher certainly gives you the impression of a large Napoleonic battle! The rules bring out issues such as deciding where you really need to influence the battle, which areas can be left with less attention for a while and maintaining a reserve to change the situation and support success or limit disaster.
As in reality the skill is in juggling all of the above while keeping focused on your actual aim and what you need to achieve.
It is tempting to get pulled in to managing the details while ignoring the big picture, committing your reserve too early and even battle fatigue as the game goes on.
In this game for example my aim was to survive with my army intact until nightfall. I had one complete Corps on table in the centre with a decent position to defend and half a Corps on their left. Neither side had any troops on my right.
The rest of my army would arrive on my left. Sean initially sent an attack in against my centre where I felt rather outnumbered. First decision for the Austrians: take the attack on the chin or move the half Corps from my left to my right outflanking the French attack on my centre but leaving an open space on the Austrian left the French could exploit. I chose to move the half Corps to the right and develop an attack there hoping that fresh Austrian forces would arrive on my left before the French could exploit the gap left.
Initially the choice went well, it forced the French to draw off a substantial number of battalions from their attack on the Austrian centre and allowed the centre to hold on successfully. The next real decision for the Austrians was when the remainder of the half Corps arrived on my left: leave them on the left to link up with the Reserve Corps when it arrived, move them to the centre to shore up my forces there and maybe throw the French back or move them to the right to join the rest of their corps. This time I decided to leave them on the left and use them to support an attack by the Reserve Corps when it arrived. I'd lost sight of my objective there, I didn't need to attack but had visions of sweeping the French from field and marching on Paris!
The next crisis was when the second French Corps arrived on the French left behind some as yet un-scouted but probably Imperial Guard (as Napoleon was on the field) brigades awaiting the arrival of the last Austrian column. Sean then had to choose where to commit this Corps. Before he could commit it the Austrian Reserve Corps arrived.
A tidal wave of Austrian Grenadiers, Kuirassiers, Hussars and artillery appeared on the French flank and prepared to attack. Again I was distracted by the hope of glory and had not considered that while I had a lot of units they had a very limited space to deploy in and were indeed facing some decent French units. At this point the initiative passed to the French in the form of their second Corps, where would it be committed?
At the time I think it seemed obvious to both of us that it would move to support the French Guard hold off the Austrian Reserve Corps and this indeed is what Sean did, as would I have done in his place.
However, with the benefit of hindsight and a clear head that was not in the middle of a battle, that was perhaps the decision that lost the French the battle. To win the French needed to destroy eight Austrian brigades before nightfall. The Reserve Corps was undamaged as were the units of the half Austrian Corps supporting them. As a result while Sean put a big dent in the Reserve Corps most of the units just withdrew off the table (see later!) and, while my dreams of victory by breaking the French army (which as I would have needed to break ten brigades were unrealistic) were shattered Sean only managed to destroy a single artillery battery.
I suspect that had Sean instead sent his second Corps to attack the already battered Austrian centre he might have had much more success, the contest there was close and another entire Corps might well have tipped the balance.
The French Guard could have been left to hold off the Austrian Reserve Corps and the French Cuirassiers used to prevent the Austrian left reinforcing the centre leaving it isolated with the Reserve Corps unable to intervene in time and no Austrian reserves left.
So as ever with Blucher (and Rommel) much to contemplate after the game to try to do better next time and at least make new mistakes not old ones!
One final thing which came up was the ability in Blucher to "juggle" your losses between destroyed brigades and brigades withdrawn from the field. Sean had to destroy eight brigades or force me to withdraw enough units so that I'd have less on table than I had withdrawn (the destroyed ones don't count as withdrawn for that count) and by the end while I'd only had one unit destroyed I had withdrawn 5 or 6 (mainly from the Reserve Corps).
It is difficult to get your head around the fact that destroyed brigades don't count as 'withdrawn' and withdrawn brigades don't count towards the destroyed level. One of the first things I learned playing Blucher was when to withdraw units rather than having them destroyed and the importance, especially if you are attacking, of actually destroying brigades rather than having your opponent withdraw them (easier said than done of course).
Using the Insurrection Hussars to win the scouting the Austrians managed to capture the majority of objectives in Scharnhorst though the French got to choose the battlefield:

Both sides had two columns on table with the Austrians having two arriving on the left flank of the battlefield and one French column arriving on their right giving a somewhat crowded battlefield:

The French centre advances while the Austrians respond by using a reserve move to attempt to outflank the French on the Austrian right:

The French continue to push forward supported by their artillery on the hill. Some of the French attackers are drawn off to meet the Austrian advance on the French left though:

A powerful French Cuirassier Corps heads for the Austrian centre:

The last few Austrian reserve brigades in the centre deploy to counter the Cuirassiers:

A second French Corps has arrived on the French right. The remainder of the Austrian II Corps has also arrived on the Austrian left and moves up to support the hoped-for arrival of the Austrian Reserve Corps:
The French 2nd Corps moves forward on the French right. The Austrian Reserve Corps arrives and looks well placed to crash into the French right but is facing the Middle Guard and some powerful artillery. In the centre the fight has died down somewhat with the French thrown back but the Austrians looking shaky themselves:

Initially at least the situation looks good for the Austrians:

The Austrians suffer from lack of space to maneuver. To try to gain space Austrian Kuirassiers charge the French guns but are repulsed. The Grenadiers and Kuirassiers are taking losses from fire and the situation has deteriorated quite quickly!:

The battle overall:

The Reserve Corps leaves a couple of brigades to delay the French and retires more off the table before they are destroyed stabilising the situation somewhat:

In the centre and on the right the Austrians are now gaining the upper hand with French brigades being destroyed and forced back:

On the Austrian left some desperate French attacks are repulsed, night will fall soon and the Austrians will probably hold on:

The Austrians push on in the centre and on their right:

The Austrian lines hold firm:

Night falls and the French are forced to fall back:

300 points of Blucher certainly gives you the impression of a large Napoleonic battle! The rules bring out issues such as deciding where you really need to influence the battle, which areas can be left with less attention for a while and maintaining a reserve to change the situation and support success or limit disaster.
As in reality the skill is in juggling all of the above while keeping focused on your actual aim and what you need to achieve.
It is tempting to get pulled in to managing the details while ignoring the big picture, committing your reserve too early and even battle fatigue as the game goes on.
In this game for example my aim was to survive with my army intact until nightfall. I had one complete Corps on table in the centre with a decent position to defend and half a Corps on their left. Neither side had any troops on my right.
The rest of my army would arrive on my left. Sean initially sent an attack in against my centre where I felt rather outnumbered. First decision for the Austrians: take the attack on the chin or move the half Corps from my left to my right outflanking the French attack on my centre but leaving an open space on the Austrian left the French could exploit. I chose to move the half Corps to the right and develop an attack there hoping that fresh Austrian forces would arrive on my left before the French could exploit the gap left.
Initially the choice went well, it forced the French to draw off a substantial number of battalions from their attack on the Austrian centre and allowed the centre to hold on successfully. The next real decision for the Austrians was when the remainder of the half Corps arrived on my left: leave them on the left to link up with the Reserve Corps when it arrived, move them to the centre to shore up my forces there and maybe throw the French back or move them to the right to join the rest of their corps. This time I decided to leave them on the left and use them to support an attack by the Reserve Corps when it arrived. I'd lost sight of my objective there, I didn't need to attack but had visions of sweeping the French from field and marching on Paris!
The next crisis was when the second French Corps arrived on the French left behind some as yet un-scouted but probably Imperial Guard (as Napoleon was on the field) brigades awaiting the arrival of the last Austrian column. Sean then had to choose where to commit this Corps. Before he could commit it the Austrian Reserve Corps arrived.
A tidal wave of Austrian Grenadiers, Kuirassiers, Hussars and artillery appeared on the French flank and prepared to attack. Again I was distracted by the hope of glory and had not considered that while I had a lot of units they had a very limited space to deploy in and were indeed facing some decent French units. At this point the initiative passed to the French in the form of their second Corps, where would it be committed?
At the time I think it seemed obvious to both of us that it would move to support the French Guard hold off the Austrian Reserve Corps and this indeed is what Sean did, as would I have done in his place.
However, with the benefit of hindsight and a clear head that was not in the middle of a battle, that was perhaps the decision that lost the French the battle. To win the French needed to destroy eight Austrian brigades before nightfall. The Reserve Corps was undamaged as were the units of the half Austrian Corps supporting them. As a result while Sean put a big dent in the Reserve Corps most of the units just withdrew off the table (see later!) and, while my dreams of victory by breaking the French army (which as I would have needed to break ten brigades were unrealistic) were shattered Sean only managed to destroy a single artillery battery.
I suspect that had Sean instead sent his second Corps to attack the already battered Austrian centre he might have had much more success, the contest there was close and another entire Corps might well have tipped the balance.
The French Guard could have been left to hold off the Austrian Reserve Corps and the French Cuirassiers used to prevent the Austrian left reinforcing the centre leaving it isolated with the Reserve Corps unable to intervene in time and no Austrian reserves left.
So as ever with Blucher (and Rommel) much to contemplate after the game to try to do better next time and at least make new mistakes not old ones!
One final thing which came up was the ability in Blucher to "juggle" your losses between destroyed brigades and brigades withdrawn from the field. Sean had to destroy eight brigades or force me to withdraw enough units so that I'd have less on table than I had withdrawn (the destroyed ones don't count as withdrawn for that count) and by the end while I'd only had one unit destroyed I had withdrawn 5 or 6 (mainly from the Reserve Corps).
It is difficult to get your head around the fact that destroyed brigades don't count as 'withdrawn' and withdrawn brigades don't count towards the destroyed level. One of the first things I learned playing Blucher was when to withdraw units rather than having them destroyed and the importance, especially if you are attacking, of actually destroying brigades rather than having your opponent withdraw them (easier said than done of course).
Friday, 20 December 2019
Black Sea's First Tryout
Having been lured into buying a Frigates and Brigs starter set after painting up the free frigate in Wargame's Illustrated I'd painted the ships up but failed dismally to rig them.
Luckily Dave kindly offered to rig them for me so I'd handed them over a short while ago and, as he had finished them, we arranged to play my first game.
Firstly I have to say what a difference the rigging makes, Dave had done a fantastic job and made the ships look so much better. I'd liked the paint job I did on them but without the rigging they just didn't look right. Now they looked so much better and, for around £12 expenditure, a fleet of sailing ships was ready for action!
Dave had painted his ships up as British while mine were still rather generic (though destined to be Spanish or French). We used two frigates and three brigs a side and didn't use any nation-specific rules or many of the advanced rules.
The Spanish (or maybe French but certainly Johnny Foreigner) fleet heads for the enemy:
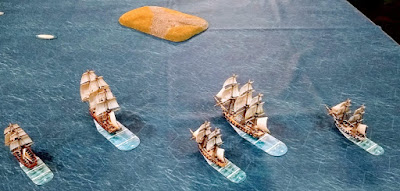
The first move and the Spanish are somewhat constricted by an island and a sand bar:

The British come into view:

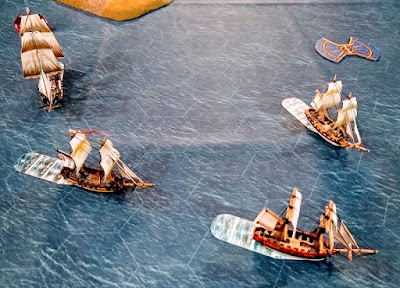
Despite the constriction caused by the island and sand bar the two Spanish frigates look well placed to fall on the British brigs while the British frigates are a little far away to support them. What could possibly go wrong? Well for a start the British brig in the centre could open fire and kill the helmsman on the leading Spanish frigate, that's one thing:

So with the helmsman hit the Spanish frigate goes out of control. It could go to port and maybe clip the sandbank, ahead and demolish the impudent British brig or starboard and hit the island. Of course the helmsman falls to starboard and the Spanish frigate hits the island reducing it's hull strength by half and preventing it from firing. It also blocks the following frigate which has to slow down to avoid running into the grounded ship. A single Spanish brig makes it through and is now facing three British brigs:

The battle continues with shots being exchanged. The Spanish plan has fallen apart very quickly!:

One British brig has been forced to strike:

Both fleets are suffering slightly from the end-of-the-world effect. Most of the Spanish ships have taken some damage, for the British two brigs have now struck but the rest of their force is in good shape:

The Spanish frigate that ran aground fights on and refuses to strike despite taking a lot of damage:

One of the Spanish brigs has struck however with the relatively undamaged British frigates dealing out a lot of firepower:

A lucky shot from the second Spanish frigate sets fire to one of the British frigates. Maybe this will turn the tide of battle which seems to be going against the Spanish?

The British close in on another Spanish brig which is heavily outnumbered:
The British frigate which was on fire manages to put the fire out. Three Spanish brigs have now struck their colours and one Spanish frigate has left for home before it too had to strike. As is traditional the British take the victory and the Spanish are left wondering what might have been but for the loss of the helmsman at the start of the battle:

So how did Black Seas play? Well it looks fantastic (thanks again Dave!) and the rules seem fairly easy to pick up. We probably missed a lot of things but that's inevitable in the first run through especially when I haven't even got a copy of the rules yet. We both enjoyed the game (and, due to my ineptness in sailing games that's by no means a given in a sailing game for me) and I'm sure will play again.
Downsides? As we played it the game did suffer a bit from the 'end of the world' syndrome but I'm sure we can overcome that. There isn't as much variety as there is in Cruel Seas which has various weapon types and more variety in the ships for sure plus there is my inevitable confusion over wind direction which is something I just can't get my head around.
As can be seen from the photos the flags improved Dave's British further so I'll be adding Spanish (or maybe French) flags to mine soon. I think the 74 gun ships would look very impressive and it would not take much encouragement from Dave for me to invest in a few of those.
Luckily Dave kindly offered to rig them for me so I'd handed them over a short while ago and, as he had finished them, we arranged to play my first game.
Firstly I have to say what a difference the rigging makes, Dave had done a fantastic job and made the ships look so much better. I'd liked the paint job I did on them but without the rigging they just didn't look right. Now they looked so much better and, for around £12 expenditure, a fleet of sailing ships was ready for action!
Dave had painted his ships up as British while mine were still rather generic (though destined to be Spanish or French). We used two frigates and three brigs a side and didn't use any nation-specific rules or many of the advanced rules.
The Spanish (or maybe French but certainly Johnny Foreigner) fleet heads for the enemy:

The first move and the Spanish are somewhat constricted by an island and a sand bar:

The British come into view:

Despite the constriction caused by the island and sand bar the two Spanish frigates look well placed to fall on the British brigs while the British frigates are a little far away to support them. What could possibly go wrong? Well for a start the British brig in the centre could open fire and kill the helmsman on the leading Spanish frigate, that's one thing:

So with the helmsman hit the Spanish frigate goes out of control. It could go to port and maybe clip the sandbank, ahead and demolish the impudent British brig or starboard and hit the island. Of course the helmsman falls to starboard and the Spanish frigate hits the island reducing it's hull strength by half and preventing it from firing. It also blocks the following frigate which has to slow down to avoid running into the grounded ship. A single Spanish brig makes it through and is now facing three British brigs:

The battle continues with shots being exchanged. The Spanish plan has fallen apart very quickly!:


Both fleets are suffering slightly from the end-of-the-world effect. Most of the Spanish ships have taken some damage, for the British two brigs have now struck but the rest of their force is in good shape:

The Spanish frigate that ran aground fights on and refuses to strike despite taking a lot of damage:

One of the Spanish brigs has struck however with the relatively undamaged British frigates dealing out a lot of firepower:

A lucky shot from the second Spanish frigate sets fire to one of the British frigates. Maybe this will turn the tide of battle which seems to be going against the Spanish?

The British close in on another Spanish brig which is heavily outnumbered:

The British frigate which was on fire manages to put the fire out. Three Spanish brigs have now struck their colours and one Spanish frigate has left for home before it too had to strike. As is traditional the British take the victory and the Spanish are left wondering what might have been but for the loss of the helmsman at the start of the battle:

So how did Black Seas play? Well it looks fantastic (thanks again Dave!) and the rules seem fairly easy to pick up. We probably missed a lot of things but that's inevitable in the first run through especially when I haven't even got a copy of the rules yet. We both enjoyed the game (and, due to my ineptness in sailing games that's by no means a given in a sailing game for me) and I'm sure will play again.
Downsides? As we played it the game did suffer a bit from the 'end of the world' syndrome but I'm sure we can overcome that. There isn't as much variety as there is in Cruel Seas which has various weapon types and more variety in the ships for sure plus there is my inevitable confusion over wind direction which is something I just can't get my head around.
As can be seen from the photos the flags improved Dave's British further so I'll be adding Spanish (or maybe French) flags to mine soon. I think the 74 gun ships would look very impressive and it would not take much encouragement from Dave for me to invest in a few of those.
Subscribe to:
Comments (Atom)