Wednesday 31 August 2022

ADLG-R Later Polish v Ottoman Turk

A second outing for the Poles under ADLG-R, this time the later period army against Simon's Ottomans. A similar army list to last time with muskets instead of harquebus basically!

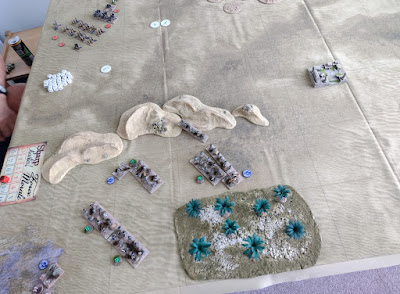
Both armies deployed with the traditional infantry centre and cavalry flanks:


The Poles immediately begin to advance in the centre and on the right:

Polish artillery demonstrates remarkable accuracy battering the Ottoman cavalry that thought they would be an easy target and weakening them before the inevitable Winged Hussar charge:

The Polish fortified camp sits in splendid isolation!:

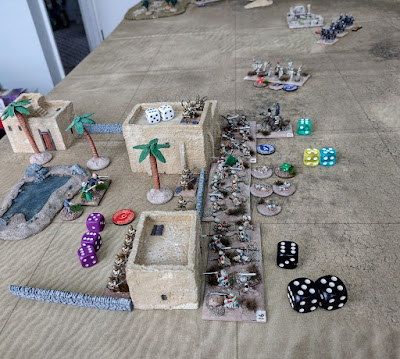
Combat! Polish infantry and dragoons pile into Janissaries:

Unfortunately as in the last encounter the Polish infantry fares badly and markers sprout everywhere!:

The Polish centre crumbles away quickly:

Winged Hussars get to charge! The remainder of the centre flees:

On the right an indecisive combat has been ongoing for a while:

The Polish army breaks with the Turks still a few points off their breakpoint:

A second game where the Polish infantry were slaughtered by Janissaries! Being the later armies the Janissaries are not elite and the Polish infantry have 2HCW so, in theory, it is a more equal combat. The Janissaries have the advantage of impact so are better at contact (though several of the Polish units benefited from overlaps) but after that the 2HCW should help the Poles.

The Hussars were also fairly ineffective (to be fair they were under FoG-R as well), looking far more magnificent than their actual game strength. I suspect as with FoG-R the most effective Polish army wouldn't bother with more than the minimum Hussars but where is the fun in that?!

Friday 26 August 2022

Sharp Practice Sudan Mahdists v British

My third 'colonial' game in a row saw Dave and I try out the Sudan modifications for Sharp Practice from the 2021 Lard Mag. The modifications also include a short three game campaign so we played the first scenario from that in which the Mahdists have to capture a missionary and his family from a defended village before a relief column can intervene:


The Mahdists have two commands appearing from B and C on the map while the relief column starts from A and the missionary and the garrison from D.

The Mahdists make a strong start with vast numbers of fanatical warriors emerging from the wadi and rushing towards the village:

The British relief column arrives as does another Mahdist horde, neither force can see the other due to the intervening sand dunes:

Just in time the British Garrison deploys into the village before the Mahdist skirmishers can over-run it:

British fire cuts the skirmishers down in droves and they flee back:

The warriors are undaunted though and press on:

Hussars gallop ahead from the relief column to help out the garrison:

One group of warriors turn to face the Hussars while the rest prepare to assault the village:

The warriors charge home! they have taken a few casualties and lost their fervour, British infantry defending in cover are tough nuts to crack but maybe wild enthusiasm and numbers will prevail!:

Almost, but not quite! The British narrowly repulse the warriors but lose some men and take a lot of shock:

The warriors regroup and prepare to charge again:

Elsewhere the relief column is making slow progress while the other Mahdists lurk in the sand dunes hoping to attack the British as they march towards the village:

The Hussars crash into the Mahdist warriors at the gallop! The warriors refuse to be defeated and hold their ground:

Very much battered but still standing the warriors repulse the Hussars! 

The fanatical warriors charge home again!

This time the fight goes in favour of the Mahdists, one British group is almost wiped out and pushed back while the other is also forced back. Warriors swarm into the village searching for the hated missionary:

With the missionaries about to be captured (the Mahdi has demanded that they not be killed!) and the remaining defenders overwhelmed British force morale collapses and the relief force retires into the desert. A great victory for the Mahdists!: 

Despite my playing SP last week both Dave and I were rather rusty with the rules and hadn't had time to fully digest the amendments before the game resulting in us making a few errors which we can correct next time, none of them had much of an effect on the game I think and they probably balanced out as they were on both sides!

The amendments worked well, basically they introduce one of the concepts from Infamy of 'fervour' for the wilder warriors making them move quicker and be more resilient to the effects of shock. This is just as well as the British firepower with breech-loading rifles is awesome and can be devastating! 

We both really enjoyed the game and are keen to play the next scenario, my Sudan collection has not been used in years which is a shame as I am quite fond of them. Even though they are not really based for SP the casualty markers worked well, it has even inspired me to order a few more figures for leaders and the Naval Brigade for the next game!


Wednesday 24 August 2022

Sharp Practice Indian Mutiny British v Mutineers

As I'll be spending a lot more time in Norfolk now I thought I'd check out a relatively local club, the Cowards club based in Hoveton. Having got in touch with them one of the members, Pete, kindly agreed to arrange an introductory game for me of Sharp Practice.

The period was the Indian Mutiny, something I've never played before, and Pete and I as the British took on two other club members commanding the Mutineers. The scenario was a rescue one where the Colonel's wife and her maid had barricaded themselves in an old tower while a mob of mutineers attempted to capture them. The British objective was to rescue the lady before the door could be broken down:


My command consisted of a group of British impact cavalry and two groups of British line infantry. The cavalry arrived quickly and set off on their mission at a canter:


Breaking into a gallop the cavalry catch the mutineers in the rear, so far so good!:


The mutineers are wiped out in one combat for no loss. Now all the cavalry have to do is dismantle the barricaded door and bring the lady back to safety. Should be easy enough?!:

Perhaps not so easy, while the officer encourages the ladies to dismantle the barricade the cavalry turn round as more mutinous mobs can be seen rushing to stop the rescue!:

Meanwhile the rest of the British force has been advancing to confront the remainder of the mutineer force. My British infantry have been very unenthusiastic though, moving at a snails pace:

The mob intercepts the British cavalry before they can get away with the lady. This is going to be trickier as, apart from the risk of being shot, the cavalry will have to charge frontally at at the walk this time to clear the rabble away:

In the centre loyal sepoys engage organised rebel sepoys. The rebels quickly gain the upper hand:

With their officer distracted by the rescue attempt the British cavalry prepare to charge again:

The cavalry charge once again:

In the centre the mutineer sepoys are pressing home their advantage:

The cavalry charge fails and the shattered remnants fall back:

Fortunately the mutineer's army morale broke at this point in a close game after a couple of units on the far right routed giving the British a narrow victory!

A fun game and great to try out a new period at a new club. Hopefully I'll make more visits in the future!

Monday 8 August 2022

MWWBK Action on the NW Frontier!

The first game for my 20mm Indian army for Men Who Would Be Kings against Gary's Afghans. We diced for the scenario and ended up with Sikh's having to capture an objective (a ford in a river) from the Afghans.

Afghans, hordes of them, lurk in a village near the ford:


The Indian force consists of three groups of Sikh regular infantry and some Bengal Lancers. A war correspondent watches from the ridgeline:

The Indians advance while the Afghans send a strong force around the Indian right on the other side of the river:

One Sikh group turns to face the outflanking Afghans:

Afghan horse charge the Bengal Lancers! The Lancers are great if they get to charge, less so if they are charged:

The Lancers are massacred losing four men to the Afghans two:

The Afghan horse follow up and disperse the rest of the Lancers. Not a good start for the Indians!:

Meanwhile Afghan warriors attempt to close with Sikh infantry but are stopped in their tracks by Sikh fire. The other Sikh groups shoot down the victorious Afghan horse:

The other Afghan horse are making good progress around the flank:

The Afghan warriors are still lurking in the rocky ground:

More Afghan warriors charge into Sikh infantry:
 
Losses are heavy on both sides and the Sikhs are pushed back:

Again the Afghans follow up:

The warriors are across the river:

The warriors in the rocky ground finally charge home but are driven off though the Sikhs lose men as well:

The other Afghan cavalry also attack though they have lost a few men to fire:

Afghans close in for the kill:

The situation is looking grim for the Indians:

Sensing victory the Afghans close in from all directions:

It is all over for the Sikh infantry with the Afghans triumphant:

Another invasion of Afghanistan ends in disaster! I failed to keep my groups together and also used the Lancers badly, I should have kept them in reserve to make sure they could attack rather than being attacked.

Gary kept the pressure on from all directions right from the start and I'll need to have a re-think for the next game......