Tuesday 31 March 2020

ECW Scot's Lancers

12 ECW Scot's Lancers. Not by any means something I needed urgently or at all really but for some reason they made it onto the painting table! Having said that I sometimes use Confederate Irish or Scot's Royalist in the one day Oxford FoGR competition so you never know maybe they will get an outing:

Again a very basic paint job but they look okay from a distance:

TMOCB Vietnam additions

A few more things for the Vietnam games. Firstly some VC/NVA commanders from East Riding Miniatures with basic paint jobs. Do 20 mm metal figures ever match plastic ones? These are far chunkier than the plastic I have:

Next a couple of buildings from Sarissa so I can make up six villages:

Finally some cache markers (bags of rice, crates of weapons and a VIP):

To The Strongest - For King and Parliament ECW

For a long time FoG-R was the set of rules I played most often being very popular at the club and resulting in me collecting numerous armies for it.

Over the last couple of years though it has declined drastically in popularity making it hard to arrange games other than the occasional Oxford one day competitions.

Some people are now playing Simon's ADLG-R variant but the Renaissance period has been largely swamped by ADLG now and for me ADLG-R suffers from the same issues I find with ADLG.

A while ago one of my friends suggested that we try 'To the Strongest - For King and Parliament' rules. I got a PDF copy of the rules but, after reading them and discovering that to play you needed three packs of playing cards each plus a bucketful of markers (plus they only cover the ECW) never got around to playing a game.

With the current lock down (and the possibility of playing it online) I thought I'd revisit the rules and have a short solo try out of the mechanisms to see how it plays.

The rules are based on a grid system which is fine as I have a suitable cloth for 15 mm figures. To try the rules I thought I'd use two simple forces, four seasoned pike and shot units for the Royalists and three pike and shot plus some dragoons for the Roundheads on a fairly open table. I didn't bother with the brigade commanders either:

The rules use an activation system with cards (or D10 in my case) needing a certain score to carry out an action depending on it's complexity. It is possible to activate units more than once per turn. In their first move the Royalists move forward and the Red and Yellow regiments open fire. Each unit has three ammunition markers that allow you to fire at long range (two squares) or double fire at close range (one square), the red counters represent the ammo.

It isn't that easy to hit, needing an 8 or more on a D10 to hit with the defender saving on a 7 or more:

A close up of the red and yellow regiments. The first row of dice behind them show the activation's; the red unit needed 2+ for it's first activation (to move) and scored 5. To get a second move it needed 6+ (higher than the first die) which allowed it to shoot. They did score a hit but the Roundhead grey coats saved it:

In their turn the Roundhead's close to short range and hope to open fire. Only the dragoons get to fire though and they inflict a hit (disorder) on the Royalist green coats:

With the Roundhead's failing to get a second activation the Royalist foot can now open fire at close range using double fire (and using up the second of their three ammunition counters). The fire only results in one hit on the grey coats:

The Roundhead's return fire in their turn but to no effect other than using up ammunition!:

The Royalist red coats charge the Roundhead grey coats after firing a volley. In the charge the defender fires first, then the attacker and finally there is a round of melee. All this results in the grey coats taking a single hit and the red coats falling back:

A devastating round of fire from the Royalist white coats inflicts two hits on the Roundhead blue coats breaking them as they already had one hit. The blue coats flee but the adjacent brown coats stand firm:

The Roundhead line is looking shaky, the blue coats have fled and the grey and brown coats have taken disorder markers. The Royalist line is undamaged but they have used up all their excess ammunition and can now only fire at close range:

The Roundhead's fire back with little effect:

A couple of rounds of desultory fire ensue in which the Royalist green coats take a hit but little else happens:

The surviving Roundhead foot fall back to try to rally. As they have used up their spare ammo the Royalists cannot fire at them at long range:

The Roundhead's managed to rally some losses off before the Royalist's closed in again. The dragoons are close to breaking the Royalist green coats:

Despite being a unit down the Roundhead foot start to hit the Royalist foot:

Losses mount for the Royalist's:

The Royalist green coats fall back before they are broken:

Three out of the four Royalist foot are now in trouble, the firefight is going against the Royalists as the dragoons start to target the white coats:

A few more rounds of firing and the Roundhead brown coats are almost broken as are the Royalist red and yellow coats!:

 The Roundhead brown coats finally flee giving the day to the Royalist's:

So what did I think of my first run through of the rules?

Positives

  • Despite being slightly daunting the rules are actually fairly easy to pick up and after a couple of turns I think I had the basic mechanism down.
  • The limited ammunition is an interesting concept, once you'd fired off your 'spare' ammo it was a lot harder to hit.
  • Being grid based there is none of the fiddly movement of many rule sets.
Negatives
  • As mentioned above once you'd shot off your spare ammo it was hard to hit, especially once units became disordered (only hitting on a 9 or 10 on a single die with the target saving on a 7+ if hit in the open) thus after a while the game became a little bogged down in numerous failed shooting attempts. Melee does not seem that much more efficient but that might change if you had pike heavy P&S units or with the cavalry.
  • The number of dice and markers! Since you can activate a unit, activate other units then go back and activate the first unit again you need to keep track of all the activation's each turn. In a bigger game this may be slow. The infantry need markers for ammo and disorder (took me a while to work out that a 'hit' and a 'disorder' were the same thing) while the cavalry need ammo, 'dash; counters and disorder.
  • It's actually quite easy to break combat and rally the infantry once everyone is on limited ammo so it took a while to get a result even with a small number of units.
I'd be happy to give them another go and might try running through some cavalry combats next. There are some variations in the troops (quality and ratio of pike/shot plus Highlanders for the foot, 'Dutch' and 'Swedish' trained for the horse) so that might make a more interesting game.

Tuesday 24 March 2020

Good Morning Vietnam! USMC v Viet Cong

Having painted the figures and made the scenery to play Vietnam based games the project had come to a halt as I couldn't decide which rules to use. No one at my club played the period and there seemed to be two potential sets available, TFL's 'Charlie Don't Surf' or Peter Pig's 'The Men of Company B'.

Reviews of both seemed mixed, though it appeared that CDS required a pack of cards you'd have to make yourself. 

With the club on 'lock down' I decided to order a copy of TMOCB largely on the basis that I couldn't face making the cards for CDS! After a quick read through of the rules when they arrived I set up my first game, USMC v VC.

TMOCB is a grid based game and requires a fair bit of scenery including six villages but I only had five suitable buildings so one was missing. The aim of the game for the US forces is to search the villages for caches of various items while ideally killing VC, taking limited losses and being careful not to kill any non-VC Vietnamese. The VC need to kill Americans and stop them searching the villages.

The USMC have a platoon of three sections, two of which are available immediately together with the platoon commander with the third and a supporting M113 arriving later. The VC get an initial two sections with three more coming on later. They need to recruit villagers to make up their numbers before facing the Americans.
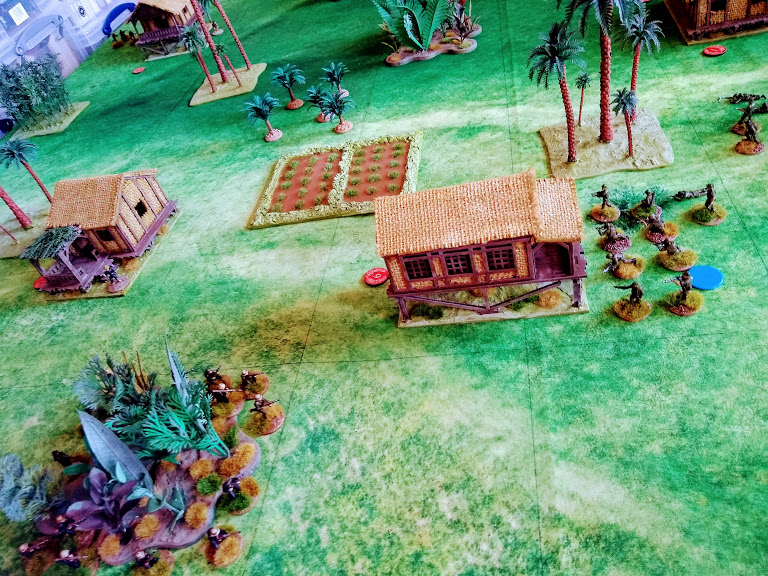
The battlefield:

The two USMC sections advance with the platoon commander between them:

The VC begin to 'encourage' villagers to join up:

The second VC section approaches another village:

One USMC section successfully searches a village and finds a valuable cache of medical supplies. They can either destroy them or, for more VP's, remove them from the battlefield:

VC numbers are increasing as they recruit more 'volunteers' for the cause:

The second USMC section searches another village but fails to find anything:

Enemy in sight! VC and USMC exchange fire rather ineffectively:

More VC are recruited. Each turn you have to mark one of your units as a 'Failed unit' which makes it harder to activate it in the next turn:

The firefight suddenly becomes vicious with four VC bases and one USMC base being hit:

The USMC platoon commander calls down an artillery strike, it does little damage though:

Another VC section moves up to support the battered one in the jungle. Another American base is down:

On the right the VC advance more men against the second USMC section:

The first USMC section is now taking heavy losses and three bases are down. Being of little use the battered VC squad in the jungle has been designated as the 'Failed Unit':

The third USMC section and the M113 arrive and advance:

Ambush! While searching the village the third section is ambushed by two VC bases to no effect:

Another search, another ambush! Again it has no effect though and is easily dealt with:

Remarkably a hat-trick of ambushes, again with no effect!:

VC mass on the American left:

One VC section decides to attempt to assault the damaged USMC second section. They rush forwards in a mass attack:

The VC charge home!

The Americans are cut down and now have four casualties (the red counters) that they won't be able to recover as the section has been wiped out:

The victorious VC section now has the USMC platoon commander in their sights hiding in the bamboo and continue their mad rush forwards:

The platoon commander flees but loses a base. American losses are really mounting up now:

More and more VC appear but this village seems deserted as only a single base of recruits can be raised, the rest must be hiding!:

On the right both sides continue to exchange fire to little effect:

With the disastrous loss of the first section the USMC forces are in a grim position, they have only found a single cache, a couple of peasants have been caught in the crossfire and the VC firmly hold the remaining villages to search. The M113 moves up to see what it can contribute:

The USMC platoon leader is holed up in the village but the VC pursue him relentlessly:

The M113 is quite effective and starts to mow down some VC, though this is made harder as they have gone to ground:

The VC section catches up with the USMC platoon leader. He elects to fight it out:

The platoon leader is killed!:

The M113 has wiped out one VC section but it looks too little too late:

 The end of the game, a great victory for the VC over the Imperialist Dogs:

The final total was 11 VC bases casualties (of which 9 were evacuated). The USMC lost 10 bases including the platoon commander (with only 3 evacuated) plus two bases of peasants were killed. The Americans only managed to find a single high value cache which they had to destroy. Totting up the victory points in the rules gave the VC a substantial victory!

So, what did I think of the rules? Well firstly they are a bit confusing with rules scattered through the book in among army lists,terrain effects etc. Once I got going though they moved quite quickly though I am sure I made some errors.

Basically they rely on rolling a number of die per unit requiring a number to achieve different actions. So for example to move into an open space for a USMC section needs you to roll one 3 or above on 7 dice. Each time you make an action you lose one dice so to continue that example to move a second square in the open would need a 3 on six dice. If you choose to stop activating a unit before they fail you can use the full die allocation of the next unit whereas if your unit fails to activate any units left only get a single die to activate  so the main issue is how far you push your units.

The difference between the VC and USMC is nicely handled, the VC are rated 'raw' and only have six dice to activate compared to the marines 7 (though the marines lose two dice if they are not within command distance of the platoon leader while the VC have no leader), fire much worse and have a worse saving throw but can be hard to shift especially if they use the 'down' action in cover. They also assault well.

Next I'll read through the rules again (I already noticed I did the ambushes wrongly, the rules were a bit confusing on those) and give it another go maybe with an NVA force next time.