Thursday, 7 November 2019

ADLG Early Imperial Romans v Germans

My Early Imperial Roman army has not had a game in a long time so when Clive wanted a practice game for Roll Call against his Germans it seemed a good opportunity to drag them back into the daylight!

The Germans with their strategist Hermann (the German) won the initiative and decided to defend in the forests of Germany:

The Romans deployed mainly on the left of the battlefield with Legions in the centre, Auxilia on the left and a cavalry command on the right. The Germans had constructed a fort with some Gallic allies in the middle, two forests doubtless containing ambushing German fanatics and a few cavalry on the German left. The Gallic commander immediately became recalcitrant and refused to join the fight giving the Romans an opportunity to attack on the left while ignoring the Gauls:

The Roman left rushes forward and the Auxilia and Legions prepare to attack the wood:

It will soon come to the crunch, the Gauls are still refusing to move while Hermann has started to bring some more German fanatics over from his left to support his right:

The ambush is sprung and the Auxila await the wild charge of the Germans. Being in the wood significantly helps the Auxilia as they retain their impact if the Germans charge them and the Germans also lose both impact and furious charge:

The Roman cavalry moves to attack on the right to put more pressure on Hermann's strategical ability:

After a few turns of restraint the Germans finally charge into a fairly disadvantageous situation. Initial results are reasonable for the Romans with three out of four warbands taking hits:

The Gauls have now decided to join in with the Germans while the Auxilia cut down the German warriors:

Having dealt with the German warbands the Auxila then fall dismally to a combination of German javelin skirmishers and a couple more warband from Hermann's command. What looked like a hopeful situation has quickly imploded for the Romans:

All may not be lost though as the Roman cavalry attack on the right presses home. The Romans have more elements, the advantage of armour and for two of their cavalry impact ability while the Germans medium cavalry are elite. The attack goes badly though and the Romans look doomed:

The Auxilia have been wiped out and the remaining Legions and Roman cavalry have fallen back to regroup:

On the right the last few Roman cavalry are cut down breaking the Roman army:

So another ADLG defeat though this time I think I played better than usual. My plan was good and delivered advantages for my troops both on the left and right, they just didn't really take those advantages!

Clive was helped by the massive size of his army (28 breakpoint to my 22), the elite upgrade for his fighting troops really helped and his light infantry are tough even against Auxila in the woods. He also had an excellent defensive position which, in an actual competition, I'd probably have refused to attack. A fun game though and nice to get the Romans in action again.

Saturday, 2 November 2019

Good Morning Vietnam!

Another abandoned project revived from the dead is some very old plastic Vietnam war figures that have been in the loft for years.

The Vietnamese are from ESCI:

Simple paint job for these and a quick black glaze rather than shading or highlights. There are almost 100 of them in total:

The Americans are from Pegasus and are nice figures, they look as if they are actually in action:

Only around 40 Marines so they will probably need some more adding:

An M113 APC, the classic Vietnam vehicle. This was ready made and painted:

All I need now are some rules to play and a load of jungle terrain.........

Cruel Sea's additions

Some more ships for Cruel Seas from Warlord Games to give our games a bit more variety.

Firstly an armed trawler:

These ships were either purpose-built for the Royal Navy or converted. They were crewed by the Navy. With some bigger guns they will add much needed firepower to the British:

For the Germans I added a couple of R-23 boats. Originally intended for mine sweeping they were also used for convoy escorts and patrolling:

From above:

I think next I'll need some more merchant ships and perhaps a couple of bigger/better boats for the British.

Friday, 1 November 2019

Chain of Command "30 days to Dunkirk" Game 3 "Going with a bang"

Another test game for Jerry's PSC based on the Dunkirk campaign. This was the third in the series in which the Germans attempt to capture the bridge at Bethume over the La Bassee  Canal before the British could blow it up.

I took the Germans, consisting of a Motorcycle Reconnaissance Platoon while Dave played the British. Things started badly for the Germans with only 12 support points being available while the British had 10. I selected a Panzer II, Pre-game barrage, 5th Columnist, Nazi trick sniper and an extra 5cm mortar team.

The table looked a tough one for the Germans with a railway embankment on the far side of the canal giving the British hard cover positions right across the table and little cover for the Germans to launch an attack from. Apart from the bridge there was also a crossing for infantry available over some sunken barges but, given the complete lack of cover on that flank, it seemed unlikely the Germans could get to it:

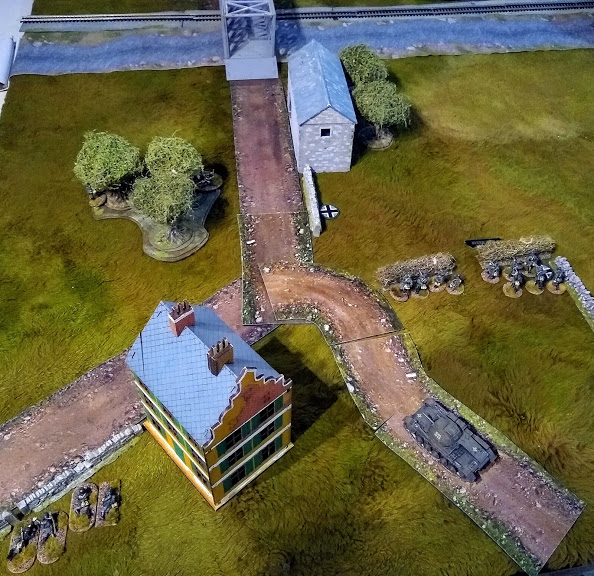
Given the situation the German plan was simply to rush the bridge as quickly as possible. All three German squads deploy near the bridge (one is in the barn in the centre), the Panzer II appears on the road and the mortars are in position to support the attack:

The tank and an infantry team approach the bridge hoping they can get across before the British can react:

Initially the German plan works, the barrage stops most of the British deploying and the 5th Columnist (looking remarkably like Captain Mainwaring) distracting the enemy successfully:

Before the Germans can cross the bridge the British manage to deploy a section and a senior leader who open up on the Germans trying to rush the bridge. It is close range and the Germans are in the open but remarkably they only take a couple of shock:

The 5th Columnist sniper takes the opportunity to take a shot at the isolated British senior officer from the upper floor of the blue cafe but misses his target:

A French Somua S35 appears on the road and shoots at the Panzer II but misses:

Feeling that the attempt to rush the bridge with infantry will fail in the face of the British deployment the men retreat into the barn:

Unfortunately for the Panzer II the British also have an anti-tank gun which deploys and hits the Panzer II wounding the commander and putting a couple of shock on the tank:

Meanwhile the German squad on the right has been exchanging fire with the British killing the British junior leader. Finally the sniper manages to hit the British senior officer and knocks him down. British force morale is falling but their position is solid:

In a triple phase the Panzer II rallies off its shock but the Germans don't achieve much more:

The French tank advances and the British deploy a Vickers MMG to put more fire into the Germans on the left behind the hedge. In an attempt to stop the sniper killing the fallen British senior officer the British mortar team fires smoke behind their own lines to cover the officer!:

Another shot from the anti-tank gun takes out the Panzer II. German morale is holding up well so far. Remarkably the British have made little progress towards getting a CoC dice to blow the bridge:

The German squad on the right breaks and falls back:

The British begin to move along the railway embankment having seen off the threat on their left:

The British defensive line still looks strong though their force morale is falling after yet another leader, the one in charge of the anti-tank gun, is killed:

The Germans are now reduced to hoping that their two mortar teams and the sniper can reduce the British force morale enough to break them before they can blow the bridge up. Unless they cross the bridge themselves the British can't do much more damage to the Germans:

The shadowy 5th columnist sniper takes his revenge on the mortar crew, killing them both and reducing British force morale further:

The British finally have a CoC dice and try to blow the bridge. The charges fail to go off properly and the bridge is only damaged not destroyed:

The game has now reached a stalemate, the British would need two CoC dice to attempt demolition again while the Germans might be able to reduce the British force morale to zero eventually but it will be a slow process:

Another interesting game in Jerry's campaign, a tough task for the Germans given the lack of suitable cover to launch an assault from. If I'd had more support (I had 12 out of a possible 19) and Dave less (11 out of 12, I think the French tank was free or half price) that might have made a difference as might using a Stuka attack, though Dave did take anti-aircraft guns.

Probably the most effective thing for me was the dirty Nazi trick 5th columnist sniper, he only cost 1 point, can be deployed anywhere and has no effect on force morale if he is killed. 

Hopefully it was a useful test for Jerry as it brought up the issue of what happens if the British only partially destroy the bridge? It also showed how scenarios can evolve, in the last playtest the Germans had a hedgerow very near the sunken barges crossing and promptly rushed across the canal taking position behind the railway embankment and mowing the British down!

Monday, 21 October 2019

Chain of Command "29 Let's Go!" campaign game 2

Gary and I played the second game in our pint sized campaign. After the failure of the first American probe at La Cambe Colonel Goode's outlook became worried. A second attempt was therefore ordered using a fresh platoon supported by three more Shermans, a mortar battery and some engineers with a flamethrower.

The patrol phase resulted in deployment points similar to the first attempt:

The first Sherman rumbles onto the battlefield. The American plan this time is to get all the tanks and the mortar in place first then advance a scout team to force the Germans to deploy. Once they have deployed the tanks and mortar should be able to deal with them even in cover:

The second Sherman arrives:

The tanks advance with the remaining Sherman bringing up the rear:

The Shermans are almost in their allocated firing positions:

Disaster strikes though as the third Sherman is ambushed by a Panzerschrek team and destroyed:

US Infantry deploy to support the tanks:

To try to capitalise on their success the Germans unveil a MMG and their senior leader. They open fire but are quickly wiped out by the massed return fire of the Americans putting a big dent in German force morale especially as the senior leader with them is killed:

The Panzerfaust team opens fire again from ambush but only manages to destroy the Sherman's hull MG and inflict some shock on it:

Yet another ambush sees the Sherman destroyed. American force morale is low now as well:

The Americans deploy a scout team that advances down the road:

The scouts almost make it to the German entrenchments and threaten the jump-off point:

The Germans deploy a squad and wipe out the scouts:

With both sides force morale down to three there followed some desultory skirmishing before the Germans decided to retire to avoid further losses. With only a single Panzershreck shot left the remaining Sherman could sit back and pick off the Germans with HE so it probably was a wise decision on Gary's part.

Colonel Goode's opinion went up to "worried" after the victory but an unfortunate episode involving the US airforce quickly took him back to "nervous" so General Cotta was called in to give the Colonel a pep talk. I was hoping the next scenario would be easier but it in fact looks even harder!