Tuesday, 13 July 2021

Chain of Command 24 Hours to Basildon Scenario 2 "What's Behind Bully Tonight?"

Gary and I played the second scenario in our "24 Hours to Basildon" PSC last night. In the first scenario the LDV had managed to inflict significant losses on the Germans before falling back to fight again.

The second scenario "What's Behind Bully Tonight?" is fought on the outskirts of Margaretting where the British have to destroy a culvert under the main road while attempting to hold the Germans up. Each side would receive 8 support points while the LDV would be down three men (not so significant as they were unarmed!) and the Germans down 6 men, doubtless resulting in Gary disbanding a rifle team from one of his squads.

The map for this scenario is much more suitable for a fighting defence with the Black Bull Inn giving a base for the defence, some other buildings to hold and limited access for wheeled vehicles.  As there are only five scenarios in this PSC I felt it was time to make a stand with the LDV unlike in the first game where I'd aimed to hit and run as it were. My objectives were 1) to blow the culvert up (gaining more support in the next game), 2) to inflict further losses on Gary's weakened platoon and 3) to, if possible, win the scenario and inflict the first delay on the Germans. To achieve this I was prepared to take some losses if necessary!

The Germans approach from the left while the British hold the pub and buildings:


The "Black Bull" Inn, one of Gary's excellent buildings. Behind it there is an impromptu demolition team consisting of two itinerant French onion sellers who happen to be explosives experts! They need a task roll of 12 to move the explosives to the culvert then 9 more to set the explosives and detonate them:

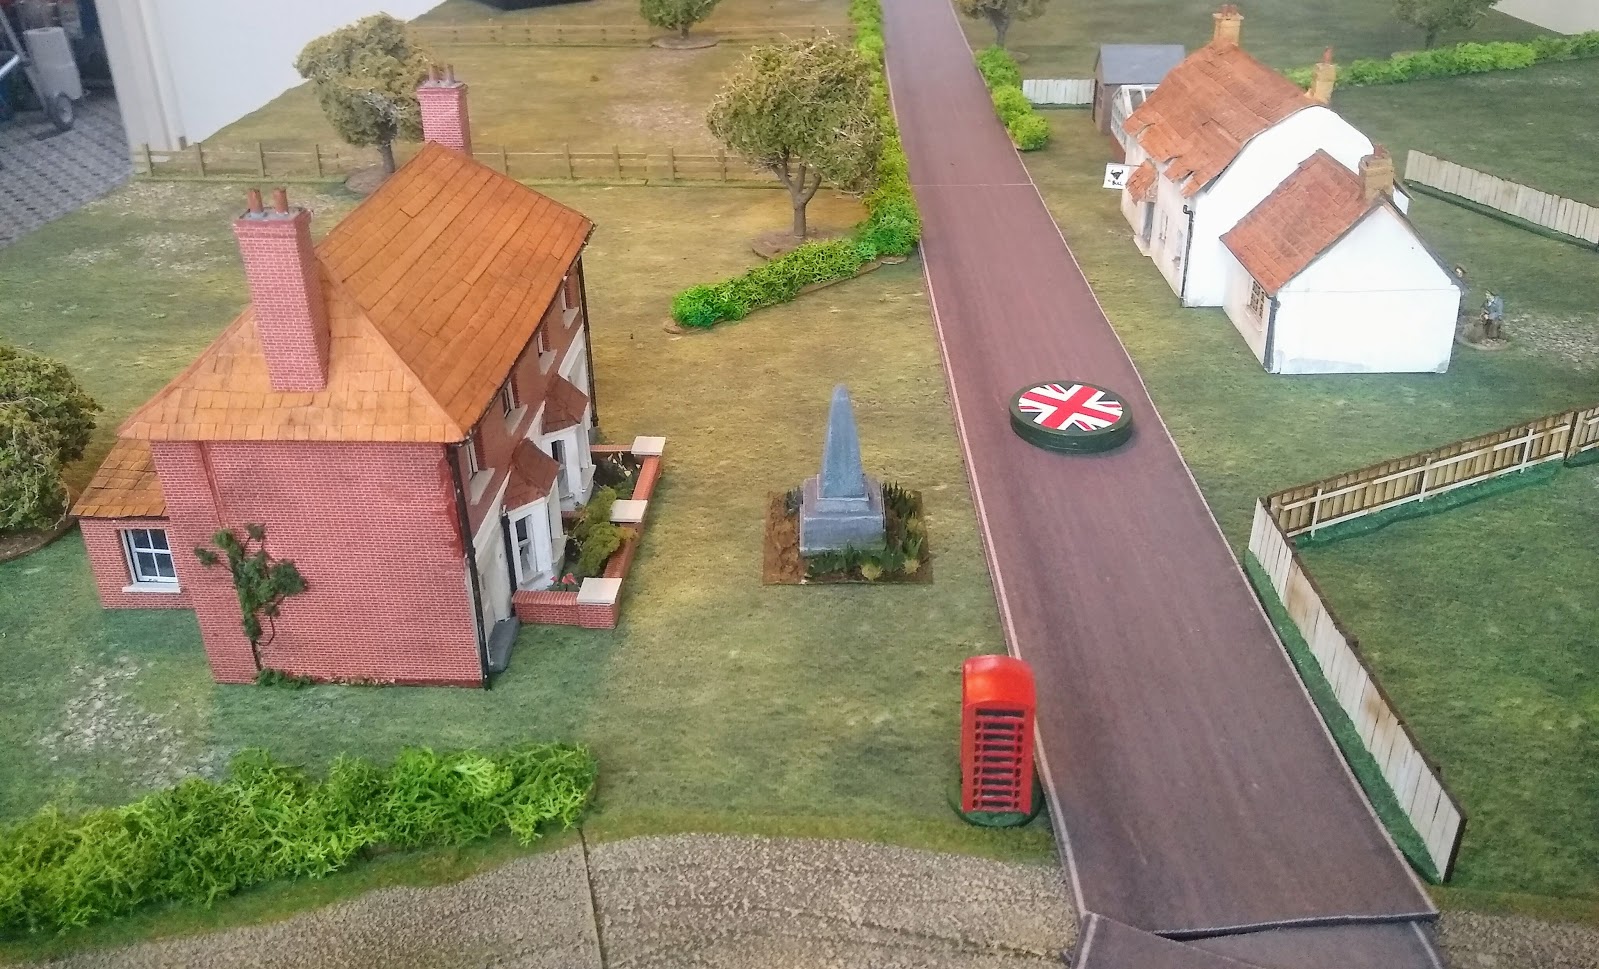
Another of Gary's buildings, a large detached house with the village War Memorial in front. The culvert is at the crossroads near the telephone kiosk:

The British have deployed two minefields, one to block the main road and a second on their left behind the detached house. The Germans immediately start their attack bringing on two squads and the inevitable armoured car together with an infantry gun. A powerful force!:

Sgt Baker deploys and encourages the Frenchmen to move the explosives quickly, apart from this no British are yet to be seen:

The Germans continue to advance, they are getting close to the pub now and the British will have to do something soon. Not having the command die to activate the Sgt or the demo team for a couple of moves and rolling low on the task means that the explosives are moving more slowly than the British had hoped:

The Germans have set up a lot of firepower aimed at the pub. So far it is quiet but the British had hoped to have moved the explosives by now. To prevent the Germans from capturing them the LDV will have to deploy someone in the pub after all which wasn't part of the initial plan!:

Cpl Lewis' squad deploys into the pub. At least the shotgun armed members will be able to fire at this short range!:

The fire is largely ineffective but does manage to kill the Obergefriter of the German squad!:

Unfortunately the Germans respond with deadly effect, four of Lewis' squad becoming casualties and Lewis himself wounded:

With Lewis' squad almost wiped out the LDV deploy Wallace's squad upstairs in the pub:

Their fire is more effective, taking out four Germans:

From a combination of not having the right command dice and only throwing a one for the task when they did the itinerant Frenchmen have still not managed to move the explosives:

To try to reduce the amount of fire aimed at the pub the LDV deploy a Boyes Rifle and crew. It takes a shot at the armoured car and misses:

Again the pub proves to be a death trap for the LDV, Cpl Lewis has a sole survivor with him and is pinned while Cpl Wallace has lost half his squad. LDV morale is falling quickly:

Further German fire proves too much for Lewis and his companion who flee from the pub. Wallace only has two men left with him now. Things are going badly wrong very quickly for the British:

Cpl Lewis and his man flee from the pub. The Frenchmen have finally moved the explosives to the culvert so maybe there is still a chance of salvaging something from the fight?:

The firefight rages on at the pub:

The Frenchmen don't seem keen to rush and barely make a dent in setting the explosives up:

Cpl Lewis and his man are cut down by the German squad that had been advancing behind the pub without seeing much action. The LDV's morale is almost broken:

The third LDV squad under Cpl Roberts also deploys into the pub but fares no better than the other two and is shot up: 

The battle is over as the LDV flee the field without having destroyed the culvert, inflicted many casualties or delayed the Germans at all. A brave fight by the volunteers that may go down in history none the less!:

So a heavy defeat for the British who took a massive 18 casualties, almost all in the pub. The Germans only suffered four losses plus the Obergefriter all of whom will return to action in the next game together with the three men lightly wounded in the first game. The LDV platoon is effectively wiped out having lost nine men permanently with a further four out for the next game (that's 13 out of 26!) and the men's opinion at -2. 

Gary certainly played well, he set up an impressive fire base and with 8 support points could afford both the armoured car and the infantry gun which did much of the damage to the men in the pub. 

I'm not sure if I played badly or not, things certainly didn't go according to my plan. I was hoping to have transferred the explosives before using up more than one squad defending the pub but the limits of only four command dice and poor rolls for the task meant it took way longer than I'd anticipated. Once I'd committed the second squad to the pub it was going to be hard to stop the Germans but I still hoped to destroy the culvert but that didn't help and I ended up throwing the third squad in as well to equally little effect! The other choice I made was to deploy the AT rifle rather than the MMG which had been so effective in the first game (I had this as well but it never got on table), on reflection maybe I should have used the MMG but then if the AT rifle had taken out the armoured car I'd probably think differently!

As a result I'll now have to play the remaining three scenarios with a single platoon of Home Guard. They are slightly better than the LDV and have more support choices but still only get four command dice and little integral LMG support. The British certainly have their backs against the wall but of course there is always hope and all is not lost yet!


Sunday, 11 July 2021

Chain of Command German Armour

A while ago I bought a couple of Rubicon kits from Buoys Toys in Cromer, a Panther and a PzIV, which had been sitting around for ages unmade and unpainted. 

I'd wanted to paint them in a late war camouflage scheme but felt that would be hard to do without an airbrush. I'd been thinking about buying an airbrush for a while but, taking some advice from my club mates, decided that it wasn't worth the considerable expense, lack of potential use (as I mainly paint figures) and the need to learn how to use it decided against it! Fortunately one of my club members, Mike from the excellent Tactica Studios, offered to spray the base colours on for me so I could finish the rest.

Mike sprayed them with the basecoat yellow then added the green and brown camouflage. I decided to add a 'dot' pattern over the camouflage and finished the rest of the models tracks, detailing and mud splattering (though not as well as Mike would have done, his tanks look much nicer than mine!).

The Panzer IV:


Another view:

The Panther:

Another view:

I think I might have gone a bit overboard on the dots, most pictures seem to show far fewer and I didn't realise quite how many I'd added until I'd finished, on the individual panels they looked fine but when I looked at the overall tank I realised just how many there were! They have grown on me though and now I quite like them and am looking forward to using them at some point in the future!

Friday, 9 July 2021

Sharp Practice Peninsular British v French

This week's game saw Sharp Practice action in the Peninsular with my painted-ages-ago-but-never-used British taking on my French under the command of Dave.

We went for a modification of the 'Resupply Hougoumont' scenario published in the 2020 Lard Mag. The action was transferred to Spain where the valiant Sgt Fraser was tasked with resupplying the garrison of the village of San Miguel which was under attack from the dastardly French! I had enough figures for the French but only two groups of the 95th Rifles for the British instead of the three groups of Hanoverian Jaeger Corps the scenario suggested. Assuming that the 95th would of course be better quality etc I felt two groups was enough anyway!

The village of San Miguel. In the distance the cart of ammunition with Sgt Fraser can be seen. The French will arrive from the woods on the top left, the 95th Rifles from the wood on the bottom left after a couple of turns:

The hard-pressed defenders of San Miguel from the 3rd Foot (The Buffs). Being low on ammunition they can only shoot at short range and half effect until the ammunition cart reaches them. They are not allowed to leave the village either:

Sgt Fraser, bravely commanding the relief attempt despite already being wounded in his right arm! A group of skirmishers from the Buffs accompanies him:

The Sgt makes good progress along the track but the French can't be far away!:

Here they are! Four groups of Fusiliers and two of Voltiguers rushing forward to try to intercept the cart:

The 95th also arrive and open fire on the Voltiguers at extreme range (advantage of the rifles!). The Voltiguers are already shooting at Sgt Fraser and his men:

The 95th advance to try to support Sgt Fraser. He is a long way away though:

Sgt Fraser decides that continuing to try to move while being shot at close range isn't wise and engages in a rather outnumbered fire-fight with the French Voltiguers, perhaps long range fire from the Rifles will tip the balance?

The French Fusiliers deploy into line and advance on the 95th. Sgt Fraser and his men are forced back by accumulated shock though the French Voltiguers are also suffering:

The Voltiguers perhaps unwisely follow up the retreating Sgt Fraser exposing them to more fire from the 95th which is starting to hit home now:

By concentrating on the Voltiguers the 95th have ignored the French Fusiliers. They advance and fire a devastating volley which takes out four Riflemen!:

Captain Smith of the 95th rallies off some shock and urges his men to fall back out of the line of fire of the French Fusiliers:

In the confusion of battle and with large amounts of smoke billowing across the field the French don't notice the Riflemen have moved and continue to blast away! Their officers try to get them under control but keep failing:

Unfortunately without the support of the Rifles Sgt Fraser and his men, despite putting up a valiant fight, are forced to retire off table. The ammunition has failed to get through and the defenders of San Miguel are in trouble now!:

So a victory for the French after an interesting game which was certainly different from our usual AWI/F&I wars games with much more open terrain. On reflection I should probably not have moved the wagon along the road (as far as we could tell there was no advantage to moving on the road) and instead gone across country which might have meant it could have got a bit further before the French could start shooting at it. Much to my surprise (most rules rate the 95th as supermen!) the 95th were hardly better than the Hanoverian Jaegers so perhaps I should have added a third unit!

Having said that Dave played very well, using the quicker moving Voltiguers to intercept the wagon and the slower moving Fusiliers to block off the Rifles from interfering in the fight between the Voltiguers and the Sgt for very long. Sgt Fraser was also very lucky taking numerous hits to his group most of which had little effect!  

Friday, 2 July 2021

Infamy, Infamy Romans v Gauls

Having played a few games of Infamy on table top simulator I had my first actual game against Dave's Gauls. I used my Late Romans as proxies for Early Imperial Roman and we both used the starter forces with no extras.

We decided on the patrol scenario with the Romans entering from the south and the Gauls from the east and west (plus their six deployment points). The Romans have to scout four terrain pieces to accomplish their mission. Luckily for the Romans a lot of the terrain ended up close to the Roman deployment area:


Four groups of Legionaries supported by some archers arrive for the Romans and move forward:

A group of Gallic archers appear and open fire on the Legionaries. One is killed (my units don't have single figures so casualties are marked with green counters)!:

The final Roman unit, some Auxiliaries, arrive and advance on the Gallic archers. The Roman archers also fire on the Gauls killing three of them:

Some Gallic skirmishing cavalry pop up next, they throw javelins at the archers and kill one:

The cavalry attempt to charge the archers but are slowed by the field giving the archers time to evade:

The Gallic archers have fled but two units of Gallic levy have dashed out of the woods to threaten the flank of the Legions. Unfortunately for the Romans their Auxilia had been redeployed to the left once the archers fled!:

The Gallic cavalry charge the archers again, this time the archers decide to stand:

Despite the odds being against them the archers slaughter the cavalry though they take heavy losses themselves:

Two Legionary groups wheel to face the Gallic levy who decide to charge the Auxilia instead as an easier target:

The Auxilia are pushed back:

Charging the Auxilia has left the flank of the levy open to the Legions. They seize the opportunity and slam into the flank of the Gauls:

One unit of levy is slaughtered:

In the second round of combat the other unit of levy is cut down:

Two units of Gallic warriors charge out from the forest into the flank of the Legionaries. The Legionaries fight back though, surviving to turn to face the Gauls:

The Legions are triumphant! The Gallic warriors fall back though the Romans are now greatly weakened and have  a lot of shock on them:

The Gauls fall back while the Roman Auxilia advance to support the Legionaries:

Sensing that the embattled Romans are weakening the Gallic general throws in his has reserve, Noble warriors supported by their cavalry counterparts:

Remarkably yet again the Roman line holds and cuts down several Gallic nobles:

The surviving mob of Gallic warriors attacks the Roman lines, can they hold yet again?:

The Roman Auxiliaries break! The Gauls follow up into the battered Legionaries:

The front group of Legionaries flees as well. The rear unit holds on though:

The Gauls charge on into the surviving Legionaries:

The second group of Legionaries also flees from the Gallic warriors:

The Roman archers fall back shooting at the warband:

While the battle has been raging elsewhere the other two groups of Roman Legionaries have been largely unengaged and remain fresh. The Gauls only have a group of Noble cavalry left plus the Gallic warrior unit that, while very successful, now has a lot of shock and is vulnerable to a flank charge by the Legionaries. The Gauls decide to withdraw into the forest and await another opportunity to take on the Romans:

A quite close game that could have gone either way. On reflection it is noticeable that the Romans barely advanced 1/3 of the way on the table, partly as there were enough terrain areas to scout near their deployment zone and partly as it seems suicidal to advance past barbarian deployment points leaving yourself vulnerable to ambushing flank attacks. The ambush seems very powerful for the barbarians, even frontally the Roman auxilia and archers will suffer badly the archers especially as they can't evade.
The legionaries are much more resilient but of course you don't get that many!

As ever with TFL rules they were slightly confusing (we couldn't find anything about moving and shooting for instance) and the similarity to, but significant differences, with Sharp Practice and Chain of Command perhaps does not help as you have to remember which rules are specific to which set and not just assume they are all the same!  

They also have the usual TFL issue in that, while they have missions, there is no time limit on them so it is always an option to just kill the enemy to win though on the few games we have played so far it appears very hard to drive force morale down so most games end when one side has hardly anyone left and admits defeat!

Overall I think CoC is still by far the best TFL game with SP and Infamy being similar, fun to play now and then but probably not more than that.