Thursday 30 December 2021

Kiss Me Hardy Spanish v British

Having found Black Sea's not especially to my liking Dave suggested that we try the TFL set 'Kiss Me Hardy" so for my last game of the year Dave kindly came round to sail the seas of the Mediterranean in a scenario from the new Lard Mag called "Desperate measures in the Mediterranean".

After making up some cards and ship data sheets I decided to use my Spanish as the French in the scenario giving them somewhat better stats than the rules give to the Spanish but hopefully making the game a little more balanced. The British objective is to destroy the Spanish while for the Spanish getting off table to sail to Corsica while hopefully inflicting some losses on the British is what's expected.

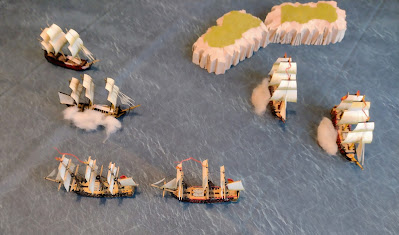
The Spanish have four 3rd Rate ships, the San Francisco and the Neptuno under the command of Capitaine Diaz and the San Justo and Monarco under Commodore Rodrigo. Initially Rodrigo's force is at anchor having landed men to secure fresh water and food.

The British fleet also has four ships, Admiral Pound with the 1st Rate Imperial and the 5th Rate Firkin plus two 3rd Rates, Badger and Avoirdupois under Captain Stone.

The San Francisco and Neptuno are already under sail:


The San Justo and Monarca recall their ships boats and cut the anchor cables:

The Spanish have a land fortification available, unfortunately they appear to have failed to supply it with cannon or crews!:

The San Francisco and Neptuno are making good speed:

The San Justo and Monarca raise their sails and will be on the move soon:

The enemy appears! The Imperial and Firkin make slow progress hindered by the wind direction and the sailing ability of the big 1st Rate:

With a more favourable wind the Badger and Avoirdupois also appear and move towards the Spanish more rapidly:

Both sides clear for action:

The British open fire on the San Francisco with their bow-chasers:

The Monarca is better placed and fires her initial broadside:

The San Francisco takes a broadside from the Badger:

The San Justo and Monarca have raised sails and get under way both firing at the unfortunate Badger which is taking a bit of a pounding:

It get's worse for the Badger as the San Francisco replies with her own broadside:

The Monarca keeps the pressure on with another broadside. So far the British Avoirdupois and the Spanish Neptuno haven't had much of an effect:

More broadsides are exchanged. The Badger is taking a real beating now:

At last the Imperial and the Firkin prepare to join the fight:

The Badger has had enough and stikes it's flag after yet another broadside from the Monarca:

The situation may improve now for the British though as the mighty Imperial closes in on the damaged San Francisco and the Neptuno:

The San Francisco gets the first broadside off though it isn't as effective as it could be as many guns have been damaged in the fight with the Badger:

The Badger runs aground drifting after striking:

The ships close on each other! Now it is the San Francisco's turn to take a pounding, she has a lot of damage and fire has broken out. At least the Neptuno is still in good shape and can try to help out:

It is looking very likely that a collision will occur somewhere:

Meanwhile the San Justo and Monarca attempt to turn to engage the Avoirdupois:

The Imperial has just collided with the Firkin, luckily for the British the damage is minimal though the Imperial loses her bowsprit. With no other option the San Francisco puts her fire out and heroically sails between the two British ships then unleashes both broadsides! Despite the carnage on the San Francisco's decks she manages a few hits on the British:  

The San Justo and the Monarca are almost ready to resume the fight with the Avoirdupois. Both Spanish ships have taken little damage while the Avoirdupois is rather battered so the odds would seem to favour the Spanish:

The heroic crew of the San Francisco just fail to get off table and are forced to strike by the Imperial. However, the Neptuno ensures that everything isn't going for the British by stern raking the Firkin:

At this point we decided to call the game as we had been playing for quite a while and it was getting late.

For the Spanish the San Francisco had struck, the Neptuno and the Monarca had a little damage while the San Justo had not taken any damage at all. As for the British the Badger had struck and run aground, the Avoirdupois and the Firkin were heavily damaged and even the Imperial was quite damaged. 

As a result the Spanish Commodore is prepared to declare the action a mighty victory for his valiant ships with a special mention for the San Francisco which was in the thick of the action for the whole engagement.

I have to say I enjoyed KMH much more than I did Black Seas, everything seemed to go along quicker with the card-driven move sequence and be simpler to work out which, as a non-specialist in the period, is fine with me! The game took longer partly because I'd never played before and Dave had only had a couple of games so went spent a while looking things up, after a few games I'm sure it would be much quicker and I'm certainly keen to play again as the ships look fantastic. Of course it may have helped that I used French stats for my ships rather than Spanish so the difference in quality wasn't quite so vast.


Wednesday 29 December 2021

ADLG Teutonic Knights v Communal Italian

A rare outing for my Eastern European medieval collection this week with the Teutonic Knights taking on Sean's beautifully painted Communal Italian.

I hadn't looked at the list before and, from what I remember, it has had a major change in that you can now have six Baltic medium swordsmen (the previous version had very few infantry at all). On the assumption that Sean's Italians would be infantry based and not that manoeuvrable I went for one command of the Balts with a couple of skirmishers and two identical commands of knights and light horse giving a decent sized army of 24 elements. The vague plan was to dominate any terrain with the Balts, hold up most of the Italian army with some light horse and smash the rest with the two knight groups.

The terrain fell nicely for the Teutons who deployed the two mounted commands on the left and centre with the Balts on the right:


Following the plan the knights begin to redeploy to the right leaving a couple of Turcopoles and Hungarian horse archers to delay the Italians. The Balts move forward towards the fields:

Sensing an opportunity the Turcopoles charge home against an Italian crossbow horse. They inflict a hit and give the Italian knights something to think about:

In the Italian's turn the Turcopoles finish off the Crossbowman forcing the Italians to detach some knights to deal with them:

Elsewhere Italian infantry advance while the Teutons continue to redeploy and push forward into the fields:

One Turcopole valiantly holds off the knights while the other makes a run for the Italian baggage, only lack of command points will stop him now: 

Remarkably the Turcopole survived the first contact but falls to a flank charge from another knight. The Turcopoles have certainly done their job well:

The lines are closing in the centre and on the right:

Shooting casualties mount for the Teutons and they have a bit of a traffic jam on the right by the fields:

Further shooting goes more in favour of the Teutons though and the first knight is into action on the far right:

The situation between the two fields is rather complex!:

The Italian mounted crossbowman falls to the Teutonic crusader knight:

The Italians commit to an attack with the odds in their favour, at least if they win quickly:

One Teutonic knight has fallen and one Crusader is down with the second almost joining him. However, the Teutons still have uncommitted units available:

The impressive looking but undefended Italian holy standard falls to the Turcopoles. Being worth 6 hits this is a blow to Italian morale:

The Italians demonstrate that they too can loot camps as two knights hit the unprotected Teutonic camp. The second knight command is going to be forced to charge soon. A couple of the Italian spearmen have been weakened by shooting but they do have the advantage of their mad man-propelled carts with spikes which are bad news for any mounted:

Numbers are starting to count for the Teutons in the battle for the fields:

Teutonic and Crusader knights crash into the Italian spear line!:

The Teutons are quickly gaining the upper hand between the fields:

One Italian spearmen is ridden down with a second almost gone. Against the spikey carts and mixed spear/crossbow things go less well though:

The Italian army is almost broken, a few more hits suffice for the Teutons and victory goes to the Germans:

A close fought game with the Italians breaking exactly and the Teutons being only four off breaking themselves, it was closer but I managed to rally a couple of units at the end. Could easily have gone the other way.

The plan worked reasonably well I think and the Turcopoles on the left did a great job, taking out one Italian element to equal their own loss of one and sacking the valuable Italian camp. I think I could have used the Balts better, if I'd split them up they could have attacked the field on the Italian baseline without being in danger from the Italian knights but in the end numbers counted. 

The spikey cart things seemed much more useful than regular war wagons, being able to charge home and having a ZOC really helps them and makes charging into lines of infantry considerably more risky for knights.

Not having seen Sean for a long time (over a year!) was great to meet up again and get one of my favourite DBM armies that is rarely used under ADLG into action!

Wednesday 22 December 2021

ADLG Late Imperial Roman v Mid Imperial Roman

It's a Roman civil war this week with my true-Emperor Late Romans taking on Gordon's rather old-fashioned evil Usurpers! I went for a largely foot based army with few mounted while Gordon's force had fewer foot but considerably more mounted.

One of Gordon's commands was either in ambush behind the hill or flank marching on a fairly open table:


The Usurpers advance rapidly. This suggests that their hidden command is behind the hill otherwise their flank will be very exposed: 
 
Apart from throwing forward some skirmishers the true Emperor's men await developments in the centre and the right:

The Usurpers forces continue to press forward, the Legions are equally matched but the Usurpers Auxilia are armoured and facing some less then confident archers:

On the left the true Emperors Legions are not really getting into the action. Some Auxilia have been sent to reinforce the centre while the Usurper has advanced his Sarmatian ally command that was hiding behind the hill:

The archers have no effect on the Usurpers Auxilia:

The lines clash!:

On the left two Illyrians have been charged in the rear by a Sarmatian light horse:

Remarkably the Illyrians turn round and defeat the Sarmatians:

In more action on the left the Usurpers cataphracts charge home while cavalry attempt to delay the other cataphracts:

The initial clash does not go well for the true Emperor though both sides take some hits:

One base of archers has gone down while the cavalry on both sides eye each other warily:

The lone Usurper cataphract has dealt with one Legion and moves on to the next:

In the centre things are going badly for the true Emperor's forces. Markers are even at six each but the whole force is close to collapse with red (3 hit) and yellow (two hit) markers sprouting:

The Usurpers cavalry fall back:

Units fall on both sides:

On the left one Illyrian sacrifices itself against the Sarmatian general so it's colleague can loot the Usurpers camp: 

Losses mount for the true Emperor, the army is close to breaking now. The Usurpers army has taken some damage and lost the camp but is still a way off breaking:

The lone cataphract takes down another Legion and the true Emperors centre is almost gone:

Sarmatian cavalry finish off a Roman cavalry unit breaking the true Emperor's army!

My run of ADLG victories came to a crashing halt with this game! 

Gordon's investment in armour for his Auxilia really paid off as well saving him from several shooting and combat hits allowing them to quickly cut through my unarmoured Auxilia and archers. 

I didn't manage to get the best out of my extra Legionaries compared to Gordon's army and also failed to get my elite impact heavy cavalry into action on my right perhaps worrying too much that they were slightly outnumbered. I also wasted two Auxilia who tried to redeploy but ended up stuck behind my falling Legionary line with no command pips to move on. 

Having said that it was a fairly close game (mostly as my army was larger and I sacked Gordon's camp) and Gordon's army was around 4 or 5 hits from breaking itself.