Tuesday 29 September 2020

Rommel Late War Germans v Americans Scenario 6 'Relief'

Jerry had painted up a load of 6mm Late War Germans and Americans and was keen to try them out. We went for Scenario 6 "Relief" with me as the Germans and Jerry as the Americans. The Americans have some isolated forces (in this case paratroopers) which the rest of the American force needs to break through to while the Germans try to stop them.

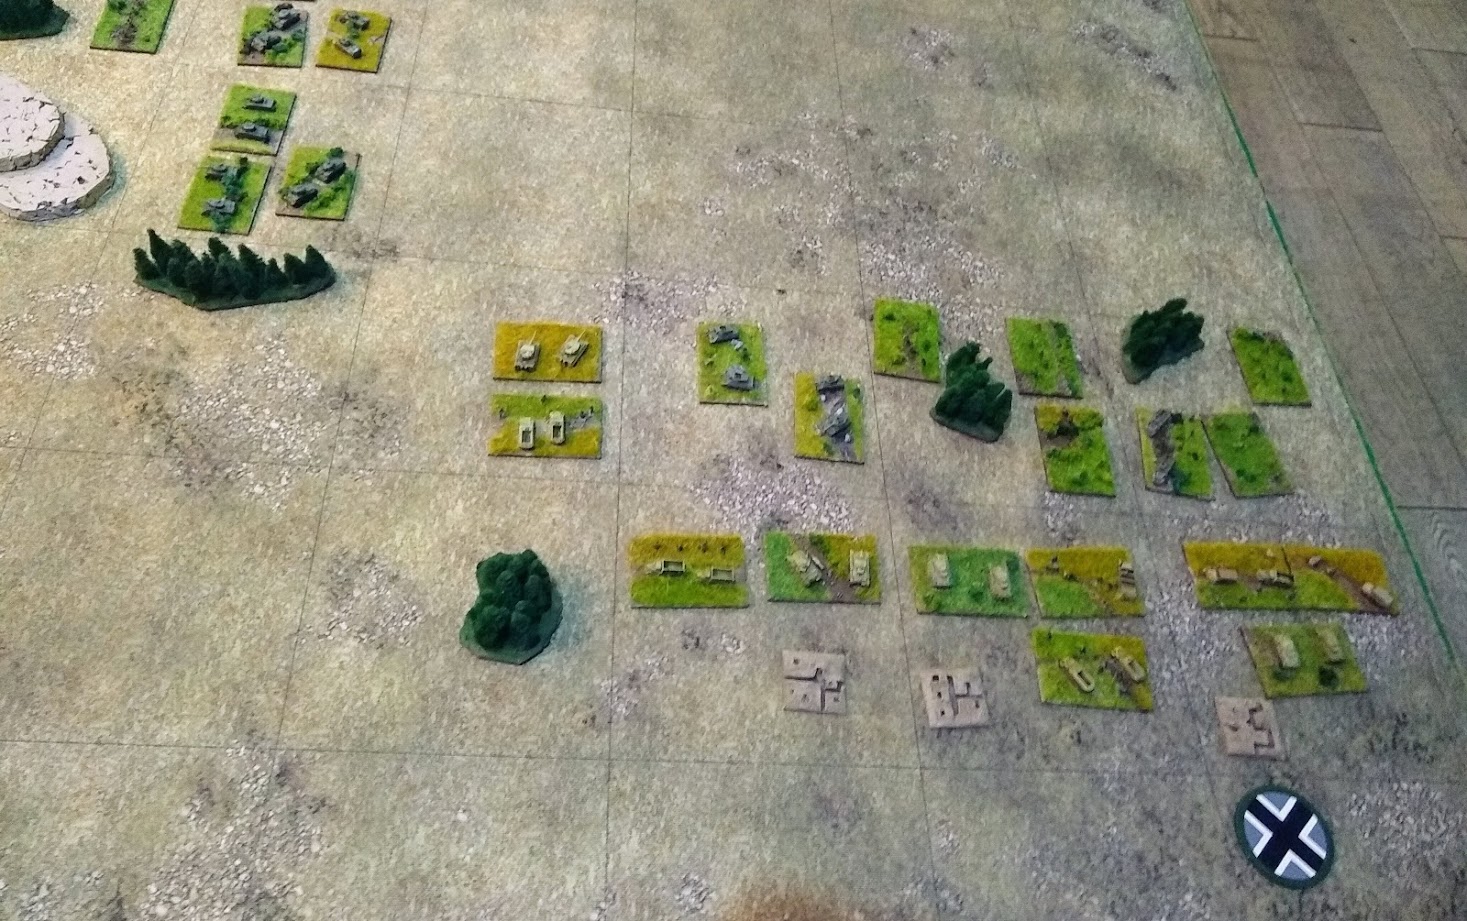
I had an Infantry KG which deployed across the centre of the table entirely in terrain with a small Panzer KG holding some of the line and a larger Panzer KG deployed in reserve. Jerry's force relieving force was made up entirely of Sherman's and Armoured Infantry allowing him to move quickly but limiting his numbers a little:

Another view:

The Americans make a strong attack on the German Infantry KG at the far end of the line but the terrain hinders their progress and stops them making the best use of their armoured units:

The German reserve Panzer KG is masked by an equal number of American elements:

The Germans sneak a Tiger company and some Panzer Grenadiers onto the flank of the Americans:

Using three tactical moves the Tigers and Panzer Grenadiers capture the American supply base which the Americans left undefended. This is a serious blow as it will make it much harder for the Americans to move as they are out of supply:

The Americans continue to attack the German Infantry KG but, while they inflict a few losses, the German infantry hold on comfortably:

The American paratroopers are still awaiting relief, the Germans have not attacked them preferring to leave them for later:

The smaller German Panzer KG sends it's Panzer IV's forwards to capture the American objective:

With the American attack on the German infantry stalled, the objective controlled by the Germans and the American supply line still held by the Tigers and Panzer Grenadiers the situation is hopeless for the Americans and they call off the relief attempt, the paratroopers will have to hold on longer or surrender!:

This was only Jerry's second Rommel game. In the first I'd underestimated him and come close to defeat so this time I made sure not to make that mistake again! It showed how steep the learning curve is for Rommel, once the terrain was placed and I had a line of woods/mountains/towns across the table it was always going to be very hard for Jerry to break through with the disadvantage for attacking terrain and the fact that his armour was of little use in the terrain.

The Relief scenario is also a tough one for the attacker as you have to hold your supply base, control the sole objective and be able to trace a line of supply between them which is not easy as it gives the defender several ways of winning the game.

Jerry's armies looked great, the basing being really varied with little dioramas on some bases and the towns (made of 3mm buildings) also looked fantastic as did the railway line.

ADLG HYW English v Florentine Italian Condotta

The third outing for the HYW English, this time against Sean's Florentine Italian Condotta.The terrain consisted of a waterway on the English right with a hill enclosed by fields next to it and a couple of other fields.

The English deployed with the Black Prince on the right, King Edward III in the centre and the Earl of Oxford on the left. The Florentine army consisted of knights, crossbowmen and some hired Swiss lackies:

The English advance quickly on their right where they feel they have an advantage:

The Black Prince continues to attack driving back the Florentines facing him:

On the left though things are not going so well and the English line is being outflanked:

The Florentines begin to attack the Earl of Oxford:

With both armies winning on one flank it will be in the centre where the Swiss are station that the battle will be decided:

On the left only the Earl of Oxford himself fights on:

The Swiss begin to cut through the English foot while now that the Earl of Oxford's command has been wiped out the King's command is under pressure from the Florentine knights as well:

The Swiss are triumphant and the English army breaks:

This was a fairly close game, Sean's army had taken quite a few losses and for a while it looked like it could go either way. I made at least one simple mistake that had a bit of an effect and need to try to cut out that sort of error in future. I should pay for better quality generals as well as the 'Ordinary' ones I use didn't get enough movement pips on a few occasions. Back to the drawing board!

Saturday 26 September 2020

Black Seas HMS Victory

I'd assumed HMS Victory would be included in the British Fleet box I bought and was somewhat surprised that it didn't. No matter, as soon as Wayland Games had it in stock I ordered one!

The kit is very similar to the other larger Black Seas models with a resin hull and metal masts and details:

The bow:

Ready for action:

I now have two 1st Rates and three 3rd Rates for the British compared to one 1st Rate and six Third Rates for the Spanish. As ever I'm not sure I'll buy any more but I have thought that several times before.

I think perhaps it would be worth looking at other rule sets, while Black Seas is relatively simple for two people to manage twelve ships may need even simpler rules!

Monday 21 September 2020

ADLG Assyrian Empire v Meriotic Kushite

Another ADLG game, this time using my Assyrians against Gordon's Meriotic Kushite. I'd assumed this was the Biblical army but there is a later Kushite list which is the one Gordon used!

The Assyrians managed to get a waterway to narrow the table against the likely to be larger Kushite army. They decide to rush forward to try to engage the Kushites as quickly as possible. One Kushite command is missing. The Assyrians assume it must be medium foot ambushing in the palm grove, flank marching given the terrain does not seem likely. It later transpired that the Assyrians were partly correct in this assumption:

The Kushites advance to meet the Assyrians who throw a medium foot unit and a cavalry unit out on the right to slow the rest of the Kushites when they arrive:

Oh dear. The ambushing troops are a load of camelry and cavalry who will not be delayed much by the two Assyrian elements facing them. Not medium foot as expected!:

The Kushite cavalry withdraw from the Assyrian foot and chariots. The Assyrians desperately try to redeploy to meet the Kushite ambush on the right:

The Assyrian right is a confused mess of chariots and cavalry rapidly being out flanked by the Kushite camelry and cavalry:

The Assyrians form a line of sorts on the right. In the centre the Kushite foot, elephants and cavalry have charged home on the mixed Assyrian foot:

Despite an initial resistance the Assyrians do badly in the combats:

The situation looks bad but perhaps not unrecoverable:

The Assyrian mixed heavy swordsmen/bowmen in the centre are collapsing rapidly while the Assyrian chariots struggle to get into contact:

Much of the Assyrian centre has been destroyed while the Kushite camelry are more than holding their own against the Assyrian cavalry and chariots:

The Assyrians break in rout leaving the Kushites victorious:

Gordon only lost two elements in this game so it was a very decisive victory for him. Having said that I don't think I had the best of luck, despite being a largely shooting army the Assyrians inflicted very few shooting hits and did badly in the combats.

However, Gordon definitely out-thought me as I didn't expect the ambush to be mounted (though I should have done as looking his list he could have camels and was bound to have them). Once he sprang the trap I was left trying to shore up a desperate position and ended up aimlessly moving the chariots around to try to stabilise things so the outcome was by no means unlucky for me!

Tuesday 15 September 2020

Rommel Stavropol 7th January 1943

Andy and I's latest Rommel game saw us return to the Eastern Front in 1943 for the battle of Stavropol. This engagement took place following Stalingrad and saw the Soviet 3rd Guard's Mechanised Corps attempting to break the German LVII Panzer Corps defensive line between the Manych and Sal rivers. I took the part of the Russians while Andy led the Germans.

The map was fairly open with just one significant urban area, Stavropol, some areas of deep snow, frozen rivers and a couple of forest areas. To win the Soviets needed to hold 3 out of 5 objectives by nightfall:

Intelligence reports had a powerful Panzer KG holding the forward lines supported by forces allocated to the 23rd Panzer KG. I deployed my 7th Brigade on the right with the 8th and 9th Brigades and my artillery support in the centre. The plan was to capture the two nearest objectives while holding on to the town of Stavropol itself:

T34's from the 8th Brigade attack the centre objective:

Somewhat surprisingly the German's put up an initial resistance then fall back allowing the Russians to capture the objective:

On the right the 7th Brigade occupies their objective. So far so good, now all they have to do is hold on until nightfall:

The reason why the Germans gave up the objective so easily becomes clear, they have planned to use 'Gaps in their lines' to push a strong force of Panzers and Panzer Grenadiers past the Soviet line and into the Russian rear lines! The Soviets have fallen for the trap hook, line and sinker:

The breakthrough force attacks the Russian artillery, they have an especial dislike for the Katyusha rocket launchers and hope to wipe them out:

The brave Soviet crews of the Katyusha's manage to withdraw from danger though. Their colleagues in the foot artillery are not so fortunate and are wiped out though:

Determined to finish off the Katyusha's the Germans attack them again. This time some Soviet infantry rush to their defence and hold the Germans off:

Elsewhere in the centre though the Soviets have taken a battering from the better trained and equipped Panzers, losing the centre objective and having only a few elements left. Stavropol is still held strongly though but is now isolated:

With the imminent collapse of their position in the centre the Soviets try to push forward on the right where the German forces are thinly spread. Progress is slow though:

Hardly anything remains of the Soviet centre and the Germans prepare to assault Stavropol. The situation is looking increasingly desperate for the Russians:

Having learnt a lesson the Soviets use 'Gaps in their lines' themselves to capture the German supply line as part of their attack on the right. They are still a long way from the 3rd objective they need though and their remaining units have taken many losses:

The Soviet attack is petering out as the Germans collect their forces and hold on securely:

The Germans assault Stavropol and will soon capture it:

At this point I called it a day and retired leaving the Germans victorious. Andy used his powerful Panzers very well, the 'Gaps in their lines' ploy was very successful isolating many of my units and denying me the use of my artillery which the Russians really need to support their rather weak armour especially.

I dithered a lot about what to do with my forces on the right, initially planning to use them to support the centre but changing my mind as the centre collapsed and trying to attack on the right instead ending up with them not contributing much to either sector. I suspect this was a game where I tried to do the obvious thing and should perhaps have looked at other options which might have been more successful!

Friday 11 September 2020

TMOCB Firebase attack

With the interior of the firebase finished and the exterior produced from assorted old scenery it was time to try out the firebase scenario for TMOCB.

This scenario uses the US forces as normal with the NVA supported by some sappers attacking the base.

Lt. Donovan deploys his men to hold the base, attaching himself to the artillery battery. Sgt Rambo holds the ammunition bunker, Sgt Barnes the accommodation bunker and Sgt Elias the command bunker. the force is supported by a couple of M113's parked on the helipad:

NVA sappers appear at the perimeter and try to destroy the defences:

Some of the sappers are killed:

Others, however, break into the base:

Following up the sappers the NVA main force assaults. The mortar battery falls and Sgt Elias' men are under heavy pressure around the command bunker:

More NVA storm into the base though some of the perimeter defences hold out:

Several of Elias' men are down and the situation looks grim until Sgt Rambo leads a counter-attack:

Rambo's men shoot down several NVA around the captured mortar battery:

The other end of the base has just seen a few sporadic sapper attacks which have been repulsed. An NVA artillery strike hits the area and takes out one of the US gun crews:

Rambo assaults the NVA holding the mortar battery and drives them out wiping out the NVA section in the process. The casualty markers show where the fighting has been heaviest:

The other end of the firebase has been secured and Sgt Barnes starts to move his men up to engage the remaining NVA:

With few NVA left and the Americans in a strong position the NVA withdraw:

The final casualty count:

This was certainly different to the searching villages or rescuing downed aircrew scenarios. The action was fast and brutal from the start with casualties quickly mounting.

I think I need to read the rules again now I've had a trail game and pick up some of the differences for the scenario, for example in this one both sides have cache loops which cause events. Neither side used them but perhaps they should. Many of the events are artillery strikes though which are risky for both sides as they are in such close proximity! I also need to re-read the morale rules, one of the changes for the firebase game is that neither side can evacuate casualties which means that, together with the close proximity of the units, they can lose a lot of their action dice to morale failures.

It was interesting though and I can see that there are a few different ways you could approach it both as the NVA (concentrate the attackers or attack all around the base in weaker numbers?) and the US forces (defend the bunkers or try to defend the perimeter, emphasise shooting or add in some assaults as well?).

This was my 7th solo game of TMOCB so I think I've had a fair return on the investment as well as enjoying painting all the figures, vehicles and scenery for the project. I'm sure I'll play some more in the future!