Sunday 31 March 2019

ECW Personalities


As the ECW/TYW project is approaching being able to get on the table it was time to add a couple of personalities to the generic commander bases I'd already done.

Having looked through a few different manufacturers I finally settled on Bicorne Miniatures range of ECW personalities and sent off an order.

The first base consists of King Charles and the Royal Standard Bearer Sir Edmund Verney:

My second choice was Prince Rupert and 'Boy' his dog:

As usual the flag on the King Charles base is removable so I'll be able to swap it for a TYW one if I want to use the army as a TYW army.

I thought 'Boy' was rather small. He was a white hunting poodle who accompanied Rupert into battle and was thought by his opponents to have magic powers! He was killed at Marston Moor in 1644.

Looking at this picture painted by Louise, Princess Palatine, he does not look that fearsome:

He was also the subject of a number of propaganda leaflets on both sides:

Quite an effect for a small white poodle!

Friday 29 March 2019

ADLG-Arrrrrr Buccaneers v Late Imperial Austrian

Another test game of ADLG-R against Simon last night. Simon has been working on his adaptation of ADLG for a while now mainly looking at TYW/ECW type armies so we thought I could try an 'unusual' army in the Buccaneers (in reality PIRATES!) to see how they fared.

I based my list on the FoGR list which gave me a somewhat smaller army than FoGR and didn't include the ship as Simon had no rules for it yet. None-the-less I did bring the ship and deployed it for scenic effect!

The table was depressingly open from the Pirates point of view apart from the waterway. The Pirates deploy across the table and face an Austrian army with an infantry centre and small cavalry wings:

The initial action was on the Pirate left where Veteran Pirates, Mad Pirates and Pirate Skirmishers face off Austrian cavalry and Dragoons:

Elsewhere the Pirates advance to support their guns and the Austrians advance in general:

On the left the Austrians manage to trap and kill a Pirate skirmisher but look rather outnumbered and not well placed to face the heavier Pirate foot:

The Veteran Pirates cut down a Dragoon while the Mad Pirates deal with the other Dragoon:

Pirate and Austrian artillery start to inflict hits on the main battle lines:

On the left the remaining Austrian Dragoon has been disposed of as has one Austrian cavalry element. The remaining Austrian cavalry are looking very lonely:

The Veteran Pirates take on the last Austrian cavalry:

The main battle lines close to musketry range and open fire. The Mad Pirates from the left are well placed to outflank the Austrian line:

The ever-victorious Veteran Pirates have now wiped out all opposition:

On the right things are going less well for the Pirates. If only there were some rules for the Ship!:

Two big holes appear in the lines as units start to break on both sides:

The successful Pirates from the left are now getting into contact with the Austrian flank:

Austrian morale collapses but, in a final combat, the Austrian infantry on the left obliterate a unit of Mad Pirates which is just enough to break the Pirate morale as well resulting in a mutual destruction:

One group of Pirates on the right heroically defended the Pirate baggage to the end against overwhelming odds:

So in the end an almost-victory for the Pirates, the Austrians were well over their break point while the Pirates only just slipped over theirs.

The Pirates were always a fun army in FoGR though perhaps somewhat one dimensional overcome by two factors, firstly that you are PIRATES and secondly that you have a PIRATE SHIP (at least if you get it on table)!

Some thoughts on the ADLG-R rules which came up:
  • Elite infantry units at only 2 points extra are very good value as, in effect, you pay 2 points to upgrade two elements for the double-sized infantry.
  • The system of marking hits and removing the whole unit for the battle foot means that all the units quickly become disrupted but there is little difference between a P&S unit with 5 hits out of 6 and one with 1 hit out of 6, in FoGR units gradually lost bases as well as being disordered so they effect was more subtle. Perhaps giving an extra minus at 3 and 5 hits might help.
  • The Austrian P&S shot (with few pikes) as well as the entirely musket Pirates, in FoGR the Pirates have a slight shooting advantage.
  • The Pirates seem much less vulnerable to cavalry in ADLG-R. They also cover the table better so being outflanked is less of an issue.
  • I will nag Simon to add rules for the ship!
As with the Kushites the pirates are another army I didn't paint much of, I just added a few generals, extra bases here and there, the flags and the ship. The rest were painted by another member of my club. 

They usually managed at least one competition outing a year under FoGR and it was nice to see them on the table again.

Monday 25 March 2019

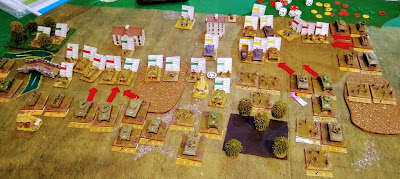
Rommel Mid War American v Germans

We played the second game of Andy and I's Rommel mini-campaign last night. I went for my full army list of 108 points while Andy had 94 points worth of Germans.

With a 12 point difference in the lists Andy chose Scenario 5 'Recon in Force' and defended. In this one the attacker has to capture three of five 'real' objectives by nightfall with the defender also being able to place four dummy objectives.

Most of the terrain ended up on Andy's side of the table and he deployed concealed to cover all the potential objectives. The Americans deployed their Infantry CC in the centre and the Armoured CC split on either flank:

The American Armoured CC advanced quickly on the right and assaulted one of the objectives in the town:

On the left the Americans began to sweep away German delaying forces:

The Americans also push forward in the centre:

American Infantry pushes forward into a wood in the centre:

On the right the Town has been taken but the objective is a dummy and the Americans press forward:

On the left the Americans are being held back by the German defenders:

Another dummy objective has been captured in the centre:

On the right the Americans have broken through the German lines and are beginning to outflank the German line. Both sides are taking losses with several German units being destroyed:

The Americans continue to attack all along the line:

The Germans are forced back into a small pocket of resistance based around the three 'real' objectives they still hold. The Americans have captured two 'real' objectives and all the dummies, will they be able to capture another before nightfall?:

The American assault on the objective town on the German baseline and another objective in the wood on the left begins:

Nightfall in close as the Germans desperately hang on:

The battle will now be decided in the town, the attack on the woods failed so the town is the only option for the Americans now:

A last-ditch attempt by the Americans to take the town before nightfall fails as a few German infantry survive the assault despite seeing many of their comrades dispersed:

Victory goes to the Germans as night falls!

This was a really close game with my last attack on the town having a 50% chance of winning the game for me. I inflicted massive losses on the Germans but they held their nerve and Andy skilfully constricted his lines to conserve his forces as the game went on.

The thing I really love about Rommel is that it makes you think about the strengths and weaknesses of your army and the oppositions, what you need to do to win the scenario and what the enemy might do.

Given the weakness of my tanks for this game, I chose two army level heavy artillery and one medium artillery attached to the Armoured CC. This gave me the option to add 11 strength points to any attack made by the Armoured CC once per turn.

I also changed the way I attacked. Previously I have gone for more tactical phases rather than using tactics so much. In this game for each of my turns pretty much I just had one tactical phase and chose one attack to concentrate on, adding all the artillery into the combat and using the maximum number of uplift tactics I could.

While this gave me less tactical phases it did result in the attacks I concentrated on doing a lot of damage, often inflicting four or five hits on the Germans and allowing me to capture positions before Andy could reinforce them. On the downside of course my other attacks were weakened but still did some damage so I think as a plan it worked well.

Our next game in the campaign will  be Late War 1944 in Normandy which will give me better quality tank crews. The Germans will have weaker units so the big choice will be to try to attack or defend especially as two scenarios won't be available (we agreed not to play the same scenario twice). 

Time to draw up a new list and make a plan!

Napoleonic Austrian Grenadiers

After finishing the Grenzer's for my Sharp Practice Austrian force I ordered a couple of groups of Grenadiers from Front Rank.

In command an officer and a sergeant:

The rank and file from the front:

and the rear:

I've now painted these Austrian Grenadiers in 28mm, 15mm and 6mm! Rather worryingly I have also started thinking about the possibility of playing Blucher in 28mm with each SP group representing a Blucher unit. It wouldn't be that big an extension on what I already have for the French and Austrians especially if I only used four figures to a cavalry brigade.

As I enjoy painting them maybe I will just gradually add the odd group now and then and see how it goes.

Saturday 23 March 2019

TYW/ECW Infantry

The final Warlord Games 28mm TYW/ECW infantry unit has been finished, this time in light blue coats:

The army now has six pike and shot units. Just one more cavalry unit to finish and I'll be able to start using them (assuming I can find someone to play!).

Thursday 21 March 2019

Chain of Command Blitzkrieg German v French

A first outing for the newly painted Blitzkrieg German army for CoC against Gary's French.

We decided to play Scenario 1 'Going with a bang' from the 1940 book. I opted for the Grossdeutschland Motorised Infantry Platoon and, with 10 support points, chose an Sdkfz222 armoured car, a pre-game barrage, the infamous 'red dice', a demolition team and a 'Shabby Nazi Trick' collaborating sniper! Gary chose a French Reserve Platoon and had 8 support points available.

The table had a road running lengthwise. a few buildings and some enclosures. The two culverts the French need to blow up were both at the far end of the table from the German start line making them harder to get to but taking longer to prepare the demolition charges:

Initial moves went well for the Germans with one squad and the mortar deploying with the Feldwebel behind a stone wall and another squad racing forward to the stone enclosure on the right. The French deployed a Groupe in the demolished part of forward building but their fire was ineffective:

The French Lieutenant deployed and ordered the demolition teams to start setting the charges on the culverts:

The first French Groupe in the house started to take losses from the Germans behind the wall:

The second German squad moved into the enclosure with no losses so far:

The French deployed a second Groupe in the rest of the house, their fire was far more effective and the Germans started to lose men:

With the German squad in the enclosure failing to make further progress and the French rapidly setting their demolition charges it was time for the Sdkfz222 to appear and give the Germans some mobility and extra firepower:

At this point the Germans had a large stroke of luck- a stray mortar round set the central building on fire! As they had a CoC die to play the Germans used it to end the turn forcing the two French Groupes to exit the building and giving them two shock per section:

One of the French Groupes forced out of the building breaks under fire:

The other French Groupe starts to head for the enclosure but mills about in confusion:

The French bring on an R35 to take on the German armoured car:

One culvert has been blown up but only damaged so the charges have to be reset. The second has the demolition charge laid but the French need a CoC die to set them off and don't have one. The French Groupe continues towards the enclosure:

The final German Squad dashes forward to contest the enclosure with the French:

Another French Groupe deploys in the ruined buildings towards the rear of the French position:

The French reach the wall first:

The Sdkfz222 moves forward and mops up the remaining men of the broken French Groupe:

The second French Groupe forced out from the house is now in trouble with a number of losses and several shock. French morale is near breaking:

The Germans pour more fire in and the French Groupe breaks ending French resistance:

Initially things went very well for the French, the demo charges were set quickly and they built up a CoC die to explode the first charge. The French infantry in the houses was holding the Germans back successfully.

The random event really changed the course of the game though, forcing the French out of their stronghold and allowing the Germans to wipe out two French Groupes. The French also had no luck with generating another CoC die.

I continue to think that the 'red dice' is a big advantage, activating units is the hardest part of CoC and having 20% more activations is very useful. Add in the two LMG squads and you have an even bigger advantage.....