Thursday 29 October 2020

Infamy, Infamy Roman v Germans

I wasn't intending to try Infamy just yet but being unable to play at the club anymore and a visit to the Orc's Nest shop resulting in an impulse purchase of the rules and cards last week changed that. 

After a quick read through and the impression that it was basically Sharp Practice with sticks I thought I'd give it a go as a solo game using my 25mm Late Romans as Early Imperial Romans and some Carthaginian Gaul's and Spanish as Germans. 

With room for only a 4x4 ft table I used just the fixed lists and put down some terrain. The Romans quickly appeared and started to move into the Germanic wasteland:


The Roman archers are ambushed by some Germanic warriors! 

The archers are broken quickly and the Germans pile into the Legionaries behind:

The Romans stand fast and repulse the Germans:

Some Auxila arrive and advance while the Germans deploy slingers (heavily influenced by Spanish fashion!) in the broken ground as the ambushing German warriors fall back:

The German war leader arrives with the German cavalry to support the slingers:

The rest of the Germanic warband moves out from a forest and begins to build up fervour: 

The Auxila are charged by the German cavalry. Meanwhile the German slingers have been inflicting kills on the Legions:

The Auxila only just hold on and the cavalry fall back. Both have large amounts of shock:

The Legionaries continue to advance on the German warband but take more losses from the slingers:

The Germanic warband leader attempts to raise the fervour of his men. They are less than impressed and appear unenthusiastic to face the advancing Romans losing most of their fervour!:

The Romans charge home throwing their pila to little effect:

The first round of combat goes largely to the Romans with the elite German warriors in the centre coming off worst:

In the second round two lots of Germans fall back but the one on the left pushes back some Legionaries that had been weakened by the German slingers. A second unit of Romans, also weakened by the slingers, falls back as well:

The Germans break the Legionaries on the Roman left:

Most of the units involved now have too much shock to do anything else:

The German cavalry having rallied off their shock close on the Auxila and throw javelins at them. Combined with losses from the German slingers the Auxila break:

With the Romans only having one effective group left (the Legionaries on the far left) the battle is over and the Germans have triumphed over the invaders:

After a slow start I quite enjoyed the game. It is a bit different to Sharp Practice (which to some extent is confusing) and, on this small game, it seemed quite hard to inflict losses on units (though it was easy to inflict shock on them). At the end of the game both sides still had high force moral levels despite losing a few units each. The way the flag cards are used is quite different as you can't use them to activate units apart from at the phase end and they are mainly used for actions instead. I'll definitely need to re-read the rules again as I'm sure I did several things wrongly. 

The German slingers were very effective but the warband groups are much less effective than the Legionaries so for the Germans I suspect it is vital to weaken the Legions before they contact the warband units. I also think they could have made more use of their ambush ability but of course that's hard to do in a solo game. 

When we are able to play again I think I will try to arrange a game and see how it works on a full-size table with a proper scenario.

Wednesday 21 October 2020

Blucher Napoleonic Swedish

 I wanted to add some more units to my Blucher collection but was struggling for inspiration. Flicking through various manufacturers web sites I came upon the Blue Moon Swedish in their Minor Nations section

The Swedes were an army I knew little about other than that they participated with little enthusiasm in the 1813/14 campaign under the recently appointed Crown Prince, the former Marshal Bernadotte. They also apparently fought the Russians in 1807, losing Finland in the process.

So something slightly different with unusual hats and suitable to support my Russians and Prussians rather than the many French allies I've painted lately. Blue Moon seem a bit variable but I thought I'd take a chance and order some.

The figures when they arrived were actually quite decent, especially the infantry. One problem I'd not anticipated was that there is remarkably little information available on Swedish Napoleonic uniforms and much of what there is tends to be very vague! 

As a result I splashed out £20 on an out-of-print copy of the venerable Osprey book 'Scandinavian Armies in the Napoleonic Wars':


I'd expected that this would have the usual Osprey tables of uniforms for each troop type for the Swedish and Danish/Norwegian armies but on looking at it all it had was some plates of mostly Danish troops and a number of black and white sketches of units where it didn't say which army they were from!

It was useful on filling in the background to the participation of the  Scandinavian armies in the Napoleonic wars so wasn't a total waste of time!

In the end I painted the figures based on a random web site I found on Google which had some pictures of various Swedish units. 

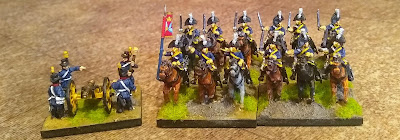
Swedish artillery and Dragoons:

Three brigades of Swedish (or possibly Finnish!) infantry:

I'm pleased with how these came out, especially the infantry unit in the yellow and blue uniform. For some reason I forgot you need two guns and crews for a Blucher battery and only painted one but I have enough figures for another so just need to paint it up. I might well add some more I think, perhaps some Guards and Light Infantry.

One last thing I read was that their participation in the Napoleonic wars was the last war the Swedes fought in which is quite an achievement when you think about it.


Rommel Soviet and German additions

Having decided to expand my mid-war Soviet army for Rommel so I could use it for early and late war I made a few more additions to the available tank force.

SU85, T34/85 and T34/76:


T-26's:

I also took the opportunity to add a few more bases for my Germans, firstly some Fallschirmjager:

Secondly a Jagdpanther, Jagdpanzer IV and a Nashorn:

All of these are from Pendraken, all my other infantry for this collection are from Minifigs and are much more slender than the rather chunky Pendraken casts. I think I prefer the Minifigs ones but in this case couldn't be bothered to place two orders!

A few days after ordering these I realised I should have got some BT7's a BA6 and a T-35 to do some scenarios Andy found on the net, oh well next time......


Friday 16 October 2020

ADLG-R Holy Roman Empire v Louis XIV French

For a change I played an ADLG-R game against Simon who wrote the amendments to ADLG to use them for the Renaissance period.

I went for the Holy Roman Empire (previously known as Hapsburg Austrian Imperial!) while Simon used Louis XIV French. I chose a mainly infantry army with limited cavalry support and a few light cavalry and dragoons and opted for a traditional deployment with the infantry in the centre and the mounted on the flanks:


Both sides think they have an advantage on their right and try to press home on that flank:

The Austrian left flank falls back to delay contact:

They push forward on the right though where they have the advantage of the hill and superior numbers:

The attack goes well and the French are taking losses:

On the Austrian left they face elite French cavalry with French Guard infantry closing quickly in support:

The French infantry close on the Austrian line but take losses from musketry:

The Austrian right is making good progress but on the left things are not so good as the cavalry are being overwhelmed. The stout German allied foot hold on well though and come close to breaking the French Guard:

Most of the French have been swept away by the Austrian right flank and the rest are close to collapse:

With both sides close to breaking the Austrians falter first and concede the battlefield to the French:

This was an enjoyable game which I thought I was winning right up until I lost! Simon had several units only a single hit away from being destroyed but the Austrians couldn't quite get the last hits on them to finish them off. 

Unfortunately with the new Covid restrictions in London this will be my last game at the club for a while so it will be back to playing solo Vietnam games and painting I guess!


Tuesday 13 October 2020

ADLG Lithuanian v Feudal Russian

 This week's ADLG game saw my Lithuanians taking on Gordon's Feudal Russians. Lithuanian used to be a rather underrated army back in the days of DBM and I used it many times successfully. In ADLG though it appears less attractive as an army and I don't think I'd used it before. 

I went for the traditional DBM-style army of Lithuanians combined with Hussites and Teutonic knights to face Gordon's Russians. The Teutons deployed on the left, the Hussites in the middle and the Lithuanians on the right:


The Russians have cavalry and mercenary knights facing the Teutons, spearmen against the Hussites and a mixture of Russian and Cuman cavalry against the Lithuanians:

The Teutons divide their forces. With an 'ordinary' commander this might cause control issues but hopefully they will quickly get into combat when it won't matter so much:

The Russians press forward on both flanks while the spearmen head for the Hussites:

The Teutons are now a considerable distance apart. Hopefully they will manage to get to charge:

The Russians attack! With insufficient command points the Teutons on the left fail to engage and are stuck in place:

Combats go badly for the Lithuanians and markers start to sprout among the Hussites especially:

The Teuton Grand Master manages to get into combat but the knights on the left are still stuck. The Hussites are falling rapidly now:

The Lithuanian army breaks after heavy losses in the infantry especially:

I think my plan was reasonable but I didn't execute it well. The Teutons ended up doing little as I dithered over where to commit them and managed to split them into two groups after which a couple of low command roles resulted in half of them being unable to move at a critical time. 

The Hussite war wagons (to me at least) are pretty poor in ADLG, pretty much any infantry cut them down easily and anything they do well against can just ignore them. 

The army was pretty much my favourite DBM army and is capable of being fielded as most Eastern European armies such as Polish, Hungarian, Wallachian or fully Hussite so I really should try to use them more! 


Monday 5 October 2020

Chain of Command 30 Days to Dunkirk "Lestrem Blitzkrieg"

Jerry and I played the final scenario of his 30 Days to Dunkirk PSC. For this game I took the Germans while Jerry had the British.

The aim of the scenario is to get two infantry units off the far side of the table before the defenders can achieve two CoC dice to end the game. With 12 support points I chose a Stuka Bombardment, a Panzer II, a 'Red Dice' and two 'Shabby Nazi Tricks', the 5th Columnist and the Sniper.

The Germans start on the left with the British on the right. The Stuka Bombardment was immediately effective as the yellow house in the middle of the terrace was hit and rendered unstable while the house with the red roof had an UXB in it!:

The British deploy a section in entrenchments on the German left. Again the Stuka's paid off as they started with 11 shock! In response a Panzer II starts to move down the road while a German squad advances on the right with a mortar team in support:

The British attempt to deploy a section on the German right. It gets through the Stuka bombardment but a cunningly placed 5th Columnist impersonating Captain Mainwaring manages to persuade the Corporal that they are in the wrong place and should go back down the road they came from:

The tank continues to advance as does the first German squad. A second squad deploys next to the mortar team and both groups begin to engage the British infantry holed up in their entrenchments:

A 2pdr Anti-tank gun reveals itself and takes a shot at the Panzer II. It misses!:

The British finally manage to deploy a section on the German right together with their mortar team. Again though both are badly shocked from the Stuka bombardment. The Germans advance to engage them while they are still suffering from the shock:

The AT gun and Panzer II continue to exchange shots, the tank taking some damage while the gun loses crewmen and gains more shock. The final German squad moves up in support:

On the right the Germans are suffering losses despite having superior firepower as they are in the open:

Both the AT and the British section in the entrenchments are pinned. The section shortly breaks for the rear:

On the right the German squad makes it to the hedgerow after taking 50% losses but remarkably no shock to speak of:

The second German squad moves up to support the first and try to clear the British from the hedgerow:

They reach the hedge and open fire on the British who quickly break:

The Panzer II finally drives off the British AT. British morale has almost broken:

The remaining British surrender, the Germans will be pressing on to Dunkirk!:

This was another interesting CoC game which looked a tough task for the Germans.

None of us have used the Stuka Bombardment before I think and I must admit it seemed very effective, damaging two of the buildings, preventing Jerry deploying (he failed numerous attempts to deploy his senior leaders) and putting significant levels of shock on the units that did deploy.

As a result the Germans were able to advance with relative freedom as the British firepower was greatly reduced as they attempted to rally off all the shock they had from the Stukas. It also meant that some of them were pinned and almost broken before they even started. Having said that an early 'end of turn' would have negated it and Jerry was unlucky with his arrivals and the amount of shock they took.

Jerry's campaign has been great fun and provided much more interesting games than the Abbeville PSC Gary and I tried.