Wednesday 20 September 2023

Blucher 1809 Austrian v French

Our second 6mm game of Blucher, this time using 300 points of Austrians against Sean's French. Sean managed to out-manoeuvre me at the Scharnhorst map stage giving him 6 VP to my 4 VP, though with one of Sean's VP being on table if I could capture it we'd be equal on 4 VP each:

Both sides had three columns on table and one off-table, I had one potentially arriving on the French left flank while Sean had one arriving behind his left flank.

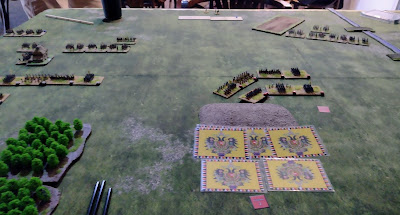
The initial set up. The Austrians plan is to capture the VP village the French hold on the Austrian left, attacking it with an infantry corps supported by the reserve corps which is deployed in the centre. The Austrian corps on their right will cross the stream and redeploy to the right of the reserve corps:


The Austrians waste no time moving to attack the village and starting a preliminary bombardment with heavy artillery:


The corps on the right flank redeploys across the stream as planned:

The French defend the village with infantry and a dragoon division:

The plan unfolds with the reserve corps moving up to support the attack on the village. the French, however, have countered with a cuirassier division in their centre:

Austrian hussars clash with French dragoons but get the worst of the combat:

Grenadiers from the reserve corps are more successful, breaking a French allied infantry brigade:

The Austrian attack progresses while the reserve corps cuirassiers hold off their French counterparts:

The Austrian hussars regroup behind their infantry, surprisingly the infantry are quite successful at shooting down French dragoons:

The overall picture (other than the columns which were off-table and had now arrived but were not really engaged at all):

Austrian grenadiers demolishing more French allied infantry:

Gaps are starting to appear in the French lines with brigades starting to break on both sides:

At this point after three hours with battle fatigue setting in we still had several turns to play until nightfall and both armies were a fair way from their break points so we decided to stop here. 

The French line was staring to collapse but the Austrians had suffered similar losses and both sides had several vulnerable brigades so the outcome was very much in doubt still. 

Playing at 300 points with 6mm armies certainly makes it look like a battle, but the extra MO to move units every turn (three MO dice instead of two at 200 points) results in the turns not unreasonably taking longer to play and it being somewhat easier to withdraw damaged brigades before they rout. A smaller table might have helped but I'm not sure how much as it is the MO dice that limit what you can do really, not the table size (the same issues arise in 300 point 15mm games where the table is relatively smaller).

Thursday 14 September 2023

Longstreet 'The Crossroads' Union v Confederate

After a considerable gap I thought I'd revisit Sam Mustafa's 'Longstreet' ACW rules, partly as they have an interesting campaign system and partly as they need less space than 'Fire and Fury'. When I played them years ago I wasn't that enthusiastic about them (partly as I really like F&F) and lost interest quite quickly without really giving them much of a chance.

In this game my Union force took on Ian's Rebels. Each side starts off with a brigade sized force of three infantry regiments, a cavalry regiment and an artillery battery. The game is run partly by a card deck and partly by dice.

The scenario we went for was the encounter at a crossroads, Ian won the initiative and decided to attack.

My force deploys to defend the crossroads. As we don't know if the Reb's will attempt to out-flank us one infantry regiment and the cavalry are in reserve:


The Rebels choose a simple frontal assault, hoping to overwhelm the Union front line before the reserves can move up:

Union artillery and infantry open fire. defending the fence line gives them an advantage in combat:

Unfortunately Ian plays one of his cards, 'Confusion' to move the Union infantry over the fence towards the Rebel attack! Obviously the men felt the Reb's were wavering and a solid advance would drive them off:

The union men regret their choice as the Rebels charge!:

The Union regiment is forced back and takes some losses but mitigate the situation with a 'like a Stone Wall' card that improves their defence against the charge:

The cavalry also clash:

Volley fire rolls along the Union lines hitting the advancing Rebels:

the Reb's charge again, this time engaging the artillery as well as the infantry regiment:

The Union cavalry is gradually being pushed back:

The Union artillery is forced to limber up and retreat leaving one gun behind while the infantry fall back over the fence:

At this point we called it a day as we'd spent quite a while going through the rules reminding ourselves how to play. It was more fun than I remembered, when/if to use the cards (either to activate units, 'save' hits or for their special effects) is something to think about for sure.

The balance of the game also changes over time, in 1861 the Rebels tend to have the advantage while the Union becomes better in the later years. 

The campaign system follows a single brigade over the war and, I think, is really designed for multiple players but Ian and I enjoyed our game so we are going to start a campaign off with our next game and see how it goes. It was certainly good to get the boys in blue and grey out again even if it was only a small proportion of them!

Monday 11 September 2023

ADLG Umayyad Arab v Khazar

Another practice game for one of Gordon's future competitions, this time with a Dark Ages theme. Gordon was trying out Khazars which was a slight problem as I'd consigned all my Dark Ages armies to the loft!

Looking at the lists Umayyad Arab seemed a suitable historical(ish) opponent especially as not all the army had been relocated yet. A search found some, but not all, of the rest of it leading to a composition I probably wouldn't have chosen had I been able to find them all!

However, when we chose the terrain it appeared that the unusual army composition might be an advantage. Gordon was expecting massed heavy spearmen and impact mounted (the figures I couldn't find) and as a result picked a lot of rough terrain which suited me as I had a fair few medium foot including some of the fearsome Dylami impact swordsmen. As a result the table was very cluttered. 

Gordon had a flank march which was allied and went unreliable, his mounted were facing mixed heavy spear and bow and his Slav medium infantry up against my better quality Dylami and medium spear. So far so good:


Both sides move up to contest the plantation:

The Khazars attempt to redeploy their mounted wing:

The Umayyad heavy foot advance anyway hoping to outflank the Slavs while the cavalry and bowmen redeploy themselves:

Crunch! The orchard is the scene of heavy fighting:

The Umayyad's fight hard and gain the upper hand:

The Khazar cavalry have few opportunities to get into the fight:

Losses rack up for both sides. The Khazar flank march continues to fail to arrive:

The Umayyad heavy foot are starting to threaten the Khazar's flanks while the mounted and bowmen from the right flank will soon be in action as well:

The Umayyads have constructed a solid line of battle while the Khazars are struggling to get much of their army into action:

With the Khazar flank march due to arrive next turn the Umayyads manage to get the last few hits to break the Khazar on-table army giving victory to the Arabs:

An interesting and fun (for me, less so for Gordon!) game where my unusual army composition paid off helped considerably by the initial deployment being heavily in my favour and Gordon's flank march failing to turn up (though flank marching with an allied general is risky). 

The Arabs had not had a run out in years, I'd forgotten I had rebased many of them for FoG-R (which was why I had so few heavy spear) and I'm not sure what happened to the rest of the army (the generals and loads of light horse) but they must be somewhere....

Tuesday 5 September 2023

'O' Group Scenario 2 'ROADS TO MOSCOW, 1941' Soviets v Germans

The second scenario in the Eastern Front 'O' Group supplement is 'Roads to Moscow' following on from Dave and I's play through of Scenario 1. 

The forces are a bit bigger in this scenario with both sides having access to armour in numbers. The Germans have to capture the town of Voin in 25 turns or force the Soviets to withdraw. As previously I took the Soviets and Dave the Germans. The town of Voin is in the middle of the table:


The Germans immediately mass on the Soviet right with armoured cars, tanks and infantry moving forward:

The Soviets respond with an ambush by two BT-7's dug in on the hill and an infantry platoon:

While the BT-7's have some success, driving off the German armoured cars and destroying one of them, the Soviet infantry take a battering becoming suppressed and losing two platoons:

The initially deployed Soviet infantry company is wiped out so a second deploys behind the hill together with four T24/76's to hold the flank. The Germans have made good progress moving up on the Soviet right:

The BT-7's have done a sterling job holding back the German armour. Unfortunately the Germans manage to deploy an 88mm gun which promptly and scarily wrecks a T34:

Desperate to deal with the 88mm the Soviets shoot everything at it that can, the last possible shot finally taking it out:

The town is still relatively peaceful and in no danger yet:

A German artillery strike rains down on the hill destroying a BT-7 and badly damaging the two nearby T-34's and Soviet infantry:

The Soviets desperately rally their men:

The last BT-7 is finally brewed up, for light tanks they put up a great fight against superior German armour:

At this point we finished the game. I think we'd probably got through maybe 12 to 15 turns so there were still another 10 or so to go. The Soviets had lost some infantry and most of their tanks while the Germans had lost far less they had not really got any closer to taking the town so the game was definitely still in the balance and could have gone either way.

'O' group are an interesting set of rules but quite hard to pick up I think, as with the first game we did several things wrongly on post-game re-reading of the rules. 

I suspect you'd need to play quite a bit to get the hang of the rules, how best to use your troops and speed up the turns which is fine (and indeed good) if you want to play a lot of games but perhaps not so suitable for the odd game now and then which is probably what I'll actually play.


Samurai skirmish

Another multi-player game in Norfolk, this time a Samurai skirmish hosted by Bill. Rich and I took the part of the Samurai lord attempting to reassert control over some rebellious peasants lead by a mysterious warrior monk. Our mission was to find and 'take care of' the troublesome monk.

My retinue, two Ashigaru with spears and two with bows:


A close up of my Samurai, the mightiest warrior in Japan!

There were a number of locations where the monk could be hiding and numerous peasants wandering around. I decided to investigate the Japanese Garden, largely as it looked so fantastic:

Rich lead his men to a large house. His Samurai follower embarrassingly got killed by a rogue Ashigaru while Rich administered some punishment for being disrespectful outside:

I find three more rogue Ashigaru in the Garden:

We rush into combat and one rogue Ashigaru is felled:

A second rebel is despatched:

The Garden is cleared. My archers take pot-shots at peasants while securing the gate to the Garden:

With no sign of the Monk we move out to continue the search:

This building looks nice but contains nothing:

Rich has lost a few followers but closes in with my men to the last remaining house. The remaining peasants huddle outside:

I detach one of my archers to take a look behind the building:

Spotting what seems to be a lurking peasant the archer fires and wounds him:

With nowhere else to hide the Monk rushes out and engages Rich's Samurai Lord, wounding him but then being surrounded. The wounded peasant from the rear of the building has turned run up to help the monk:

The Monk is cut down (by my Samurai from behind, not especially honourable I suspect but efficient):

Remarkably the wounded peasant then runs up to the Samurai Lord and kills him! It appears we were tricked, the 'Monk' was actually a follower in Monk's robes while the peasant my man shot behind the building was the actual Monk:

With the Samurai Lord dead and the Monk about to be overwhelmed we called it a day and a draw, the revolting peasants had managed to kill two Samurai but had lost numerous peasants and the charismatic and very effective Monk. 

Admittedly from my Samurai's point of view things had gone rather well, no losses from his men and as the only surviving Samurai he should now be in charge of a load of cowed peasants with his loyal followers to enforce further discipline if needed!

A good fun game as ever with some really nice terrain and figures which Bill provided, the Japanese Garden was especially splendid with it's cherry tree in blossom. Of course it has tempted me to buy a small Samurai force of my own......