Friday 17 September 2021

Chain of Command 24 hours to Basildon Scenario Five: "St George and the Dragon"

It is 05:00 on the 5th of July 1940. Since the Nazi invasion of the UK the LDV and Home Guard have attempted to slow the German advance but have only managed one success so far, in Scenario 3 "In the Steps of Boudiccea". The LDV were dispersed after the second scenario while the Home Guard had taken catastrophic losses in almost but not quite holding Gary's Germans back in the last engagement.

As a result the if the Germans succeed in this attack they will be able to take Romford before the Regular British army can intervene giving them a minor victory. On the other hand if the remnants of the Home Guard can somehow hold on at 06:00 the Regulars will arrive to reinforce them and Romford should be held.

I reorganised the remnants of the Home Guard into two sections of nine men with the Captain and Sergeant both being reduced to two command initiatives and only a 6" command radius. With 11 support points available I chose the almost ever-present Vickers MMG, a Smith Gun, an upgrade for the section BAR to a Lewis Gun, an extra BAR, an entrenchment and two minefields. I also had a free group of 'Have a Go Hero's' .

The terrain was reasonably suited to the defence. Gary provided the titular pub, the "St George and the Dragon":


The Germans are approaching from the left, the British the right:

The plan such as it was had the two minefields placed behind the fencing on the German right hopefully preventing the Germans setting up a powerful fire support base behind them. This would force the Germans to either attack in the open on the right or concentrate their forces and advance through the gardens and buildings on their left. Perhaps if they split their forces it would be possible to destroy one half before the other half could get into action?

The Germans commence announcing a Stuka attack which damaged some of the buildings and by deploying an infantry gun in the open:

An infantry squad appears and begins to advance:

The infantry continue to advance supported by a second squad:

A mortar team and the Lieutenant join the infantry gun. So far the British plan is sort of working but they have not been able to end the turn to remove the Stuka attack or have any useful command dice to deploy: 

The German infantry are making rapid progress through the gardens and will soon be shutting down the British jump off points. The end terrace building contains an unexploded bomb dropped by a Stuka so both sides are somewhat wary of going near it!:

Again the British command dice are not kind, they can only deploy a single team, the Vickers MMG, and the Stuka attack results in 4 shock for the team. With no leader they will find it hard to recover from this shock:

The German infantry push forwards again:

After picking off one of the German mortar crew and wounding the Lieutenant the Vickers MMG crew break from a combination of losses and shock in the German return fire: 

The Smith Gun manages to make it through the Stuka attack with only a single shock point. It opens fire on the Germans advancing towards the pub and kills one:

The Germans quickly respond by moving out of the line of fire:

The final German squad is advancing in the open on the British left. The only JOP the British have left is behind the hedges though they have at least managed to end the turn finishing the Stuka attack:

Finally the Home Guard manage to deploy a section, partly behind the hedge and partly in the entrenchment which the Vickers had been occupying. They open fire and kill the German mortar team together with wounding the JL commanding the infantry gun:

The last few defenders, all there is left to deploy is a single section which has failed to come on yet:

The Germans concentrate fire from their infantry gun and the squad advancing in the open. Eight hits from the infantry squad at long range on men in hard and soft cover results in four dead and two shock after three men had already gone down in the previous round of firing:

The remaining man and the Sergeant break taking the British force morale down to one and winning the game for the Germans!:

The plan I had actually went quite well, Gary did split his force and would have had difficulty supporting each part with the other. However, the Stuka attack combined with the lack of ability to deploy caused by having only four command dice meant that I couldn't get my limited force into action quickly enough to take advantage of the situation resulting in my having to deploy piecemeal and each unit I did deploy being quickly overwhelmed by German firepower. 

At the end of the campaign after six games the Germans won a minor victory, to win a major one they couldn't afford to lose a single game! Given how weak the British are that's probably fair enough and there were a couple of occasions when, if things had gone slightly better or I'd made some different decisions, they could have won more. 

We both really enjoyed all the games, looking forward to the next one each time and giving each game quite a bit of thought beforehand both on the support choices and how to approach the game. I bought and painted a lot of new figures and kit for the campaign and the quirkiness of some of these added to the fun of playing, in the end everything made it onto the table apart from the Blacker Bombard. Gary made some buildings specifically for it as well having already umpired one play though of the campaign between Dave and Jerry.

I'd certainly recommend this campaign and would happily play it again either as the Germans or British. For now I'll be continuing the Saipan campaign against Tim and looking at what Gary and I can do next, ideally I'd like to use my Russians for a change!

Wednesday 15 September 2021

Cruel Seas Imperial Japanese Navy

Having completed the Imperial Japanese Army and partly inspired by Mike's efforts with the rather poor Italian ships I thought I'd invest in a discounted Warlord Imperial Japanese Navy fleet starter set for Cruel Seas from Warlord via Wayland Games. The set comes with quite a few ships and seems much better value than buying everything individually.

On opening it the first ship, a Hei-type Escort Minesweeper, was a HUGE model compared to all the others I have. As with the IJA I put a bit more effort into painting these models:


A view from above showing the extensive armament the ship has, if it hits anything it will ceratinly do some damage! However being a 'large' vessel it will also be very vulnerable to torpedoes:

Next in the box were some large Sampans, ancient technology which became far more important for the Japanese as their conventional merchant marine was sunk leaving them to rely largely on these old boats and specially adapted Destroyers and Submarines to move supplies. There are two slightly different versions:

The second version:

The Japanese apparently didn't have much enthusiasm for MTB and the T-14 class MTB perhaps demonstrates this having a mere 15 hull points (one moderate hit could sink one!) and being armed only with a single 20mm gun plus a couple of machine guns and two torpedoes:

Viewed from above:

As with the other branches of the Japanese military in desperation some suicide weapons were developed by the IJN. Three Maru-ni Kamikaze boats make up a group in Cruel Seas. These are armed with a depth charge which very optimistically the pilot was meant to drop in front of an opposing ship:

The second type, Shin'yo Kamikaze boats, are armed with rockets:

Finally the box contained a single aircraft, the Aichi D3A 'Val':

The box provides a decent force to start off playing the IJN in Cruel Seas without the need for any additions really though it would be possible to add some landing craft and a Sub-Chaser for some more variety and extra aircraft. The initial resin model of the Minesweeper was badly buckled so Warlord sent me a replacement leaving me with the hull of the first one unused, after some hot water treatment I managed to straighten it out a bit and there are some spare guns from the Sampans I could fit it with perhaps. I certainly don't think I'd ever need two Minesweepers though so perhaps if I gather sufficient enthusiasm I'll try to make it into a stripped-down cargo carrying version (my almost total lack of naval knowledge means I have no idea if they did this but they certainly did with destroyers so it is possible I guess!).

Unlike when I put a bit more effort into painting the 20mm IJA and they looked a bit better than the 20mm Vietnam forces I'd just painted to play with I think these ships look substantially better than the other Cruel Seas stuff I've done and making me wonder if it is worth repainting some of the earlier models or just accepting that these ones just look nicer!

One thing that is lacking is flags, the ones Warlord supply are printed in a 'wavy' format and are extremely hard to cut out and glue being so tiny. I tried printing some out on paper and painting over them but again, being so small and with the rising sun design being very difficult to print or colour they didn't really work either so I'm still thinking about that!


Thursday 9 September 2021

Chain of Command Saipan scenario one "D-Day at Red Beach"

The start of another PSC, this time the Saipan one with my Japanese against Tim's USMC. The first scenario sees the Americans attempting a beach landing in the face of the Japanese which is an interesting concept and is certainly a different scenario to those I've been used to!

The Japanese start off with some entrenchments, tank traps and a bunker, with 9 support points I went for an MMG team, a 37mm AT gun, an entrenchment and a minefield. The Americans have a huge 20 support points but are unable to select any tanks being restricted to the use of LVT's in this scenario.

The patrol phase went largely as expected with the Marines getting JOP's on the beach behind the embankment and the Japanese JOP's being around their fortifications:


The first Marines arrive! All their squads suffer from an automatic loss of men when deploying in the first turn and Tim was rather unlucky with this as each squad lost the maximum three men! There is also an AT gun lurking in the woods:

A second squad appears and moves around the minefield into the woods:

The third USMC squad arrives and the Americans begin to advance:

PSC tend to lead to additions to a force, in this case Tim had acquired an LVT (A)-1 which started splashing through the sea: 

The USMC continues to advance, they are exposed in the open but poor command dice from the Japanese has prevented them deploying so far. If no one appears soon it will be an easy victory for the Marines!

Another less than ideal command dice roll means that all the Japanese can deploy is a MMG in an entrenchment. It opens fire but has little effect despite the Marines being in the open:

The Marines continue to push forward. At last one of the Japanese squads arrives and deploys into the entrenchment:

Following some preparatory shooting which kills the Japanese corporal the Marines assault the Japanese line!:

The resulting fight is short and very bloody with both sides being rated as 'aggressive'. All the Marines are wiped out and only two Japanese survive, the Japanese survivors promptly rout due to shock:

Finally the Japanese get a good command roll and deploy most of the remainder of their force. The Marines are now in a tricky position in the open and facing some serious firepower:

Both sides exchange fire. Despite being caught in the open the Marines hold up well:

The Marine section on the Japanese left is pinned and almost broken. In the centre a scout team grimly hangs on while on the right the Marines have fallen back into cover. The Japanese are also taking losses especially on the left hand squad. Having taken a lot of damage the Japanese are now gambling on winning the scenario, if they lose they won't have much of a force for the next game:

The Marines on the right break and run! Amazingly the scout team are still holding on in the centre!:

The LVT (A)-1 finally hits the beach! It opens fire on the Japanese to support the battered Marines in front of it:

An LVT-4 (the venerable Airfix kit!) had earlier arrived but had failed to move forward. Taking it in their sights the Japanese AT gun looses off a round at it. The gunner must have been an excellent shot or lucky as the shot hits home and forces the LVT-4 to retire off table! Both sides force morale is now dropping with the Marines in serious trouble:

The Marines have brought on another section but Japanese fire has broken the last of the initial Marine sections and finally driven off the scout team. Their morale breaks and the Marines sullenly retire to the beach! The victory has come at a huge cost for the Japanese though as another section of their platoon has routed on the left: 

The surviving Japanese hold the line for the Emperor! Their numbers are sadly reduced though:

Overall losses were 24 men for the Japanese resulting in them being down 11 men for the next game (7 dead and 4 wounded). As I have to play the first three scenarios with the same platoon that's not great but we have scored our first delay to the American plan. The Marines lost 25 men but that does not really matter as they get a fresh platoon for every attempt at the beach landing though the losses do affect the men's opinion.

Looking at the map for the next scenario it didn't seem particularly suitable for defence so I've opted to stay and defend the beach again. The Japanese need to score three wins to get a draw in the campaign, any more than that would be a victory. It will be harder to win the second time as Tim probably learnt a lot from the first attempt and I'll have considerably fewer men. On the positive front though I'll get to keep the defences I bought in the first game and have a 'free' extra one so the position will be stronger.

As ever with these campaigns it will be a balance between trying to hold the beach again and ensuring I have something left to use in the next two scenarios (or accept that I'll just concede those). It was certainly a close, fun game and quite different to the usual scenarios I've played!

Tuesday 7 September 2021

Chain of Command Imperial Japanese Army additions

Just a couple more items for the IJA, both from Early War Miniatures, to give the army a bit more hitting power!

First the toughest tank the Japanese get I think though that isn't saying much, the mighty Type 97 Kai Shinhoto Ch-Ha:


Secondly a better AT gun, the 47mm Type 1 AT Gun:

These should help out against any armour the Americans field and have more chance of success than the poor tank killer team guys!


Sunday 5 September 2021

Chain of Command 24 Hours to Basildon Scenario 4 "A Delaying Action"

 After successfully holding the Germans up in the previous scenario then fallen back after the second German attack the Home Guard finds itself defending Hey Bridge at 04:00 in the morning. Since they failed to get the despatch rider away in the last game they can only deploy three teams in the first turn though they do get a Bofor's gun emplaced covering the road and some Barmy Land Army girls to bolster the remaining Home Guard.

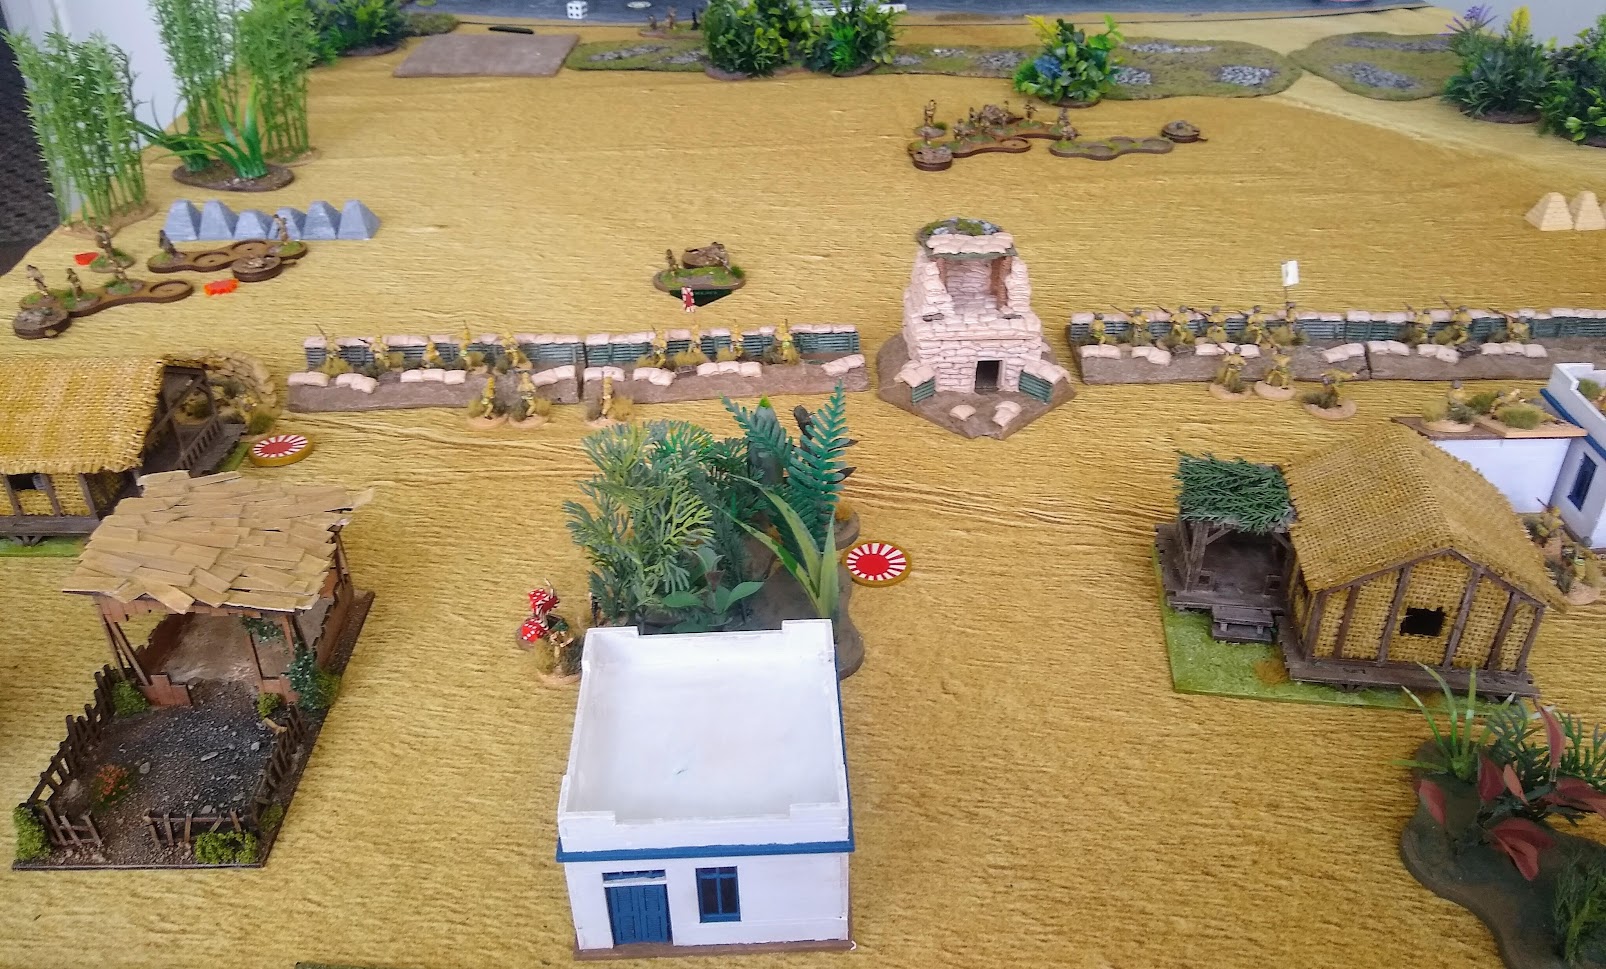
Looking at the map it appeared there were three routes down which the Germans could attack, along the road (covered by the Bofor's though) or down either flank. Both provided decent cover to move through and it seemed likely that unless the first turn ended quickly the Germans could easily over-run the position quickly. 

The campaign is at a crucial stage now where Gary can't afford another loss but has a new platoon available while I can afford another loss but am rapidly running out of men! As a result the best plan I could come up with was to try to kill as many Germans as possible while losing as few as possible of my core platoon. For support I went for the fairly useless Beaverette armoured car (it has no leader so only activates on a 1 and then can only move or shoot not both!) at 3pts, the ever-useful Vickers MMG at another 3pts and an upgrade of the squad BAR to a Lewis gun at 1pt.

The game started well with British force morale at 9 compared to the German's 8 and the patrol phase gave us both jump-off points not that far apart as I'd suspected. The red roofed house near the bridge has been made into a "Keep" as per the British national characteristics:


The emplaced Bofor's gun covering the road, this is actually Gary's model as I didn't bother buying one:

First to appear for the Home Guard is the Beaverette armoured car. I was hoping it could move to either flank depending on where the Germans attacked. In fact it never moved or fired again in the whole game!:

Germans start to appear and move forwards:

More Germans start to advance on the other flank:

The first squad of Germans moves towards the river bank. The British have a JOP in the house with the blue door but will they be able to deploy anyone?:

The British have some luck with the Vickers MMG successfully deploying and a double turn at the same time! The Germans, caught in the open, suffer two men dead from the opening fire:

The Vickers fires again and takes out three more Germans! Though it is a support squad and so the losses won't be carried over into the core platoon the losses are still painful for the Germans:

To bolster the Vickers the Barmy Land Army girls also deploy in the house:

The recently promoted Home Guard Sergeant joins the Bofor's gun crew to direct their fire (otherwise, not having a Junior Leader, it only activated on a 1 as will the Vickers and the Beaverette!):

On the other flank the Germans continue their advance with a second squad backing up the one in front. No British have appeared here yet:

The battered Germans fall back out of the line of sight of the Vickers:

More good news for the Home Guard as a full CoC dice lets them end the turn removing the three team restriction on deployment. The squad with the Lewis gun deploys in the keep just in time to prevent the German infantry just walking into it:

With few targets the Home Guard Sergeant decides he would be of more use in the house with the Vickers and Land Army girls. He does not move as far as he had hoped however:

An oversight from the Sergeant, if you look in the distance the German squad between the houses has a line of sight to him and he is alone. Oh dear:

The Germans open fire and get a single hit on the Sergeant. Being a Sergeant in the Home Guard appears to have a very, very, very short life expectancy as he tumbles to the floor dead!:

The Germans that were attempting to advance around the British right flank have given up and are now moving along the hedge next to the road having been reinforced with the remnants of the core platoon's third squad and the mortar team:

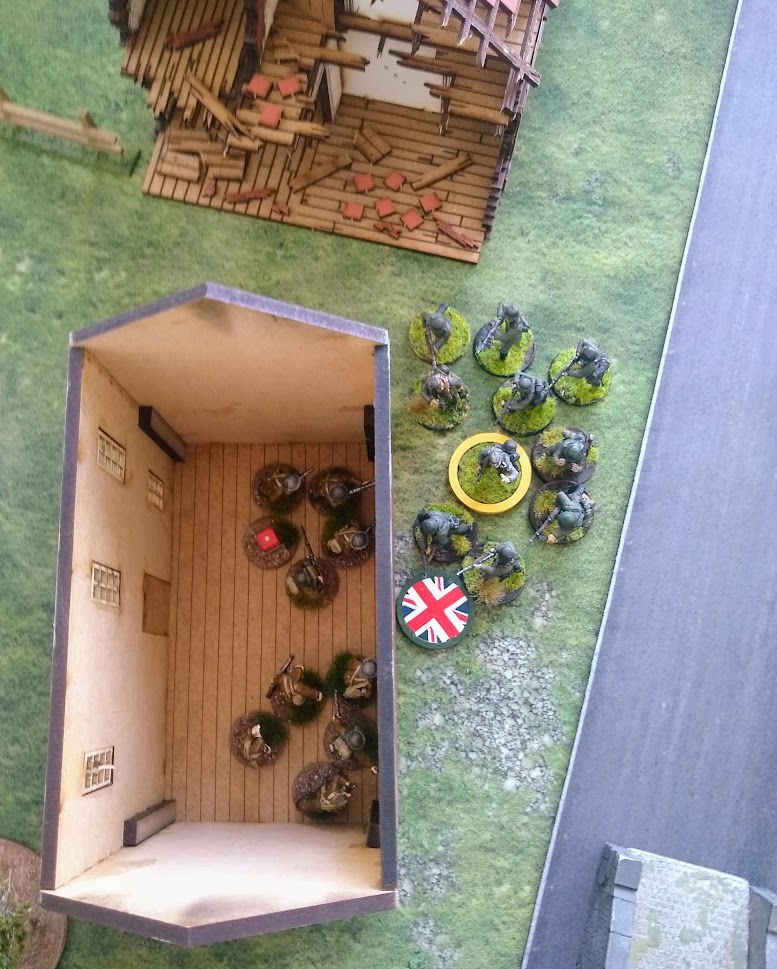
At this point I think both Gary and I were fairly confident what the outcome was going to be. The British were in a strong position and there didn't seem to be many options open to the Germans at all. More in hope than expectation te Germans decide to launch a handgrenaten attack on the British squad in the keep (there was another squad upstairs as well!):

With 19 dice against 13 the odds were very much against the Germans though helped by the fact they they had a SMG with their leader and the British had no automatic weapons at all. The outcome was disastrous for the Home Guard though as they only killed two Germans (against an average of 6 expected kills) while the Germans killed five British (against an average of 4 expected kills)! the Germans had also managed to shoot three of the Bofor's crew despite them being in hard cover:

In a matter of minutes the situation had changed from very optimistic to disastrous for the Home Guard as the section in the Keep fled out of the back door of the house leaving the victorious Germans holding the lower floor while the second British squad held the upstairs:

The Home Guard Captain had deployed with the Vickers MMG and the Land Girls but there was little for them to shoot at. As a result he had decided to move out and take control of the Bofor's but now the crew had mostly been killed this didn't seem such a good idea!:

Fire from the German squad in the distance breaks the squad which had fled from the house, killing two more men. The situation is now looking very bad for the Home Guard and force morale was rapidly falling:

I wanted to withdraw but realised that if I did all the men in the upper floor of the Keep would be captured. Figuring that a Do or Die charge was the only way out the valiant Home Guard charged down the stairs into the waiting Germans. This time the odds were very much against them with a mere ten dice against the Germans sixteen or so. There was no miracle on this occasion with five Home Guard going down and the Corporal being wounded for only two Germans hit. 

The Germans had one more phase but didn't achieve anything much before the Home Guard withdrew having suffered huge losses again:

The British losses were devastating, fifteen men from the core platoon including the Sergeant yet again with another four from the Bofor's crew. The Germans lost, I think, around 10 men but as they were mainly from their support squad and they had a three force morale advantage that's only one permanently lost.

Neither of us had ever seen a game of CoC change so quickly from both Gary and I thinking it was all over for the Germans to it being (almost) all over for me! I had some luck of my own though of course, ending the turn quickly and getting to deploy mostly when I wanted to. I also made some mistakes which I should learn from, I shouldn't have moved the Sergeant from the Bofor's gun and I should certainly have deployed both sections in the Keep on the ground floor as we'd agreed that men in the upper floor couldn't see over the hedges anyway so it didn't actually improve my field of fire. An expensive lesson but hopefully one I will take forward!

I think Gary played it well in addition, taking an extra squad was something I'd not anticipated and he cleverly managed his losses so the vast majority came from that extra squad. He took a big chance with the charge (inspired by the playing style of one of our club members, Jerry, who plays in a much more mobile and aggressive way than the rest of us!) but it paid off for him.  

As a result the next game will be Scenario 5 "St George and the Dragon. The battered Home Guard will be down 15 men leaving only 17 available including the Captain (whose men are almost ready to shoot him 'accidentally'!) and the third (or is it fourth?) Sergeant to sew his stripes on in the campaign! My force morale dice will be at -2 and I'll have one less support point as the C-in-C has lost confidence in the Captain. Backs are certainly against the wall.

Having said that Gary still needs to win the next game at 05:00 to achieve a minor victory. He has a full new platoon available (though it is a measure of how caught up in these campaigns you can get that he was worried that his original platoon would be 'upset' if he replaced them after they had fought so hard so far!). 

We rolled for support and got a full 12 points (or 11 in my case) so I will be able to bolster my men and position with some reinforcements at least and, having come this far, it seems only fair to finish the campaign though I have little confidence it will end well. 

Still to quote our inspiration, Winston Churchill, "We shall fight on the beaches, we shall fight on the landing grounds, we shall fight in the fields and in the streets, we shall fight in the hills; we shall never surrender!" and all is not yet lost, perhaps we can snatch victory from the jaws of defeat yet!