Monday 31 August 2020

ADLG HYW English v HYW French

The second outing for the new(ish) HYW English army saw them take on Stan's HYW French at 200pts this time.

I went for two mixed foot commands and a small command of mounted knights. The terrain included an impassable river, a lake and a couple of woods:

On the left the Black Prince moves over to face the French crossbowmen and mounted knights while the Earl of Oxford leads the English mounted knights towards the centre:

On the right King Edward III faces a mass of dismounted French knights and the possibility of an ambush lurking in the woods:

The initial shooting goes in favour of the English:

The lines close on each other. The French foot knights are tough opponents but have some gaps in their formations which the English might be able to exploit:

The opposing forces clash in the centre! Though outnumbered the French foot knights cut down an English mounted knight. Surprisingly the English longbowmen hold the initial French charge:

As the King prepares to engage the French on the right a horde of Brigans rushes out of the woods. Though mediocre in quality the English only have a single Hobilar and the two Irish Kerns to face them:

In the centre and left the English hold on as they attempt to work the flanks of the French knights. So far they are doing well:

Disaster follows though as much of the Black Princes command is routed in a single turn. On the right the King's men are in combat:

The Black Princes command is reduced to a few scattered elements. Vicious fighting on the right sees both armies sustain losses:

The French mop up the remains of the English left flank:

The Black Prince leads a desperate charge against some French crossbowmen but does not damage them and will soon be hit in the flank by French knights:

On the right the King is slowly gaining the upper hand assisted by the Earl of Oxford. Both armies are close to breaking:

Further combat sees enough English cut down to break the army with the French teetering on demoralisation themselves but surviving for the win:

For a long time the battle seemed winnable for the English but a couple of bad turns saw the Longbowmen collapse against the French knights very quickly. In reality the Longbowmen are quite poor against the foot knights, to shoot them they need to overcome a two factor disadvantage while in combat it is even worse so they perhaps did well to last as long as they did.

I think perhaps I should have taken my mounted knights as impetuous as well, without impact they are not great against foot knights being on equal factors but only needing 3 hits to die instead of 4 plus the effect of the 2HCW.

Another enjoyable game anyway and I'm certainly getting some use out of the English army!

TMOCB Further Additions

My Vietnam collection continues to grow as my enthusiasm for it is unabated! The latest additions are from Britannia Miniatures plus some of the Esci plastic figures I didn't get around to painting the first time.

After my efforts at making bunkers for the Firebase game I decided to just buy an artillery emplacement:

It looks much better than my attempts and, as it is larger than 6" square, I think it will make two terrain elements for the Firebase, the emplacement itself and the ammunition bunker.

I also ordered two M551 Sheridan tanks. These are resin models and initially I wasn't that impressed with them, however they cleaned up nicely and I'm pleased with the final models once they were painted:

As I know little about Vietnam era tanks (or to be fair tanks in general) I did some "research" (aka Wikipedia) to find out more about them. The Sheridan was designed to be parachute dropped and to be able to swim rivers. It was introduced into the US Army in 1967 and rushed into service in Vietnam in 1969. General Westmoreland, the Vietnam C-in-C, when urged by the general staff to deploy the Sheridan to Vietnam earlier argued that it was in fact a $300,000 machine gun platform!

It appears to have had a number of drawbacks, as the hull was made of steel (!) it was very vulnerable to RPG and mines though it could stop machine gun bullets. The ammunition for the main gun was not available in Vietnam until 1968 and in any case actually firing it badly affected the delicate electronics it was fitted with. A number of upgrades were made to the model and it continued in service until 1996.

I thought perhaps I'd need more casualty figures so ordered a few packs more:

Finally I painted up some left over figures from the Esci plastic box of US Special Forces and a few odd Britannia Americans I had left over that had been on the painting table for ages including a mortar and crew and a sniffer dog and handler:

As I liked the artillery emplacement I've now ordered a command bunker, mortar emplacement and a watch tower which will give me enough stuff to complete the interior of the firebase without having to mess around with more DAS clay!


Tuesday 25 August 2020

Chain of Command Abbeville 1940 "4th Camerons attack at Huchennville"

In a similar way to my last game against Andy this CoC campaign game against Gary had been postponed for several months being the third game of the Abbeville campaign set in 1940 with me as the Germans and Gary as the BEF.

This was the last game in which the BEF attacks and again the table was fairly open with just a couple of buildings, some limited woods and a few hedgerows. With 14 support points each I went for 4 entrenchments, a preliminary barrage, two shabby Nazi tricks and a very expensive (at 6 SP) Stug III mainly because I wanted to use the model but partly as I felt it would be effective against Gary's British/French armour. As the scenario is 'Swift to Support' the Stug will not be available until Turn 2 though.

The patrol phase went in a rather unexpected way as I'd assumed we would end up playing lengthways along the table but we ended up playing across it:

One German squad deploys behind entrenchments on the road to stop the sneaky and speedy British AC racing down the road and taking out German JoP:

The British appear among the trees and are faced by a second German squad, again entrenched:

British support in the form of a Renault R39 tank appears. Until the Stug arrives the Germans have no answer to the tank really:

The AC deploys and races over to help out the British in the wood:

The 5th Column sniper opens fire on the British. In the entire game he manages two shots, one of which causes a point of shock and the second misses!

The second shabby Nazi trick is another 5th Columnist looking suspiciously like Captain Mainwaring. He prevents the British Sergeant from deploying for a couple of moves:

The Stug III arrives and takes a shot at the armoured car, hitting but only making the car withdraw a little:

The British start deploying smoke to cover their advance:

The mortar crew do a great job for the British, dropping the smoke exactly where it is needed:

More British infantry move up. They have taken a few casualties as have the defending Germans:

Disaster strikes for the British though as just before they are ready to assault strong winds disperse the smoke leaving the British infantry very exposed:

The third German squad deploys and the British attack stalls:

The Stug III is reluctant to leave the woods:

Two British squads break and their force morale falls to zero routing them:

So a third defensive win in a row for the Germans in the campaign making it hard for the British to stop the Germans winning the campaign when they go over to the offensive.

Gary was unlucky in this game, most of the drop in his force morale came from injured officers who dropped like flies. He used the smoke very effectively to reduce the effect of the Stug and the superior German firepower but the smoke dispersed at exactly the wrong moment for him allowing the Germans to cut down the advancing British.

Given the difficulty for the British to win the campaign now I'm not sure if we will continue or maybe start a different one next time.

Thursday 20 August 2020

Black Sea's Spanish v English

Dave kindly agreed to give me a game of Black Seas using all the larger ships I'd made up over lockdown.

Having only four English ships (1 x 1st Rate and 3 x 3rd Rate) against seven Spanish (1 x 1st Rate and 6 x 3rd Rate) I made all the English crews veteran and all the Spanish inexperienced to try to even the fight up a bit and gave Dave the choice of sides.

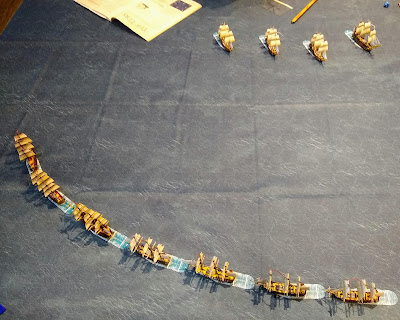
Dave opted for quality over quantity and chose the English. The Spanish deployed in a long line (Monarcha, San Justo, Santisima Trinidad, Argo, Santa Ana, Santa Margarita and San Francisco) while the English deployed heading for the Spanish line:

The English charge forward though their 1st Rate is falling back and out of the action for now:

The fleets close and will open fire soon, the English look very outnumbered:

An English 3rd Rate catches fire! Despite a whole load of lead being thrown at the English very little of it hits:

The entire Spanish fleet is firing while the English have mainly bow chasers to reply with. The veteran English crew easily puts out the fire:

The Spanish line breaks up and the rear ships come under fire from the English 3rd rates:

The Santa Maria and San Francisco take a pounding as does the Santisima Trinidad. Spanish fire is still ineffective:

The English 1st Rate moves into range:

The San Francisco is on fire as is the Santisima Trinidad. The inexperienced Spanish crews can't put the fires out:

The English 1st Rate pounds the Spanish:

The San Francisco has struck her colours while the blaze on the Santisima Trinidad rages on inflicting more damage as the crew fail to douse the flames. The English 1st Rate also catches fire but again the veteran crew quickly put the flames out:

The Santa Margarita exchanges close range broadsides with an English 3rd Rate:

The Santa Margarita strikes! The Santisima Trinidad is close to striking when the crew finally put the fire out. With two of the fleet struck and the flagship close to striking the Spanish admit defeat and flee from the English:

The ships looked great and it was nice to get them on the table. They are also reasonably sturdy surviving the trip to the club and back plus the game with only a couple of dropped sails and ratlines.

Making all the English veteran and all the Spanish inexperienced more than made up for the numbers, in the firing at long range on a D10 the Spanish only hit on a '1' while the English hit on a 1 to 5! Thus while the Spanish had vastly more shots they hardly did any damage while the English regularly hit home. At close range the Spanish hit on 1 to 3 while the English hit on 1 to 7. The crew quality also made a huge difference to putting the fires out.

Looking at the points values in the rules the ships are 20% more expensive for veteran crews and 20% less for Inexperienced ones making a Spanish 3rd Rate 224pts compared to an English one at 336pts. The English 1st Rate would have been 540pts and the Santisima Trinidad 544pts.

The entire Spanish fleet would equal 1,880pts while the English total 1548pts so in theory the English should have had another ship.

I confess Dave had a better plan than me (though if I had tried sailing head on into the English fleet I'm sure that would have been a disaster!) but I don't think I'll be using veteran ships against inexperienced again. If we'd played the national characteristics as well Dave would have had another +1 to hit for being English which would have made it even worse!

Tuesday 18 August 2020

Rommel The Trasimene Line, Italy June 22nd 1944

Pretty much five months after we had initially planned to play this game Andy and I met up to play the scenario 'The Trasimene Line' between the Allies (Andy) and the Germans (me) set in Italy in 1944. The actual battle took place between the 20th June and 2nd July and saw the Germans attempting to hold up the Allied advance.

Looking at the map and the forces available the objective for the Germans was to hold three out of five objectives (the black crosses) by move 16:

Normally I'd think about abandoning one objective to shorten the defensive line but from the map there didn't seem anywhere suitable. Even abandoning two didn't seem realistic. As a result I planned to deploy my paratroopers holding Vaiano on the German right, the 755th Regiment the centre and the 754th Regiment the left holding Sanfatucchio and Pucciarelli with the few Panzers I had available in reserve around Badia. After hopefully holding back the enemy for a while the paratroopers would drop back from their rather exposed position. That was the plan anyway.....

The initial deployment for both sides. The Allies have spread out pretty much along the table and look like they will attack all along the front. Andy starts by using the tactic 'Carpet Bombing' to put a single hit on each of my tanks in Badia. This is a bit of a shock to the Germans but they reflect that perhaps the tactic might have been more dangerous used on an objective area and they can try to reorganise the tanks before they will be needed:

The first Allied attacks go in but are repulsed

The action hots up around Sanfatucchio. Using flank attacks the Allies start inflicting damage on the defenders:

On the other flank Vaiano is also under heavy pressure with the German paratroopers (who by this stage of the war are rated as average troops not elite) taking a battering despite feeding reserves into the fight. The plan of withdrawing the paratroopers from the town after a while will be difficult as they are almost surrounded:

Half the paratroopers are out of action and they can't retreat (you can't move diagonally between two enemy held squares). The Germans don't have enough units available to break the encirclement so the surviving paratroopers will have to fight to the end:

Elsewhere the Germans are holding on. Most of the damage done to the Panzers has been removed by reorganising them but they have not yet been committed partly as all the fighting is taking place in bad terrain for them:

The last few paratroopers make a final stand:

They are over-run and the Allies capture Vaiano giving them the first of the three objectives they need:

On the left the 754th Infantry are desperately holding on around Sanfatucchio and Pucciarelli, greatly reduced in numbers and slowly being isolated:

The Allies have thinned their centre to support their flanks and have taken a lot of losses themselves though:

Sanfatucchio falls! The Allies have two of the three objectives they need. The Germans in Pucciarelli hold on grimly. Both sides are almost exhausted on this flank and night will come soon, can the Germans hold on?:

The Allies regroup to attack Pucciarelli. The defenders have some surviving field defences to help them hold on:

The Germans still hold the centre objective in the olive groves strongly and have managed to stop them from being isolated with the Panzers holding a narrow corridor open for them:

Both sides throw everything in to the fight! The Germans are reduced to using a Tiger battalion to shore up the defence of the objective even though it fights very poorly in the rough terrain:

Battle rages on, the Germans doggedly refuse to give up the position:

Night falls and the Germans have just held out:

As usual a very close game, if there had been another move (the end of the game is random) Andy would have won I think as the Germans in the centre were pretty much wiped out.

Andy skillfully used flank attacks and his pioneer units to negate the effect of attacking difficult terrain though he did have a moment similar to my shock when my tanks got carpet bombed when his pioneer unit on the right was wiped out by a particularly vicious German defence early in the game.

As for the Germans I spent the entire game firefighting breakthroughs and trying to bolster the units holding the objectives. I didn't make a single attack in the entire game as at no point did it seem sensible to do so and I have learned not to attack just for the sake of attacking (or even to use the mighty Nebelwerfer which can only be used in attacks!).

Normally I'd think a game where I didn't attack at all would be very dull but this one certainly wasn't, it was tense right to the end with both sides having a chance of wining (indeed until the last move or two I thought Andy would win) and we both enjoyed it greatly.

One last thought was how poor my Rommel scenery looks, especially the hills. I did buy a load of 6 x 6 inch bases to make better hills and maybe some bocage/fields/woods but used them all on the Vietnam project to make jungle! I have added the new Eastern Front buildings though so may buy some more bases and make the hills etc, the big problem is storing them really once they are made.