Monday 31 October 2022

Sharp Practice 1812 Wurttemberg v Russians

Dave and I attended a 'Lard Day' at Chelmsford at the weekend. I'd never been to one before, the basic idea is that the organisers arrange a number of Lard rules games and the attendees play them. I opted for Sharp Practice 1812 in the morning and Charlie Can't Surf in the afternoon.

For some reason I'd anticipated a retreat from Moscow game but in fact the game was an attack on the Redoubt at Borodino by Wurttemberg troops from Ney's third corps supported by Marshal Murat himself!

Wurttemberg Jaegers advance on the redoubt to rescue Marshal Murat from Russian Jagers. In the distance a single group of French infantry hold the Redoubt:


The Wurttemberg Jagers open fire:

Remarkably they are fantastic shots and all the Russians are casualties!

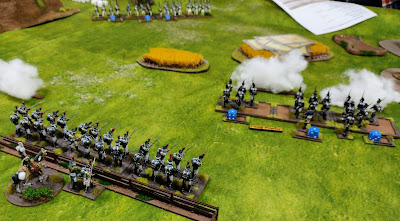
Wurttemberg line appear, in the distance a line of Russian infantry has arrived:

More Wurttemberg troops, this time the Light Infantry. In the distance the Russians have brought up a cannon to threaten the Wurttemberg line:

Fortunately the Wurttembergers form line before the cannon can fire: 

Wurttemberg Line exchange fire with the Russian Line and artillery. They wipe out the artillery but take a lot of damage themselves:

However, the Wurttemberg Light Infantry and Jaegers are almost ready to join in the firefight: 

The extra firepower slowly overwhelms the Russians though their special Russian ability to rally off extra shock with a priest keeps them in the fight longer than expected:

The Russian formation breaks and runs reducing their Force Morale to zero. However, as the Russians still held the redoubt (some Russian Jagers had entered it and wiped out the defending French earlier in the game) the overall result was a draw:

A fun game with the Redoubt being an excellent feature for the game (though unfortunately the Wurttemberg commanders failed to actually attack it!). For the Russians they had a group of Cuirassiers that they seemed rather reluctant to commit. Our plan was to clear the flank of the Redoubt then attack it which would have been fine but for the fact that a) we ran out of time and b) Russian morale collapsed before we could take the Redoubt!

One other interesting thing was that all the figures had been 3D printed, they looked nice but were apparently quite hard to print and a bit fragile. 3D printing seems increasingly popular but, for me, far too much space usage, effort and mess to contemplate at the moment.

Tuesday 25 October 2022

Sharp Practice Sudan Dervish v British

Having had two comprehensive victories for the Dervishes so far we decided to replay the last scenario again having read the rules more carefully and figured out a few things we did wrong! Dave took the British again with me as the Dervishes.

I set the terrain up to favour the British a bit this time with more open space to allow British firepower to have a greater effect. 

The British marched on to the table and headed for the Nile:


They make good progress:

However, there are hordes of Dervishes lurking in the palm groves! This time I thought I'd try a different plan and attempt to overwhelm the Naval Brigade defending the supplies on the Nile before the main body could intervene:

The British form an extensive firing line:

The Dervish plan looks to have worked well, the Naval machine gun jammed when it was fired and the Dervishes are into contact with the Naval Brigade without too many loses:

Unfortunately the stout British Jack Tars hurl the Dervish warriors back without losing a single man!

While the combat was going on the British Hussars were galloping to the rescue of the Naval Brigade. A few Dervish skirmishers seem unlikely to dissuade them:

The rest of the Dervish army arrives facing a thin khaki line of British in the distance:

Again, the Dervish warriors get into contact quickly and hope for an immediate breakthrough:

The British line holds firm though, at least this time they take some losses which weakens them a little:

Unable to turn in time the Dervishes are charged in the rear by the British Hussars:

The Dervishes are wiped out:

Losses mount for the Dervishes attacking the British line:

The Dervishes do manage to deal with the Hussars though, charging them in the rear then winning a second round of fighting:

The Hussars are dispersed:

Dervishes are in contact again! They don't give up easily:

Dervish skirmishers that have been hiding in the sand dunes emerge and pepper the British with fire inflicting heavy losses:

By the Nile the attack on the Naval Brigade has collapsed and the Dervishes are forced to withdraw their shattered units:

Both sides morale is falling rapidly. The British line have been worn down by repeated assaults and fire, one unit breaks and runs:

A second British unit breaks as does a Dervish unit. Both sides are approaching their break point:

Which unit will move first? Will the Dervishes be able to charge into the rear of the British line or will the British turn in time and see off the warriors:

Dervish skirmish fire has forced another British unit to withdraw:

The Dervishes react first and hurtle into the rear of the British line, breaking both the unit and the army:

A far more even game this time, both sides were down to three force morale in the last move and if Dave had got the last British unit to turn before the Dervishes charged it they could well have won.

Hopefully we will play more games in the future, SP seems to give an interesting game for the period which is a bit different from the usual shooting match AWI or Napoleonic SP tends to end up in (mostly because the Dervishes have virtually no firepower!).


Saturday 15 October 2022

ADLG Hunnic v Seleucid

Another practice game for one of my club mates, Ian's Seleucid's which he is thinking of using at Warfare. I thought I'd give my Huns a rare run out, an army I'm very fond of but which hasn't seen action for a while.

I went for a simple composition of two wings of MC/LC and a centre of impetuous Goths and Hun Nobles commanded by Atilla himself. Apart from the Goths the entire army was elite! Of course, this resulted in a rather small break point at 20.

Winning the initiative I elected to defend in the steppes and got some reasonably favourable terrain:


The Seleucid's turned out to be a solid line of pikemen, cataphracts and somewhat squidgy Thracians so the Huns started off by trying to out-manoeuvre the opposition with a rapid redeployment to their left: 

However, they immediately make a serious error when they decide to charge two bow-armed light horse into two Seleucid light horse armed with javelins rather than shooting at them. For some reason I thought they were bow armed despite the figures obviously being armed with javelins! The initial combat goes badly then is made worse by some Seleucid light foot joining in as support:

On the other hand the redeployment is going well, much of the Seleucid army is out of action for now and they have been forced to commit their Thracians to fill a large gap on their left:

Can the Huns overwhelm part of the Seleucid army before the rest can catch up and help out?

On the left the Huns crash into the Thracians and immediately make inroads into them. The Seleucid cataphracts next to the Thracians are very outnumbered and facing the Gothic cavalry while the rest of the Seleucids are still a move or two from being able to intervene:

The Thracians are in big trouble now:

The Goths and Huns charge home into the cataphracts with overlaps on both flanks. They will need to break through quickly though as the rest of the Seleucids are closing rapidly:

Unfortunately, the cataphracts demolish the Gothic cavalry and the remainder of the Seleucid army is able to join the action:

The two Hun light horse on the right had been finished off a while ago and the javelin armed Seleucid light horse will take the Hunnic camp breaking the Hun army:

An interesting game where I made two stupid mistakes that cost me significantly. Firstly, charging into the Seleucid javelin armed light horse when I should have just shot at them and secondly placing my camp in the centre of the table when it should have been on one side or the other! Having such a small break point amplified these errors as they cost me 8 points out of my 20 break points. 

Other than that, the plan worked reasonably well with the much more mobile Huns getting into the vulnerable Thracians and almost capturing the Seleucid camp themselves.  I think Ian had lost 17 from his much higher 26 break point so the mistakes certainly cost me, another learning experience!

Saturday 8 October 2022

ADLG-R Later Royalist v Early Louis XIV French

A practice game for a club ADLG-R competition taking place in November. Continuing my determination not to rebase any figures I went for a Later Royalist army using only commanded out shot and masses of Cavaliers to see how that would work out. Simon went for Early Louis XIV French. 

The Royalists attacked in the plains with a load of terrain on the flanks that didn't really suit their mounted:


Almost all the Royalist horse move to attack on the right:

Despite an initial advantage the Cavaliers fare poorly in the initial combat:

Three out of four bases of Cavaliers fall quickly:

Prince Rupert has been slow to fetch the rest of the Cavaliers across to support the initial attack:

They do no better than the first lot though:

With the battle all but over the elite Cavaliers see what happens when they charge elite Pike and Shot:

They fare badly is what happens and almost all the Cavalier horse are out of action, the battle is over very quickly:

Another dismal ADLG-R defeat where I failed to destroy a single base of Simons (I think I only inflicted about five hits in total)! The initial charge by the Cavaliers should have done better really but once they had been dispersed the supports were slightly too far behind to help out. 

The terrain was also pretty awful for a cavalry army with both flanks closed off leaving the French to fill the gap between using their infantry against which my less numerous and worse commanded shot units were unlikely to do well and the mounted couldn't really hurt at all.

I should probably stop trying to use FoG-R army compositions in a FoG-R style for ADLG-R and start putting more effort into thinking in an ADLG-R way instead!