Tuesday 30 July 2019

Chain of Command 'The Defence of Pokhlebin' 1942

Gary and I played the third 'Winterstorm' scenario, 'The Defence of Pokhlebin', last night. This scenario sees a Panzer Grenadier platoon from 6th Panzer Division defending a collective farm on the outskirts of Pokhlebin from two dismounted Soviet cavalry platoons.

I accepted the scenario support option to have a T34/76 while Gary chose to dice for his support and managed to gain a maximum 9 support points. The Soviet's then only managed a force moral of 8 compared to 10 for the Germans so overall not a great start for the Russians!

The collective farm has been abandoned by the locals and is under the control of the Germans:

The first Russian squad deploys in the forest on the right overlooking the farm. All seems quiet:

Appearances can be deceptive however! A German squad emerges in the farm and a Panzer III arrives along the road:

A second Russian squad deploys behind a ridge:

The final two Russian squads appear in the broken ground on the left:

The second German squad opens fire from some entrenchments hidden in the scrub:

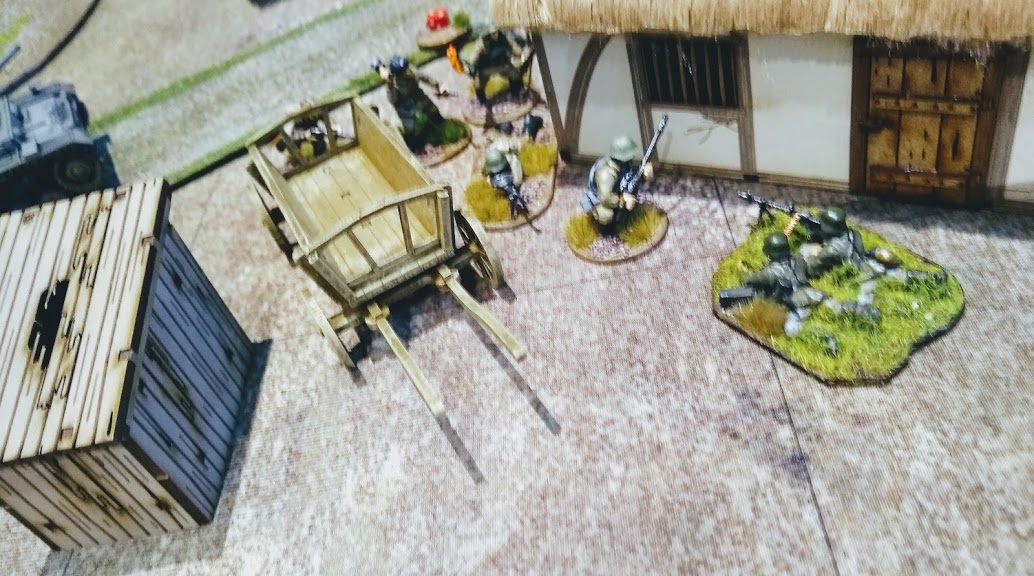
The Germans in the farm buildings attempted to set up a team behind the wagon but Russian fire quickly killed several of them and broke the remainder:

The final German squad deploys in more entrenchments in the middle of the farm:

The T34/76 arrives and begins to shell the German entrenchments:

The Russian squad behind the hill attempts to rush forwards but makes little progress and comes under fire from a German LMG in one of the farm buildings:

The Panzer III advances and takes a shot at the T34/76. With excellent gunnery the shot strikes home forcing the T34/76 to withdraw:

The T34/76 is temporarily out of action:

On the right another Russian squad attempts to rush the farm, hoping to get into cover before the Panzer III can intervene:

The tank reacts quickly though and machine guns the advancing squad:

The fire is fairly ineffective though and the Russians make it into cover behind a farm building:

On the left the Russians put down suppressing fire to limit their casualties from the Germans in the entrenchments:

The T34/76 emerges from cover again but fails to hit the Panzer III:

On the right the Russians have an opportunity to attack an isolated German LMG team. Raising an 'Uzzah!' they charge forward and cut the Germans down:

The victorious Russian squad charges on into the rear of another German group. The Germans fight them off though:

At this point Russian force morale had fallen to 1 due to the loss of the charging squad and some injuries to junior officers on the left. The Russians decided to withdraw and left the Germans in control of the collective farm.

To some extent my plan worked, drawing out the three German squads and facing each one with a smaller Russian squad while the fourth Russian squad attempted to work around the flank of the Germans.

Unfortunately the odds were stacked against the Russians, having to attack with a force only two men stronger and much weaker in LMG quantity and quality while having worse command and control (Gary used the 4 additional command dice he was allocated very well).

The two difference in initial force morale was also decisive (as it was in the last game Gary and I played). Starting at 8 it took very few losses for the Russians to drop to 4 command dice while the Germans had a much bigger buffer with a 10 force morale.

We both enjoyed the game though and it could have gone the other way with a little more luck for the Russians.

Friday 26 July 2019

ADLG Later Carthaginian v Spanish

Last night's game saw my Later Carthaginian army take on Gordon's Spanish. I went for an army with a lot of skirmishers, many of whom were elite, while Gordon went for the Roman-trained version of Spanish.

Initial deployment showed the Spanish with only two commands visible, the third either ambushing in the plantation or village or (unlikely though it is) flank marching:

Maharbal commanded the cavalry on the Carthaginian left, Hannibal the elephants and infantry in the centre and Massinissa a mixed command of skirmishers and Libyan spearmen on the right. The Spanish left flank looked weak so Maharbal and Hannibal advanced quickly to take advantage of their superior numbers:

On the right Massinissa sent some Numidians to scout the plantation. A vast horde of Celtiberians was found to be lurking! Masinissa's task would be to delay the Spanish left as long as possible:

Celtiberians prepare to advance:

Massinissa deploys his skirmishers to slow the Spanish horde:

Maharbal's cavalry presses on. Hannibal advances to contest the fields where some Spanish skirmishers are lurking:

Both sides are attacking on their left while refusing their right flank!:

Massinissa has a tough job with few troops who are quickly being outflanked:

Numidian javelinmen engage the Spanish skirmishers:

Massinissa falls back:

Large numbers of Spanish infantry contest the fields:

Maharbal has chased off the Spanish cavalry and outflanked the Spanish infantry, having only cavalry though it is hard for him to attack the Spanish infantry in the fields:

The weakness of the Carthaginian right flank is apparent, if Hannibal commits the elephants and infantry they will quickly be exposed to flank attacks from the Spanish horde!:

Hannibal commits one elephant and his own Spanish infantry to the attack on the fields:

The Carthaginian mercenary Spanish fare badly against their compatriots and the elephant fails to achieve a breakthrough. The Spanish attempt to arrange their forces to engage the remaining elephant with javelinmen:

In the background the Spanish cavalry have turned around and charged the Carthaginian cavalry but are quickly wiped out. The fight for the field is going very much in the Spaniards favour though:

On the left Massinissa is doing his best to hold back the Spanish but is being forced to give ground:

The fight for the fields continues. Some of Maharbal's cavalry join in but fighting in the fields is less than ideal for them:

Massinissa has fallen back as far as he can and now has to make a stand:

Hannibal's infantry and elephants are now engaged but the fight goes badly for them:

Spaniards crash into the Libyan spearmen and Ligurian javalinmen. Considering they are at a serious disadvantage the Carthaginians put up a good fight:

Both sides take losses but things look grim for Massinissa:

On elephant has been killed and the second is being overwhelmed by Spanish numbers. The Carthaginian Gallic and Spanish mercenaries have pretty much been wiped out:

Hannibal's command is reduced to a couple of Numidian skirmishers and an elephant that is about to be destroyed:

Massinissa is in a similar situation with the Libyan spearmen about to go down fighting:

It's all over for the Carthaginians! The Spanish army was not that far from breaking itself as a few Numidian cavalry had looted their camp and they had taken quite a few losses especially against Maharbal's cavalry:

Another enjoyable game for the veteran Carthaginians, still getting on to the table after 30 years or so!

I'm not sure I could have done much different really, while our armies were almost the same size Gordon had far fewer skirmishers than me so my fighting troops were outnumbered badly.

Hannibal's command performed dismally, hardly winning a combat despite being at worst level in the initial combats. On the other hand Gordon's cavalry were even worse being wiped out in two turns!

For my next 25mm game I think I will try to use the Late Romans or maybe even the Byzantines if I can find a suitable opponent.

Tuesday 23 July 2019

Cruel Seas Germans v Americans

I've seen a few games of 'Cruel Seas' at the club and thought I wouldn't mind trying it out so arranged to play Mike, who has been running the games, to get an idea of what it was like.

We started off with a simple scenario of two German E-Boats facing two American PT boats with both sides trying to exit the opposite board edge.

The Germans race through the sea:

The Patrol splits up as they approach the enemy:

Enemy in sight! The E-Boat opens up with it's guns and does a fair bit of damage to the nearest PT Boat with some excellent shooting:

The Americans retaliate, closing in and using their superior firepower effectively:

The second E-Boat is a little out of the fight and the Americans concentrate on the nearest one:

In a 'Nelsonic' move one PT Boat rakes the stern of the E-Boat sinking it!

Revenge is at hand however as the remaining E-Boat pours fire into one of the Americans:

Closing in the E-Boat finishes off the PT Boat leaving one ship on either side to race for home.

The second game saw a single E-Boat trying to sink an American Tanker escorted by a PT Boat. The target was an impressively large ship:

The E-Boat launches it's attack:

Torpedo's away! The Tanker desperately tries to evade:

Despite the Tanker's efforts to escape both torpedo's hit home! The German captain curses though as one fails to explode due to shoddy build quality! The single torpedo combined with gunfire is enough to sink the Tanker. The escorting PT Boat had little effect, shooting it's numerous guns with a remarkable lack of accuracy!

The Tanker's crew take to the life rafts while the E-Boat heads for home:

I'd seen Cruel Seas demonstrated at Salute when it first came out, the demonstration put me off it a bit as it had numerous ships on the rather small board you get with the starter set and looked like they were fighting in a swimming pool! The larger cloth we used for this game with fewer ships certainly looked better and Mike had done a great job painting the ships and making them look suitably worn.

As for the rules they were quick to pick up and play. The system of drawing dice to determine movement order meant, with so few ships (and the ability to choose which ship to activate rather than having individual dice per ship) meant that the order in which the ships activated was pretty decisive though there was the choice of getting your fire in first but allowing the enemy to close or standing off and waiting for them to come to you.

It reminded me in many ways of 'Wings of War', the old WW1/2 airplane game with the way the ships moved and fired (and also the tiny unreadable damage markers!) but without the need to plot your moves before each turn which gave Wings of War it's flavour with having to guess which way your opponent would go.

So having played it, I don't think I will be investing in the starter set or any more ships. I do have four unpainted E-Boats that came free with magazines though and may well paint them up in case I play again.