Monday 31 May 2021

Chain of Command Soviets

More additions to Chain of Command, this time some reinforcements for the Soviets.

Firstly another Partisan squad, these are from Warlord Games:


A demolition team. These are from Artizan (I think) and are meant to be French but I think they look okay as Russians:

Finally on the figure front some casualties from Great Escape Games:

I've probably got enough Partisans now to do a full force of them though they might need  few figures from the 'regular' Russian army to make up the numbers.

I also added a few new buildings, this time from 4Ground.

A farm set:

A village house:

Another rather garishly coloured village house:

These come pre painted to a large extent (which explains the garish yellow/green combo on the second house) so all I had to do was paint the edges. One issue was with the roofs where the paint very easily marked or came off, although the repaint I did looks noticeable in the photos it is less so in reality. I might just repaint all the roofs though anyway....


Chain of Command Operation Sealion additions

 Inspired by some of my club mates playing the recently released "24 hours from Romford" CoC pint sized campaign I bought some more figures and equipment for my Operation Sealion collection.

Firstly some ATS and Land Army girls from Bad Squiddo figures.

ATS:


Land Army girls:

Nice figures if somewhat large and quite expensive, but then I guess it is a very limited market!

Next some Local Defence Volunteers from Warlord.

First group:

Second group:

I'm not sure I'd fancy taking on the might of the Wehrmacht armed only with a collection of tools but these men seem to be up for it. The left hand figure in the second group is a bit odd looking more like he is preparing to throw open his overcoat revealing his "weapon" underneath!

One of the scenario's requires a dispatch rider, this one is from Wargames Foundry and is part of the Home Guard Communications set:

Finally some heavy weapon support, again from Warlord.

Firstly the impressive looking Blacker Bombard:

The Smith Gun:

Finally the Northover Projector and the Great Panjandrum from the Dad's Army TV series:

All nice models though I'm not sure how many times I'll get to use them.

Looking forward to playing the campaign myself at some time in the future, it seemed great fun and reasonably balanced between the British and Germans though perhaps a hard task for the British!

Wednesday 26 May 2021

ADLG Early Carthaginians v Numidians

My second game post recovery, this time playing V4 ADLG using Early Carthaginians against Gordon's Numidians. The Carthaginians won the initiative and decided to attack in the plains. The terrain fell nicely for the Numidians and disappointingly the Carthaginians failed to get a waterway to close the table down a bit!

The Carthaginians deployed chariots and javelin men on their left, a strong mixed spearmen and Gallic centre with two cavalry in reserve and further chariots and javelin men on the right. The Numidians has skirmishers on their right followed by two groups of elephants and warriors in the centre with massed cavalry and more skirmishers on their right:


The Carthaginian centre advances as does the right. The Numidians advance all along the line. The Carthaginians are feeling rather outnumbered!:


As the lines close missiles are exchanged with the fire of the Balearic slingers being especially effective:


On the left the Numidians have continued their advance and gaps are starting to appear in the Carthaginian lines. On the right superior numbers of Numidian skirmishers are starting to tell with the Carthaginian supporting Numidians getting much the worse of the encounter:

The situation on the left also starts to deteriorate as the allied Numidian light horse lose against  their rivals while the Carthaginian javelin men fall back. The Carthaginian chariots could be powerful but have limited options to get into combat in the open:

In the centre the Carthaginians drive the enemy back but are having trouble catching up with them. On the right the allied Numidians are all disrupted now and in deep trouble:

On the left the allied Numidian cavalry have been dispersed leaving the javelin men little option but to try to avoid combat:

On the right the Carthaginians have been split up and are suffering from the Numidian's firepower. In the centre the spearmen and Gaul's are left with little to attack:

On the left the Carthaginians fall back but can't stop the Numidian's exploiting gaps in their lines:

The battle as a whole. The Carthaginians are taking a slow drip drip of losses from shooting and while they have inflicted a few themselves are unable to bring the Numidians to close combat where they would have the advantage:

The end is in sight for the Carthaginian left with the chariots unable to break through and the Numidians attacking weakened Carthaginian troops and exploiting open flanks:

Things are no better in the centre or on the right and the Carthaginian army slides to defeat!:


For once although I lost the game I'm not sure what else I could have done (other than choose a different army!). The terrain allowed Gordon to dominate much of the battlefield and the Carthaginians just couldn't get any of the Numidians into combat. 

This was exacerbated by a couple of changes to the rules, firstly that it is much harder to stop the enemy evading by getting behind them in that now not only do you have to be behind them but also facing the evading units and secondly that light horse can now ZOC all units making them much better at pinning the opposition and defending flanks.

I'd probably have been better off with Later Carthaginians who can have more cavalry and medium foot so maybe I'll try them next time and as always was great to play Gordon!

Thursday 20 May 2021

Cruel Seas: Royal Navy v Kriegsmarine

My first face to face game for a considerable while saw my Royal Navy force take on Mike's Kreigsmarine at "Cruel Seas". 

As Mike had not played before and I hadn't played for ages we decided to play through a few of the introductory scenarios in the rule book.

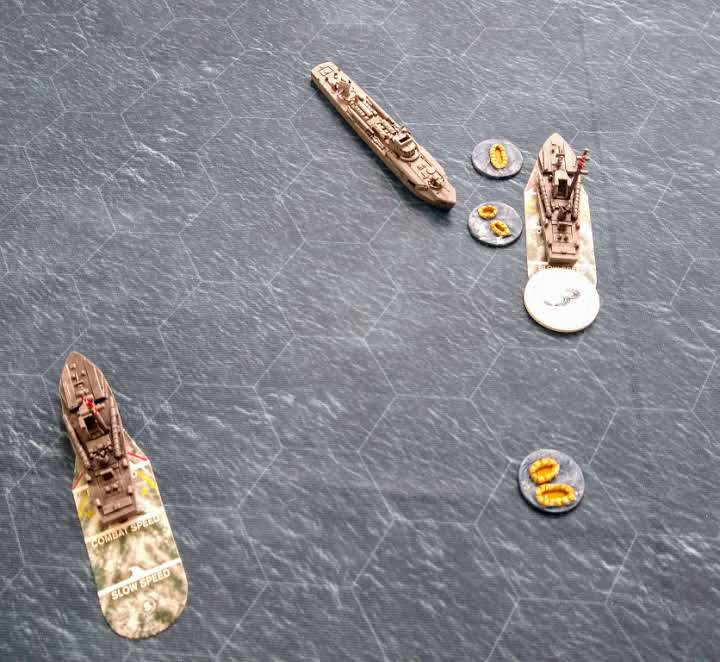
First up was "Ships in the night" in which two Vospers face one E-boat with the objective being to exit off the opposite board edge ideally while sinking the opposition.

Vospers ready for action:


An E-boat appears in the distance!


One Vosper is quickly sunk by the E-boats firepower and the E-boat exits the board successfully to win the encounter:


Scenario 2 was "Torpedo run" where an E-boat attempts to shepherd a tanker across the board while two Vospers attempt to sink it.

The tanker plows on through the waves while the E-boat attempts to get between it and the Vospers. One Vosper has launched torpedoes!


Close up of the torpedo launch:

One torpedo is heading for the tanker, will it hit? Yes! Will it explode? Yes! The tanker is heavily damaged but still afloat. Can the E-boat save it?:

The Vospers close in for the kill but the E-boat is perfectly placed to defend the tanker:

Disaster for the Germans as the E-boat takes damage to it's bridge and fails to change course leaving the tanker undefended:

The tanker is finished off by the Vosper's and the crew abandon ship giving victory to the RN:

Scenario 3 was "To the rescue!". An RAF Fairmile rescue launch has been badly damaged and drifts helplessly in danger of imminently sinking. Four Vospers, one specially equipped to rescue the crew, attempt to save them before three E-boats can capture or sink the crippled vessel.

The stricken launch in the distance:

The rescue Vosper is almost at the launch, unfortunately accurate fire from two E-boats sinks it before it can collect the crew:

A second Vosper attempts to close with the launch, it can still rescue the crew though it will take longer without the special rescue kit. Meanwhile the remaining two Vosper's attempt to distract the E-boats:

One Vosper closes right in on the Germans, inflicting some damage on the nearest E-boat:

Disaster strikes as the Launch sinks! The crew take to the life rafts and the nearest Vosper desperately attempts to pick them up while an E-boat closes in for the kill:

The E-boat blows the Vosper out of the water helped by a second E-boat:

Only two Vospers remain now out of four and another is quickly sunk. The remaining Vosper retires as the situation is now hopeless:

The final scenario was "Spy boat" where a Fairmile MGB attempts to drop an agent off on enemy held coast while being stalked by E-boats.

Enemy coast in sight! In the distance an E-boat can be seen but it has not spotted the Fairmile yet:

The Fairmile approaches slowly hoping that the watching E-boat won't spot it and unwilling to travel at speed over the minefield between the island and the shore:

The Fairmile crosses the minefield successfully:

The E-boat finally spots the enemy and calls up reinforcements:

The Fairmile reaches the shore successfully but the enemy is closing in:


A short exchange of fire results in the Fairmile being put out of action. Any surviving crew will be stranded on the enemy shore!:

Great fun and excellent to be playing "in real life" again! As ever a tough task for the RN in the scenarios, the E-boats are far more powerful than the Vospers which are very fragile and every time I've played these scenarios it goes badly for the RN.

In total I lost 4 Vospers plus a Fairmile and only managed to sink the tanker largely due to the torpedo strike and the hit on the E-boat bridge at a vital time. I don't think I got close to sinking an E-boat at any point.

Hopefully I'll get to play more Cruel Seas as it has potential to be an interesting game if you can get the balance between the forces right. Convoy attacks might work better and between us Mike and I have quite a few merchantmen so we could do a decent sized convoy together.


Thursday 6 May 2021

28mm Terrain Builds

While I was recovering from a bout of Covid19 I wasn't really able to paint figures but did manage to make quite a few new buildings. These will mainly be used for Chain of Command (and maybe Sharp Practice).

First was a church from Empires at War, I've wanted a church for a while now but most models I saw were either too big, too expensive or both! This one is one of the smaller ones I could find:

Secondly a farm complex with damaged barn and stables, again from Empires at War:

Another Empires at War house:

Finally a small factory or industrial building, this time from Sarissa Precision:

They all came out okay I think despite me not being the greatest model maker! The Empires at War buildings being sort of pre-painted are a reasonable compromise between the expense of 4Ground and the need to fully paint Sarissa buildings. I've got some 20mm Sarissa colonial buildings to finish for The Men of Company B and some 28mm 4Ground Eastern Front buildings to finish off as well so hopefully they will be done soon!