Thursday 30 May 2019

Rebels & Patriots Hessians v Rebels

Gary and I played our second game of 'Rebels and Patriots', this time with me using Hessian's and Gary using his Continental's.

We tried Scenario B 'The Great River Chase' with the Hessian's escorting three rafts downriver. Gary made the rafts and we used Dave's river which was not really wide enough so had to have very muddy banks! I allocated the Hessian Grenadiers to the rafts while Gary set up on either side of the river:

The raft's set off with two making good progress and one lagging behind. The Rebels open fire on the rafts while the Hessian line infantry and artillery deploy to help defend the rafts:

The first two rafts press on while the crew of the last one start to take losses:

The first raft prepares to run the ford with Rebel cavalry and skirmishers lurking on the bank. The third raft has caught up but the crew has been reduced to a single man :

The Rebel cavalry attacked the raft with the sole man on it but he heroically beats them off:

The Hessian infantry start to outflank the Rebels on the near bank. One raft has run the ford and the second is ready to run it next. However, the third raft now has no crew as the last man was shot down, it will now just drift!:

The second raft runs the ford despite getting attacked by the Rebel skirmishers:

Two raft's head off downstream successfully, the last raft was captured by the Rebels though when it ran aground so it is 2-1 to the Hessian's:

The raft part of the scenario was good fun with the random movement of the rafts, the odd collision with immovable objects and the heroics of the crew. Gary very much concentrated on the rafts while the rest of my Hessian's tried to distract him and disrupt his units.

The rules played better this time I think as we corrected some of the mistakes we made in the first game. There is the potential for a bit of movement but the table is congested as it is only 4 x 4 ft.

Probably SP gives a more characterful game but it does take longer than R&P. Certainly the rafts were a great idea and more fun than the usual 'struggle and fail to get a wagon across the table' scenario in many skirmish games.

Tuesday 28 May 2019

Rommel Breakthrough 8th Army v Afrika Corps

As Mark had traveled down from Nottingham to play we thought we should make the most of the day and played a second game, this time with Rommel. Mark chose to attack with the Afrika Corps and we went for the Breakthrough scenario.

The British got very few terrain choices resulting in a fairly open field with two of the German objectives being in the open and two in cover:

The German's quickly capture the furthest forward objective in the open that the British chose not to defend but were slow to develop their attack on the other objectives:

The British repulse the various German attacks without much danger, aided by a raid on the German lines of communication by a small force of Crusader tanks which drew off some of the German force to deal with them:

Further German attacks fail to make any impression on the British defenders:

The British take some damage but are replaced by fresh reserves:

The slow pace of the German attacks has whittled away the day and with night about to fall the Germans have failed to break through the British lines:

This was only Mark's second Rommel game after a long break and it really showed how Rommel has a steep learning curve.

Having played so many games against Andy I think I now have a good idea of how to achieve your objectives in Rommel and how to make the best use of your forces. Mark's attack developed too slowly and concentrated on an objective on a hill that would be hard to capture especially as the Afrika Corps list we used was weighted more towards armor than infantry.

We then played again with the same forces and scenario, having learned some lessons from the first game the Afrika Corps did much better, managing to capture a second objective for a while though losing it to a British counter-attack before time ran out. I've not used the 3mm WW2 armies for a while and it was nice to get them into action again.

Monday 27 May 2019

Sharp Practice French v British Napoleonic

Having inspired my friend Mark to paint up a British force for SP we played our first game yesterday.

As Mark hadn't played before we used the basic lists from the rules and the 'Sweep the field' scenario with the French attempting to capture assorted loot and food from the Spanish countryside:

The French begin to move forwards and start looting the first building:

The British arrive and prepare to drive off the French:

Voltigeurs move towards the Spanish sheep:

The whole British force has arrived and start to engage the French:

The French bring up more men and base their position around a large Spanish villa:

The British light company drives back the French skirmishers but are now isolated:


There will be lamb chomps on the menu tonight for the French!:

The French disperse the British light company and begin to loot the Villa:

The British exchange fire with some French Fusiliers in the Villa:

The French advance on the right and start to inflict losses on the British Line in the center:

The British center has taken many losses and is unable to advance further:

The British fall back leaving the field to the French:

The British never really got going in this game, their advance was not very coordinated allowing the French to pick on one force at a time.

The army lists gave the French much better and more officers than the British who had better quality troops. The improved command and control of the French allowed them to attack where the British were weakest and move out of danger when faced by the British lines.

Thursday 23 May 2019

ADLG Koryo Korean v Samurai

Another competition practice game of ADLG, this time for Simon and his Early Samurai. I think the only historical opponents for Samurai at this period were Mongols or other Samurai. Neither of those seemed interesting choices so instead I went for the nearby Koryo Korean army with lots of impact cavalry and some heavy foot.

The terrain mainly ended up on my side of the table but the Samurai army was considerably wider than the Koreans:

The Koreans attempted a complex redeployment with the right flank cavalry moving to their left, the heavy foot sliding to oppose the Samurai cavalry and the Korean right flank cavalry splitting on either side of the heavy foot:

The Samurai immediately inflict shooting hits on the Korean cavalry:

The Korean cavalry on the right charge in but are overlapped and have taken damage. The Samurai cavalry have also been very effective shooting at the Korean heavy foot:

The Korean cavalry charge fails miserably:

On the Korean far left the Korean cavalry has made some progress wiping out the Samurai light horse and starting to roll up the flank of the Samurai cavalry. Everywhere else is looking grim for the Koreans whose flank is held by a light horse which has been charged in the flank by some Samurai foot:

 Somewhat remarkably the Korean light horse almost kill the Samurai foot!:

The light horse have disposed of their opponents but more Korean cavalry have gone down and some of the Korean foot have been shot to death:

The Korean army quickly collapses to defeat:

My second rather dismal ADLG game in a week. The redeployment I attempted didn't work and I think the army was just too small to cope with the much wider Samurai army. The Samurai shooting was very effective and much of my army had taken hits before they even got into contact.

I'll have to put more effort into choosing my army and coming up with a plan next time!

Tuesday 21 May 2019

ADLG Venetian Condotta v Communal Papal Italian

Another practice game for Gordon, this time at 225pts for a Medieval competition. I thought I'd go for Italian Condotta and the Venice option mainly as I had not used them in a long time.

I chose minimal knights, a strong foot contingent and a Swiss ally general. The terrain seemed to fall well for me with most of it on my side of the table:

I'd not realised the Papal army can have a Catalan Company ally so when Gordon deployed them to rush through all the terrain on my left I was surprised and couldn't really see what to do about them. So, Plan A, smash through the Papal centre before the Catalan's flank me was the only option really:

The Venetian centre closes in. Despite having a strategist in command the Venetian right has proved rather tardy:

On the left things go badly quickly with some Swiss halberdiers and hand gunners failing miserably to hold up the Catalan horde:

Things were not going much better in the centre as the Venetian's took hits from shooting:

The two lines clash in the centre as the 'Strategist' finally pushes his forces forward:

The combats are not good for the Venetians and they collect more hit markers and a gap in their line:

The Venetian right gets into action but also does badly. On the left the Catalans are cutting through their opponents:

Large gaps open in the Venetian lines and the army is close to collapse:

A Venetian general personally leads some pike men in a desperate attack which fails and gets him killed finishing off the Venetians:

This certainly was not one of my better efforts at ADLG. At one stage I thought I'd lose very quickly but did manage to kill a few of Gordon's units to make it look a little more respectable.

I used my Knights badly and didn't really get my elite English Longbowmen into the fight. The very expensive Swiss ended up with no real target and were always in danger of being hit in the flank by the Catalan's. Must do better...…..

Sunday 19 May 2019

Fire and Fury Gettysburg 1st Day

Having really enjoyed Dave and I's refight of 1st Bull Run a while ago I decided to do a solo version of the first day at Gettysburg scenario to see how viable it would be for us to play that in the future.

The scenario in the rulebook requires a 7 x 6ft table and as I only have a 6 x 4ft table I had to cut the map down a bit and focus on the initial action.

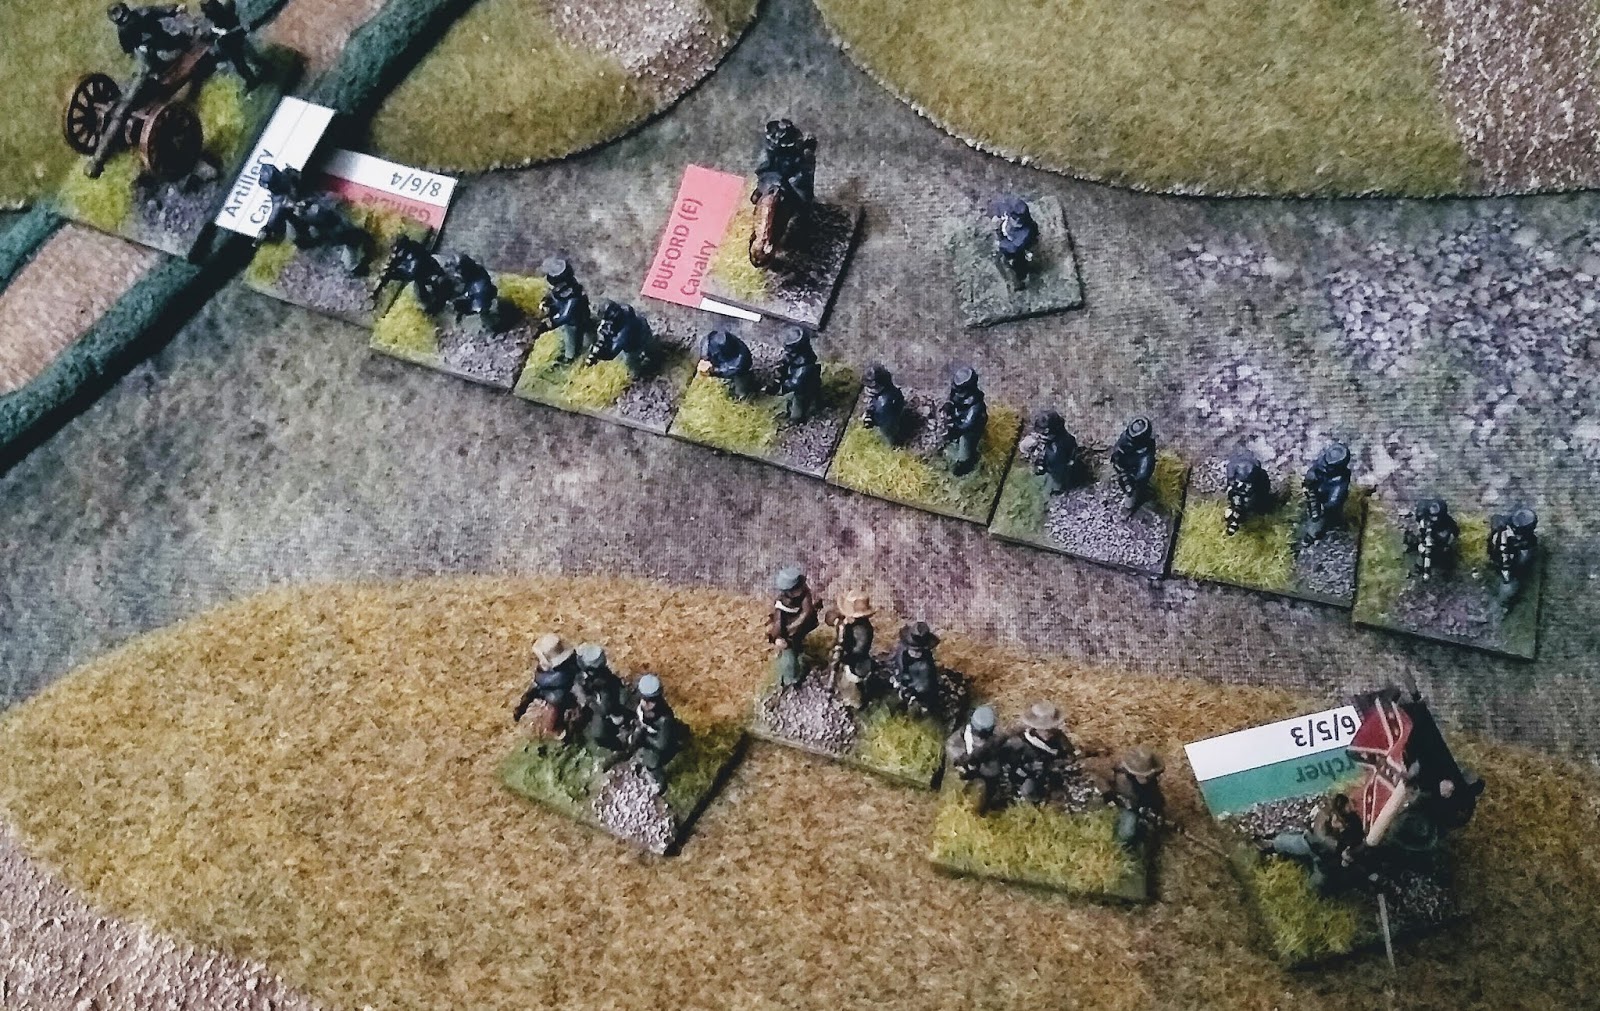
For the Union Buford's cavalry are deployed on MacPherson Ridge while on Seminary Ridge elements of the Union 1st Corps moving up in support. The Rebels start with Heth's Division of the 3rd Corps:

The battle starts with the Rebel 11am turn and they wasted no time in getting into contact, charging Buford's dismounted cavalry and moving their second line out to support the flanks:

The attack went badly for the Rebels with Devin's cavalry throwing back Davis' much larger Rebel brigade and Archer only pushing back Gamble's cavalry brigade. To make matters worse Pettigrew's brigade was disordered by fire from Meredith's Union brigade.

In the Union turn Buford's cavalry fell back to Seminary Ridge to consolidate their line. On the union right Cutler's brigade moved up onto the ridge while on the Union left Meredith's 'Iron Brigade' charged into Pettigrew's disordered Rebel brigade:

The 'Iron Brigade' lived up to their name and routed Pettigrew's Rebels, capturing him in the process:

The first half hour has gone very badly for the Rebels with their assault defeated and the Union starting to build a strong position on Seminary Ridge:

The Rebel 10:30 turn finds Archer's brigade badly isolated as all the other Rebels have fallen back. Archer assesses the situation and decides that charging Gamble's dismounted cavalry again is the best option. The odds are against the Rebels now though:

Gamble's men easily repulse Archer's brigade, wiping it out:

The rest of the Rebels reform behind McPherson Ridge, with the losses they have taken it looks like they will have to go on the defensive until reinforcements arrive. In the Union turn they consolidate their position on Seminary Ridge as more brigades from the 1st Corps move up:

By 11:00 the rest of the Union 1st Corps arrives and starts to move up to Gettysburg. The first elements of the XI Corps also arrive on table:

With the arrival of AP Hill and Pender's Division the Rebels feel strong enough to advance again. Heth advances slightly while Pender rushes his Division off to the Confederate left where the Union right flank is looking vulnerable:

Robinson's Union Division heads through Gettysburg towards the weak Union right flank. More elements of the IX Corps arrive behind them together with the Corps commander, General Howard:

It is now noon and the battle rages on. Pender's Division prepares to assault the Union right and Heth advances again in support:

Long blue-coated columns advance down the dusty roads as the Union army rushes more men into the fight. The Rebel right flank is looking weak against the increasing numbers of Union troops advancing on them:

Pender sends his men forward to engage the Union right. Union reserves are arriving but will they be in time?:

The Union forces on Seminary Ridge start to take losses but have fresh brigades coming up behind. On the Union left they advance against Pettigrew's brigade which was weakened in the initial Rebel attack:

Pender's Division storm forwards into the Union defenders on Seminary Ridge:

The Union brigade is forced back but puts up a tough fight only giving a little ground. Weight of numbers is beginning to tell for the Rebel left flank and the Union centre on Seminary Ridge is looking weak now:

It's around 1 in the afternoon when things get worse for the Union army as Ewell advances the first brigades of his II Corps onto the lightly defended Union right flank. His initial progress is slow though:

All the Union can do now is try to form a defensive line against Ewell and shore up their position on Seminary Ridge. The Union left outnumbers the Rebels so there may be an opportunity to make an attack there soon:

Pender's Division crashes into the Union centre on Seminary Ridge and drives it back. Heth's Division is still holding the Rebel left flank:

Ewell's II Corps floods forwards to attack the outnumbered Yankee's:

Union forces sweep the Rebels from much of MacPherson's Ridge, the Union left flank is making good progress. Elsewhere the Union try to stabilise their line:

The Rebel right flank is almost gone with just one brigade holding out in the woods and a spent brigade defending the road:

The Rebel centre and left however have driven further forwards and some Rebel brigades are approaching the outskirts of Gettysburg itself. The remaining Union forces defending Gettysburg have been hit hard and won't be able to hold out much longer:

It's now around 2:30 and the battle has split into three phases. On the Union left the Rebels have almost been driven from the field and there are relatively strong Union forces remaining:

The Union centre has largely collapsed though and it won't be long before the Rebels will be attacking Gettysburg itself. There is still some Union resistance though:

The Union right has largely collapsed under attack from Ewell's corps and Pender's Division. There is little fight left in the Union troops here:
3 pm will see the arrival of Early's Division on the outskirts of Gettysburg and it is  hard to see how the Union forces available will stop them. On the other hand I think it is unlikely that in the time remaining the Rebels would be able to take their objectives Cemetery Hill or Culp's Hill due to the distance involved.

At this point I decided to call it a day. The Union lost 28 stands and scored 10VP (or 22 if it is assumed the Rebels won't take the hills) while the Rebels lost 23 stands and scored 12VP.

As historically there is no clear outcome, the Union had the best of the day early on but then Rebel numbers allowed them to attack aggressively and force the Union back. As the Union commander I committed several brigades to the Union left flank where, while they made a breakthrough, they might have been more use in the centre and right to fend off Ewell's corps.

Sadly I don't think I will be playing this scenario at the club though, it took a long time to play (spread over three days!) due to the sheer numbers and even with an early start on a bank holiday I'm not sure that would be long enough.