Wednesday 27 October 2021

ADLG Early Carthaginian v Early Achaemenid Persian

Two 'classic' armies in action this week, my 25mm Early Carthaginians against Gordon's Early Achaemenid Persians. Not quite historical but certainly a meeting of old-school armies from the dim and distant past where the availability of figures and army lists was much more limited!

Looking at the Persian list I thought that I'd go for a spear-heavy list myself, it worked for the Greeks and the Carthaginians were not that much different. Last time I'd used the list in 15mm I was unimpressed with the chariots so didn't select any (also I don't possess any 25mm Carthaginian chariots anyway) so the army consisted of two commands mainly of spearmen (one of Greeks and one of Africans) with the third command had impetuous Gallic and Spanish swordsmen. A few medium and light cavalry plus elite light infantry made up the rest of the force.

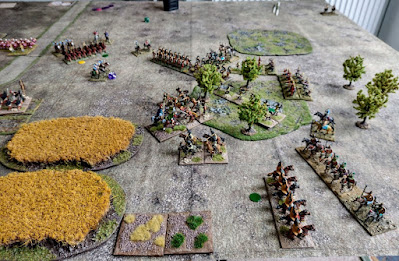
As ever given that the Persians were likely to include many mounted bowmen I tried for the waterway and failed. However, the rest of the terrain fell quite nicely for the Carthaginian defenders and they deployed with the African spearmen on the left, the Greeks in the centre and the Gauls and Spanish on the right. The Persians had infantry and cavalry on both flanks with a rather weakly held centre:


On the right the Persians quickly advanced probably looking to outflank the Carthaginian line:

They appeared to be following the same plan on my left:

Having seen Gordon's complicated redeployment attempt collapse in our last game I optimistically decided that this week I'd try it! The Gauls and Spanish move over to the centre while the Greeks fill the gap left by their departure:

On the left the Persians prepare to attack the flank of the Carthaginians. A few poor command dice have resulted in the Carthaginians being slow to react:

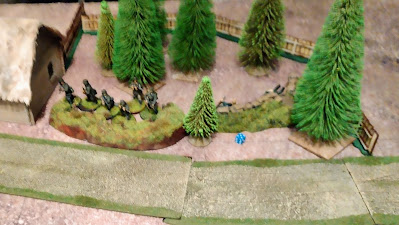
On the right encouraged by the departure of the Gauls and Spanish the Persians advance towards the orchard. it isn't ideal terrain for them though as it limits their shooting and is still held by substantial Carthaginian forces:

Units are becoming scattered and, deciding that perhaps the Gauls will be needed in the orchard after all, they reverse direction and begin to march back. Both sides are going to be needing an awful lot of command points to carry out their plans!:

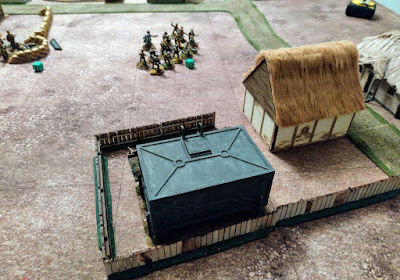
Mercenary Italian cavalry look on nervously as they attempt to defend the camp from superior numbers of superior quality Persian mounted:

The Carthaginians are starting to suffer badly from Persian archery and take hits all over the place. On the left the Persian cavalry close in on the flank of the African spearmen who turn to face just in time. The Persians on this flank are not as numerous or well equipped though:

The Greeks and Gauls form a coherent line and prepare to attack the somewhat isolated Persian infantry:

On the left the hits from shooting continue to mount but the Persian cavalry are looking a little exposed:

On the right the Persian foot enter the orchard while their cavalry prepare to overwhelm the Italian mercenaries:

The African spearmen facing the Persian foot are taking a bit of a battering from well-aimed fire and have not managed to close on the Persians. On the other hand the Persian cavalry has been largely wiped out and in the distance the Greeks are starting to push past the Persian flanks:

On the right there are also mixed results, things are looking bad for the Persians holding the orchard while the Italian mercenary cavalry are unlikely to last long defending the camp:

The Italian cavalry manage to take some Persians with them but the camp will soon fall. The fight in the orchard is going the way of the Greeks and Gauls though as they cut through the Persian foot:

Shooting hits continue to mount for the African spearmen and Hoplites, if this continues they will fall without even getting into combat:

The end is in sight for the Persians in the orchard though:

The last Italian cavalry unit survives again!:

In the centre nothing much has happened really, the Greeks have driven back the Persian cavalry and picked a few of them off:

The orchard is finally cleared of Persians. The camp has fallen but the Carthaginian army is large and can easily absorb the losses:

On the left the Persian cavalry has been defeated and the African spearmen prepare to make an attack on the Persian foot assuming they survive the archery storm to get into contact:

The battered remnants of the African spearmen finally make it into contact!:

One kills their opponent, the other is lost which isn't that bad considering they were almost gone when they got into combat:

Persian morale is close to collapse as the battle nears it's end:

The Carthaginians gain the last few hits needed to tip the Persians into defeat:

My third ADLG win in a row after a whole series of defeats has certainly increased my confidence and I'm really enjoying using my old 25mm armies again, I find it far more interesting than playing in 15mm for some reason though in theory it should be exactly the same (just bigger!). I've even started a new project to add to my 25mm armies which is under construction at the moment.....


Monday 25 October 2021

For King & Parliament "Marlowe to Maidenhythe" Campaign Game 1: The Attack on Marlowe

Having played several games of FK&P over Vassal during lockdown and both having as yet unused 28mm ECW armies Dave and I decided to try out playing on an actual table! 

One of the add-ons FK&P is a fictional campaign (in fact more a series of games) called from Marlowe to Maidenhythe which features Sir John Boulters leading the Royalists (me) and Sir Christopher Grey commanding the Parliamentarians (Dave). The first scenario sees the Royalists attacking Marlowe which is held by a similar sized Parliamentarian force.

The rebel forces deploy in front of the town:


The King's men deploy to attack the rebels. They are stronger in horse but weaker in foot:

Planning to avoid taking on the rebel commanded shot and forlorn hope in the maze of hedgerows the Royalist foot begins to move to the more open ground on their left:

On the right the Royalist horse holds back and awaits developments:

The left wing of the Royalist horse advances boldly though to pin the rebel infantry in place:

The rebels advance their cavalry slightly but otherwise remain stationary:

The Royalist foot continue to advance and open fire on the rebel Forlorn Hope:

The Royalist horse on the left have made rapid progress forcing the nearest rebel foot battalia to turn to face them:

The Royalist foot continue to advance:

The first losses of the battle as one of the rebel forlorn hopes is routed:

The second rebel Forlorn Hope is also quickly dealt with:

On the right the rebels have rushed their horse forward and engaged the Royalist horse:

Both rebel horse have charged home:

The initial fight goes well for the 'Swedish' organised Royalists against their 'Dutch' opponents:

However, they fail to build on this success and one Royalist regiment is routed:

The Royalist foot are making good progress towards outflanking the rebel line. Much of the rebel foot seems reluctant to leave the safety of the hedgerows:

Things get worse for the Royalist right wing horse as a second unit routs:

All is not yet lost though as the final Royalist horse take the victorious rebels in the flank and disperse them:

They follow up and break the second rebel unit! They promptly pursue the fleeing rebels off table:

Rebel morale is starting to fall with one battalia taking fire from the front and flank while Royalist horse prevent the other rebel battalia intervening:

Possibly too late in the day the rebel commanded shot begin to advance forcing one Royalist battalia to retire before it breaks:

Having weakened the enemy the Royalists charge into the flank of the exposed rebel battalia and break it. Rebel morale collapses and the retire from the field:

It had been quite a while since we had played To the Strongest FK&P so we struggled a bit with the rules and probably did several things wrongly. 

I tend to find the rules a bit clunky with so many markers and the use of playing cards to drive the game, while giving some interesting nuances, tends to spoil the visual aspect with cards and markers littering the table most of the time. When you do get into combat it also appears to rely to a large extent on luck (though perhaps it just seems that way with cards rather than dice!).

As for the result I felt that advancing towards Dave's superior firepower behind hedges was not a good idea while (slowly!) carrying out a flank attack would be more successful. I think Dave waited too long to advance his uncommitted infantry and by the time he did it was a little too late. I also seemed to remember that the 'Swedish' style horse with only two hits were considerably worse than the 'Dutch' three hit horse, while initially the Swedish ones do okay (and depressed Dave greatly) they are extremely brittle and don't fare well in the long run.

Having said that it was an enjoyable game and certainly looked spectacular, Dave thought he had painted his army maybe five years ago and never used them while mine had been in production for at least three years I think so it was great to get them into action!

The next game requires some 'pike-heavy' battalia for the Royalists so I might even buy a few more figures to add to my standard pike-and-shot units.....

Tuesday 19 October 2021

Chain of Command "Many Rivers to Cross" PSC Game 1 "The Village"

Having really enjoyed the recent "24 Hours to Basildon" PSC Gary and I decided to start another campaign. Looking through those available we went for the "Many Rivers to Cross" which was included in the 2018 Lard Mag. 

The campaign is written with the intention of being set in France/Belgium with the Germans attacking in 1940. However, it is quite generic and easily adapted to other periods so we went for my Soviets as the attacker against Gary's Germans in 1941. The only real change we had to make was that the German 'Stuka Bombardment' would be replaced by the Russian 'Sturmovik Bombardment'!

The campaign opens on Map Two with the Soviets having to establish themselves across a river and push forwards to the next river line. The scenario is 'Hasty Defence' from the Blitzkrieg 1940 Handbook with the only restriction being that the Soviets in the first two games can only select man-portable support weapons.

With a mighty (and indeed maximum) 18 support points I chose two MMG's (6), 4 entrenchments (4), a bombardment (2), an AT rifle (2) and an extra squad (4). I wasn't sure if Gary would choose a tank or not, if he did it could be tricky but it would use up most of his support points!

We adapted the terrain from the map slightly, one thing that is noticeable is that the buildings are far less useful for defence than European style buildings, they have few windows and doors and should probably be considered only soft cover in some cases:


The Soviets begin by deploying a MMG and the extra support squad (represented by Partisan figures in this case as providing five 13 man squads of Russian infantry was beyond me!) all deployed in entrenchments:

No response from the Germans and an opportune double phase results in Leytenant Kravstov joining the Partisans and leading them forward in a rush to capture a German JOP before the Fascist scum have time to react:

The men dash forward an impressive 14" initially:

In their second move though they don't quite get far enough and fail to shut down the JOP. This could be tricky! The Leytenant has left them to bring up support which they will probably be needing:

The Germans appear and open fire! Being in the open and at short range the fire is destructive with four Partisans going down and their leader, Sgt Davidov, being wounded:

The Germans had a double phase and fire again taking a further three Partisans out. The large squad size really helps though and despite being seven men down the Partisans are still in action!:

The Germans have deployed a second squad in the forest which opens up on the Soviet MMG. few of them have a sight line though and the fire is ineffective. Return fire sees the first German casualty of the encounter:

The Partisans finally get a chance to fire back and take down another German:

Return fire however kills Sgt Davidov and leaves only three Partisans alive. Remarkably they stubbornly refuse to break but do become pinned: 

Enraged by the continual resistance of the Partisans the Germans deploy another squad to close assault them! The Partisans are wiped out but take one German with them:

Meanwhile Leytenant Kravtsov has brought up an infantry section to support the MMG and both have been exchanging fire with the Germans in the forest:

This has gone badly for the Germans with their LMG team being wiped out and the Feldwebel killed:

Next the Soviets bring on the second MMG, again in entrenchments, to put more pressure on the Germans in the forest:

At this point with a small force morale advantage (6 to 5) the Germans decided to withdraw. The opening game was quite tricky for both of us, if I lost the campaign could almost be over before it started while for Gary if he lost too many men he would struggle.

While Gary had inflicted a lot more losses on me his position wasn't great, the two squads he used to take out the resilient Partisans were largely out of the battle, his squad in the forest was under a lot of pressure and he only had one remaining squad to deploy. The Soviets still had three of their huge squads to deploy and could quickly change the axis of attack so it was probably a sensible decision to withdraw at that point.

The final bill was 13 casualties for the Soviets, all from the support squad so no losses for the next game. The Germans lost 6 men, one of whom returned due to the difference in FM. The next game is "Farm and Forest" with the Soviets attempting to press on.

I must admit that it was nice to have the same number of command dice as Gary after my struggles with the four dice against six Home Guard and it is always fun to play with the much more aggressive Soviets!