Wednesday 31 October 2018

Sharp Practice: The Battle of St. Paul AWI Americans v British

This game was the result of a fantastic campaign run by Gary for Dave and myself.

My Patriots were attempting to capture the British base at Fort St. Paul. I had two forces making up the attacking army, one commanded by General Wilcox available immediately and one commanded by Captain Reagan which would turn up later in the day.

I had little idea of what Dave's force was other than it consisted of at least five groups and three ships which would be able to give fire support to the Fort. I also knew that the British had a blockhouse and had constructed some defences around the blockhouse.

It looked like a difficult task so my plan was to use General Wilcox's force to fire at long range into the Fort hoping to inflict some losses on the British and draw them towards Wilcox's army then attack with Captain Reagan's force when he arrived on the opposite flank.

The table set up for the game with the Rebel force ready to rumble!
As can be seen there was not much cover available for the Rebels, the Fort being well sited and the ships (off-table) having a good field of fire. First to arrive for the Rebels were a gun and two State Line groups commanded by General Wilcox himself:
The British deployed some of their troops in the Fort:
There was a gap in the fortifications on the left so General Wilcox deployed his militia under Captain Adams and Captain James to attempt to exploit this gap and engage the fort at long range:
While Captain James' men opened fire om the fort through the gap in the buildings Captain Adams led his men forward towards the gap in the fortifications. This drew fire from the British 11 gun ship offshore which immediately starting inflicting losses and shock on Captain Adam's force:
Next to arrive was Sergeant Bones and his militia skirmishers who deployed to the right of General Wilcox's force:
The British deployed more men in the fort including some skirmishers firing from the upper level of the blockhouse. They also opened fire with another ship:
The Rebel fire was doing some damage to the British but not as much as I had hoped. It had forced them to deploy most of their troops though and the arrival of Captain Reagan was imminent.
First to arrive of his force was some more militia skirmishers who deployed in support of Sergeant Bones to engage the British on the right hand side of the Fort at long range and soften them up aided by the fire of the cannon:
On the left Captain Adam's force could make no progress under fire from the ship but his Militia bravely held their ground and attempted to rally. Captain James' force was also taking losses from the Fort's defenders and the brave Captain himself was wounded in the firefight:

Captain Reagan led his frontiersmen together with Fear-God Barry's Militia (a character who had been recruited from the nearby town of Johnson's Landing and had been inspired by Revolutionary fervour!):
The fire from the gun and the skirmishers was now having an effect on the right hand side of the Fort and one group of British was forced to withdraw. Seizing the opportunity Captain Reagan led his men forwards at a run towards the Fort:
The British responded by moving the unit next to the one that had retired across to cover the gap, however this left the part of the Fort they had just left undefended! Captain Reagan urged his men on and they dashed to the loopholes on the unoccupied part of the Fort:
The British then attempted to drive Captain Reagan's men back with the bayonet:
Captain Reagan and his men fought back, downing all but one of the attacking force but losing two men themselves and having the heroic Captain himself knocked out! As the battle raged around the Fort's right side General Wilcox tried to send more troops into the attack. The Rebel force moral was beginning to waver though due to the losses incurred so far.
Captain Reagan's force was wiped out by fire from one of the ships leaving the Captain wounded and unconscious outside the fort. Sergeant O'Rourke valiantly tried to rush the Fort with his men:
Just as the attack on the right of the Fort was making progress the Rebel force moral broke due to losses to Captain Adam's force which had been under bombardment from the large British ship offshore. The Rebels had fought bravely and managed to get up to the Fort but in the end it was not quite enough. Captain Reagan was captured by the British but somewhat surprisingly the overall losses were not that different with the Rebels losing 22 men and the British 17. The final situation:

All in all a great game which we both really enjoyed. The campaign had got both Dave and myself immersed in it and certainly for me given the units and officers in my army a lot of character. 

On reflection I don't think the Rebels stood much chance of capturing the fort, the offshore fire from the ships equated to a potential 90 dice two out of three turns which, even hitting on 6's, should do a lot of damage to troops in the open. They certainly had an effect despite Dave throwing poorly for his hits and me throwing well for my effects. The Fort was also well designed with no real cover available for the Rebels to attack through while attempting to hit units in hard cover is never easy. 

Concentrating on one corner of the Fort worked well for me and certainly had Dave worried for a little while. The Rebels will now retire to lick their wounds and consider if another attempt is viable or not. We also hope that Captain Reagan will be treated honourably by the British as a brave Patriot and potential Revolutionary Hero!

Sunday 28 October 2018

28mm TYW Imperialists for FoGR

This army has come to a bit of halt at the moment due to SP, CoC and Rommel taking up my painting time. Several units have been done for it and in reality there isn't that much more to do.

The Redcoat Regiment:
The Bluecoats:
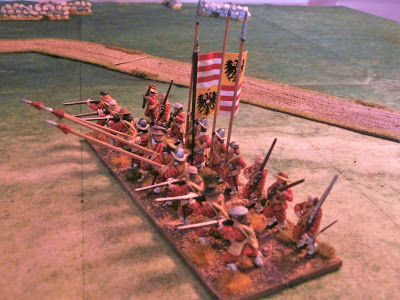
 The Violet Boys:
 Two cavalry units lead by a General:
I still need to finish at least two more cavalry units and two more infantry plus some generals and regimental guns so a little way to go yet on what was/is a long term project!

10mm Late War Americans for Rommel

Having enjoyed the recent 10mm Late War game of Rommel Andy and I played I remembered that I had some 10mm WW2 Americans and Japanese I'd painted a long time ago for Peter Pig's PBI.

A short search uncovered a box file with some painted Japanese and Americans together with a few bags of unpainted US Infantry, all from Minifigs if I remember rightly.

Looking through what was usable for a Late War American force in Rommel there were enough infantry figures and four Shermans so with some additions it would make a viable army.

Having initially forgotten that the ones I had were from Minifigs I ordered the rest of the force from Pendraken, adding two more Shermans, 3 M18 Hellcats, 6 M3 Halftracks and some artillery.

One of the joys of WW2 at the smaller scales is that they don't take much effort to paint up so once the reinforcements arrived they were quickly painted and based on a 4cm frontage. The stars were transfers from Pendraken which seem a bit small to me while the serial numbers for the Shermans came from some transfers I got with my 28mm Bren Carrier.

First up are the M18 Hellcats:
 The Infantry with a couple of 105mm Howitzers as support:
 Armoured Infantry in M3 Half Tracks:
 The four old Shermans rebased with the two new ones:
 A Priest to provide artillery support to the Shermans:

All I need to do now is make some labels up for them. While the magnetic ones I used for the 3mm desert armies worked well I think I will just use paper ones and blu tack for these as, unlike the desert armies, I won't want to change them between Early War and Mid War.

I also picked up a gridded fields cloth so our next battle won't have to be played out on the desert mat unlike last time!

Monday 22 October 2018

Wings of Glory Battle of Britain

Following on from the AWI naval game we had a couple of games of Wings of War set around Dunkirk. I had an ME109 and a Stuka which was attempting to bomb a sailing boat while Dave and Gary had a Spitfire each.

ME109 and Stuka:
Achtung! Spitfire!
The Stuka closes in for the kill while the Spitfire tries to save the day!
In both games the Stuka managed to bomb the ship, also in both games Dave's Spitfire exploded leaving him cursing his luck!

Fighting Sail AWI Americans v British

Dave and I have been playing an AWI campaign run by Gary based on the Americans trying to prepare to invade Canada via Fort St. Paul.

It has been great fun and tonight we played a naval encounter using slightly modified 'Fighting Sail'. My Americans had 3 Sloops against Dave's 4 Gunboats. The gunboats were oared so were slow compared to my Sloops but were much easier to turn.

In the campaign the Gunboats had been attempting to return to Fort St. Paul but were caught by my ships in the middle of a lake.

Dave's four gunboats:
My Sloops:
The Sloops split to engage the gunboats from two directions:
One gunboat is sent to the bottom!
The leading Sloop takes damage slowing her resulting in the following ship crashing into the back of her!
The Sloops take some damage while trying to sink another gunboat:
The second gunboat sinks while the leading Sloop takes hits but keeps repairing the damage:
Following this the third Sloop managed to circle around and sink another gunboat leaving just one. The group of two Sloops managed to untangle themselves and it was quickly all over for the remaining gunboat.

An enjoyable game which demonstrated as usual my ineptitude at sailing rule sets! Dave was a little unlucky in that for a few turns my Sloops fired with more dice than they should have before we realised this. I was lucky in that when my ships collided they were well placed to continue firing at the gunboats anyway so it did not matter much in the end.

The big land battle is scheduled for next Monday when the Patriot army will attempt to storm Fort St. Paul, really looking forward to that game.

Monday 15 October 2018

ADLG Carthaginians v Numidians

Another outing for the 25mm Carthaginians with their new generals, this time against Gordon's rebellious Numidian army. I chose a waterway on my left flank and a road, the Numidians added some fields and a gully most of which fell on my right.

The Carthaginians won the initiative and decided to attack. First out for the Numidians was a mixed command of light horse and swordsmen on the Numidian right and an elephant together with a second command of javelin men and light foot in the Numidian centre:
The Carthaginians deployed Hannibal with a substantial force of cavalry and light horse with Spanish Scutarii and an elephant on their left:
In the centre the Carthaginians had some Gaul's and Spanish cavalry commanded by Mago:
The Carthaginian deployment was completed with the Libyans, Balearic slingers and Numidians on the right under Massinissa:
The Numidian left consisted of a similar mixed command of elephants, swordsmen and light horse:

Hannibal and Mago opened the battle by advancing quickly on their Numidian opponents. Massinissa held back holding the right flank with the African Spearmen and the slingers in a field:
The Numidians retired their mixed swordsmen and elephant command on their left covered by some light horse. The centre dithered rather just sending forward some skirmishers while the Numidian left dashed forward towards Massinissa:
The Carthaginian cavalry charged home on the left while the Spanish and elephant continued to advance:
 In the centre Mago pushed on with the Gaul's and Spanish cavalry:
On the right Massinissa also pushed on while the rebel Numidians somewhat surprisingly tried to force the Balearic slingers from the fields with light horse:
Battle was now joined all along the line with the rebel Numidians taking losses:
 The Gaul's are about to charge home:
On the Carthaginian left most of the Numidians have been dispersed:
 In the centre the Gaul's and Spanish cavalry are making good progress:
On the left Massinissa is holding on well and the Numidian light horse who attacked the Balearic slingers in the fields have been destroyed:
Much of the Numidian centre is gone now as well, although the Carthaginians have some casualties the Numidian army is broken by it's losses and flees!

This was a very 'bitty' game in which the elements became scattered all over the battlefield. I think Gordon suffered firstly from a lack of terrain to hide in and secondly as they were defending and were quickly pinned back by the Carthaginians the Numidians had little space to evade or retire into forcing them to stand and fight at a disadvantage in most places.