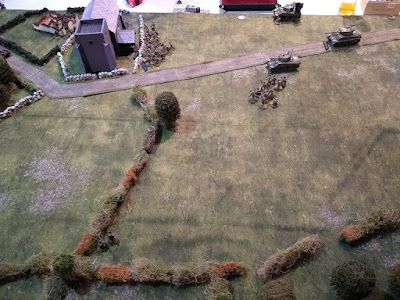
Having given it some thought the patrol phase went much better for the US this time with the Germans restricted to only two jump-off points and the US having one relatively near the church this time, albeit in the open:
The surviving Marder makes an early appearance for the Germans:
The Americans bring on all three Sherman's together with a platoon behind the hedges on over-watch in an attempt to discourage panzerschrek attacks on the tanks. The platoon sends out a scout team but this proves to be a mistake as the Marder fires on them and kills them:
With a double phase the US attempt to rush the church. They go all-in and deploy both remaining squads together with the Lieutenant:
One squad makes it to the church wall with the other close behind. One problem of course is that they have blocked any support fire from the Sherman's if the Germans appear in the church:
US firepower drives the German squad from their entrenchment. The Germans replace the departed squad with their panzerfaust team which inevitably knocks out the Sherman facing it. The Sherman troops commander responds with his top-mounted HMG but fails to do any damage to the pesky panzerfaust:
The Sherman's and infantry continue to move up but it is hard to see how they can easily target the Germans who lurk out of sight without exposing themselves in the open:
Inspiration occurs though and the Lieutenant orders one of the sections lining the churchyard wall to move across to the hedge line. This will allow the Sherman's to blast the church at point blank range with HE fire which will affect the German squad hiding inside:
The American infantry form a firing line on the hedge while the Sherman's blast the church:
The fire on the church pins the squad inside but fails to inflict many casualties. The German Leutnant and squad leader manage to stop the squad breaking by rallying them in between shots but they stay pinned. The final German squad deploys in the small orchard nearby to allow a panzerfaust shot at the nearest Sherman, luckily it misses. The rest of the squad fire on the GI's behind the hedge and inflict some losses and shock but suffer in turn from return fire:
The Sherman's switch their attention to the squad in the orchard and a hailstorm of fire hits the Germans:
:
They break and run though their sacrifice has allowed the German squad in the church to rally. German force morale is down to 4 now:
The German squad in the church leaves while the other German squad opens fire on the thin line of GI's holding the hedge:
The GI's fall back from the hedge out of sight. As it was getting late by now Gary agreed to withdraw at this stage, with German morale so low they could have held out a while but would probably have been driven off eventually by the remaining Americans:
I certainly did better in the patrol phase this time and I think this was a better plan than the first one. Gary didn't expect me to be able to start so close to the church so that went well but, in fact, once I'd got to the wall it wasn't obvious what to do next, assaulting the church seemed suicidal and since the Germans would not come to the windows I couldn't shoot them!
We both wondered what would have happened if I'd assaulted the church when the occupants were pinned.
From memory Gary had 9 men inside with around 13 shock which would have been 8 dice for the men, 2 for the JL (10), 2 for me using 2 dice to move to assault (12), -6 for the shock (6), plus 2 for an SMG (8), plus 4 for an LMG (12), plus 1 per 2 for defending (18) halved for pinned to 9.
For me I had 10 men left in my squad which equates to 9 dice for the men, 2 for the JL (11), a possible 3 more if I had thrown the Lieutenant in as well (14), 2 for an SMG (16) plus possibly 4 more for the two BAR's in the squad (I think they count as assault rifles in combat but couldn't find where it said that) so maybe 20 dice in total or 17 without the Lieutenant.
Not bad odds but by no means a certainty!
The campaign now has two more boards to clear for the Americans to gain a major victory, any defeat for them will be a major victory for the Germans so the campaign is finely balanced. In the last game the Germans will have to use the battered survivors from the first three games so if the Americans can get past the next table a win could be on!


No comments:
Post a Comment